It has a lower margin for stability and adjustments can be very sensitive. I hadnt thought of this until now, but you could link two kit motors together to get a motor twice as long. Each set includes five components; a wing, a propeller assembly with shaft and bearing, a 7 rubber band motor, a parts sheet and a fuselage stick with wire motor hook. It should be slid into the slot. I decided to try bubble soap because it is likely available in many of the places where you would find Guillows toy planes. (Some day you will want to deliberately twist wings. 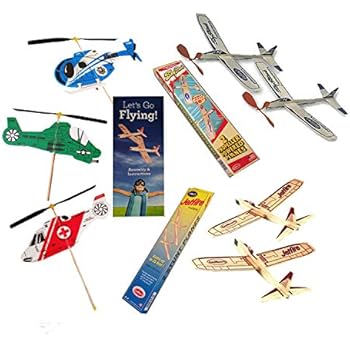 Not only will the cambered airfoil have a higher lift coefficient slope, the trailing edge will slant up, increasing the attack angle of the wing, also increasing the lift. Also mark the exact center of the wing and 3/32 on either side of that, as we did before. Now I will show you how to wet form wing camber using a form. 1) Shaved and balanced prop with pitch increase of 2 degrees (less mass, longer prop rotation/ duration using 1/8 rubber) It does not take much bend in the rudder to make this fast plane turn.
  You can get both from your pharmacy. Here is a video using a 15 loop of 3/32 rubber for the motor.
It is a bit of the logic behind the Squirrel wing. The single most important thing you can do to get longer flights is to use a longer motor. The one on the plane is so close to the stick that the knots rub on the stick. You can increase the dihedralandform the camber at the same time. Place the whole thing on blocks to dry. After that, everything slips together according to the instructions. Align the steel rule along the edge of the rudder and cut with the razor blade. I decided to try forming the curve with my fingers. Flying faster uses more power and that runs the motor down sooner. Let it dry out completely before moving it. After the wing has completely dried, lift the jar of water off the wing. Having a full circle with a slight overlap reduces the chance of the motor coming off the hook. Push the pin all the way through the stick.  First flight spun in to the right. A larger propelleracceleratesa larger volume of air by a lesser amount and is more efficient. This requires a little more care and attention, but can produce equally good results. Set the rudder to just overcome the excess left turn and maintain a left circle. Tape the other end down. After you have seen it fly a few times, you will have a better idea how fast to release it. Make a similar set of marks on the tailplane. Or you can file it down. The center of gravity must be in the correct place on the wing for the plane to balance properly. What this means is that the Sky Streak should not be expected to fly as long as relatively lighter models. For soft wood, holding it under the faucet for a couple minutes will be sufficient. There are several things that may be done. Because it is the thrust of the propeller that is causing this right turn, when the motor winds down, the right turn will disappear and the plane will descend in a left circle, making an overall figure 8. For whatever reason, I can now increase the windings to 500 with the 10 loop and that thing climbs like a rocket even though I know it has more torque with the shorter loop. With 150 turns in the motor, the plane should climb slightly and circle to the left with the wings banked slightly down to the left. Step forward, moving your arms forward for a gentle push, releasing the propeller first and then immediately releasing the airplane. The hobby shop had Strato Streak planes, but since the same instructions will work, I went ahead and bought four, one for a kid in the neighborhood, three for me and two friends to play with at Lagunita. It is helpful to have marks along the slot so you can keep track of where the wing is. Lube is even more important if you want to put in many turns. Motors must be protected from light. I made a 14 loop (HTP = 8) but I couldnt really get more than 400 turns without over-torquing the plane and sending it into a kamikaze dive. Here is what it looks like when we are done. Start by putting about 150 turns into the motor. If you put in too many turns, the motor will break. Notice that the hook on the propeller shaft goes on the same side of the stick as the wire motor hook at the back end of the stick. The wing has a note on it WARP THIS EDGE DOWN IF PLANE DIVES LEFT. We need only two. Wrap your fingers around the top of the wing and press your thumbs into the bottom of the wing, more toward the leading edge, and form a curve in the wing. I have drawn a line along the high points on top of the airfoil and extended the line onto the ends. Here is a video using 300 turns in the blue rubber band. You can also wrap rubber bands around your fingers to get a better grip on the parts. We want the high point 40% back from the leading edge on a 2 wing, so that is 0.8 or approximately 13/16. This weight is the same fraction of the total weight of the sheet as the wing pattern area is to the area of the whole sheet. It can move back and forth in the slot. An important part of getting this plane to fly well is finding the best position for the wing. Science Olympiad National Supervisor, Aeronautics. See them at the Guillows site here: If you buy them from Guillows online, consider getting a bag of extra motors and 6 props as well. I recommend that you mark the wing and tail center before assembly. You can also use scissors on this thin, soft wire. These include: Dip a couple inches of the rubber into the lube. With those modifications and 1,100 to 1,200 turns on the motor (79 to 86% of breaking) I have had many flights of 35 to 37 seconds. Align the inboard end of the form with the marks 5 from the tip and align the high point mark on the form with the high point mark on the wing. Grab the tag ends tightly with a clothespin and pull hard. The circle can be about the same diameter as the hook on the propeller shaft. Later I decided that 3/32 strip is better.). This can cause breakage of the parts. The new hook looks like this. Soak the whole wing in a cookie pan of water. We are advocates of simple model aviation! Coat the wire with glue and set it aside to dry. Now you can add more turns to get longer, higher flights. Shyam I found that bending wings around a 2 diameter jar would break the balsa. One way to measure the wing area is to trace the wing onto a thin sheet material of known, uniform density, cut out the pattern and weigh it. The wing can be pulled through the fuselage slot without damaging the camber. Weigh it down with soup spoons to keep it under water. This can be very annoying when you have a tightly wound, lubed motor in one hand and a prop in the other. Many modelers prefer more stability and would use more. Your email address will not be published. Your email address will not be published. We cant bend balsa sheet in two opposite ways at once, so the center of the wing must remain straight across the middle to maintain the bend upward to the tips. You can sand the sheet parts to thin them. The Causeway, Maldon, Recent kits come with a very heavy hook.
The heavier prop will require the wing to be moved forward. Do the same with the other wing and form. The cambered wing is better for this. This motor can take up to about 1,400 turns. Maybe the simplest way the left turn can be decreased by bending the prop hanger slightly to the right. Unless you have a very big flying field, it is preferable to have the plane circle the same way on the way up and on the way down. It is hard to make precise bends in steel wire while bending over a camera tripod and working at a distance. Put stooge and winder in the search window. Weigh it down with soup spoons to keep it under water. The trailing edge of the fin is soaked in water until the wood is flexible. You can shift it slightly with your fingers. Near the trailing edge, it is almost straight. If the plane does not climb at all, move the wing forward closer to the propeller. But you will need to know what you are doing. They also stretch wind their motors with a winder. Carefully insert the corner of one wing tip into the slot in the side of the fuselage. Fill a jar 5 deep with water. Good flight, but steep descent, so moved the wing all the way forward. It slips together in less than two minutes without glue, pins or sharp tools. Actually, I will be showing you quite a bit that is not included in the above references. Best Regards, You can get steel wire at your hobby or craft shop, or order online. And more dihedral to provide more roll stability. You will notice a change at first, but after a while you will not notice any further change. The stock wing has 6.4 degrees of dihedral angle under each wing. Start by taping a two foot length of 2 Ace bandage to the flat side of the form, leading off the trailing edge. Put one end of the wing into the water. The good news is it will be added to their camp next year. Great educational video of beginner Rubber Powered FF Airplane from beginning assembly to end of flight. You will need two 5 long form boards, two 2 long pieces of 2 Ace bandage, some tape, two 1 1/2 tall blocks and a jar of water about 4 11/16 in diameter.
Be careful, very little camber will do it. Last but not least, you can add landing gear. Put the hinge wires on the right side of the fin to bend right for a right turn. Get the knot as tight as possible. As you put in more turns, the torque of the motor increases. Then the propeller will pull the airplane to the right. It will buckle and break if it is forced straight into the slot. Dave Gee, who is on the AMA Education Committee, has produced a YouTube video showing him assembling a Sky Streak according to the AMA instructions. Soak the whole wing in water until it becomes soft and flexible. The Sky Streak is available from Guillows in three forms of packaging; apoly baggedsingle, a double boxed set or in their Air Plane Design Studio, which contains parts to make four Sky Streaks, including landing gear that is not included in the other two sets. The wrong amount of right rudder can have the same effect as the wrong amount of right thrust; the plane will arc to the right into the ground, or it may zoom straight up into a stall. Or set a little more right rudder to give the size of right circle you want in the glide and adjust the thrustline setting to give the same right circle in the climb. Tape the other end of the Ace bandage in place. Hold the wing against the form as you wind the Ace bandage tightly around the wing and form. I use the same buffer to polish the prop blades after shaving. The AMA breaks the wings and bends the tips up to increase the tip dihedral. Work out any twist now. The center was supported on a 3/4 x 1 1/2 x 3 block of wood to keep the inside ends of the forms off the table top. You have taken so much time and so many pictures illustrating every step. They have produced an instructional sheet for the Sky Streak, showing how they bend the wing tips up to improve lateral stability. These marks show where the edges of the 3/16 wide stick should go when the wing is inserted through the slot in the stick. The name of the airplane, the length and width of the motor and the estimated breaking turns are good information to have on the label. Place the wire in the glue and position it carefully. Leave it until the balsa dries out. Adjust everything to be straight and symmetrical. We want the high point to be at about 40% across the wing from the leading edge. At some point the wind will get under one wing and tip the plane over, spoiling the takeoff. Place a weight on the block to keep it flat. Slip an O-ring over the end and slide it down out of the way. The wing forms were cut to 6 lengths. Later I will show you how to make modifications that will greatly improve flights. On closer inspection I found that the reflexed end of the prop hook was hitting the plastic bearing box.