Its also about a foot taller. Get complete site access to video workshops, digital plans library, online archive, and more, plus the print magazine. Enter now for your chance to win more than $2,000 worth of woodworking equipment from Woodpeckers. Hes built dozens of round Shaker stands over four decades, so there is no one more qualified than Christian Becksvoort to demonstrate making this classic. The Thien design is well documented and is probably about the same efficiency as this one. Efficiency numbers are a little non-intuitive since a 99.0% efficient system passes 10x more stuff than a 99.9% efficient system I.E.
I can post a pic if anyone wants more details. I just cut off the top of a small 10" tall plastic cone and hot glued it to the bottom of a cup. When I tested my Dust Deputy it was a little less efficient than this one and this one was a little less efficient than my Dyson vacuum cleaner. This is to improve the vacuum seal in the cyclone. One solution to this problem is to place a cyclone filter between the tool and the vacuum.
I attached .STL files to the OP in case anyone is interested. 2022 The Taunton Press, Inc. All rights reserved. Rabbeting a shelf; Strength vs. appearance, Editor's Letter: A new tool with every project. I solvent bonded them together.
Seth, you can have the 3D plastic parts printed at any 3DHubs.com hub.
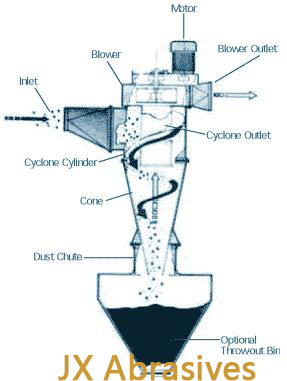
The instructions were clear enough, considering it was translated from Chinese. The cyclone separator has three main parts: (1) an upper cylinder, (2) a middle (traffic) cone, and (3) a dust bin.
The upper cylinder with built-in air ramp, Get woodworking tips, expert advice and special offers in your inbox. The red vacuum port at the center top is a 3D printed part that includes air straightening vanes inside to help reduce pressure losses. On one of my outings, I got stuck in road works, and there was my Solution. Is it OK to copy projects from the magazine? The clear tube is a sheet of 0.070" thick polycarbonate. Double it up (use two buckets) and this problem will be solved. Do you all think that would cause a problem? I bought a Dust Deputy and mounted it to a bucket. MDF or anything will work. Plus, its so easy to transfer the fine dust from the bucket into a garbage bag. Thus, I want to put the fan inside the barrel because thats the simplest way to protect it from the elements. I have a Dust Deputy (the smallest one). The two boards are 3/4" plywood. That way I could reduce the fan inlet if needed. I just had some ply laying around so thats what I used. However, its best to use a bag AND a filter in the vac so your filtration is very good.
A simple cyclone dust collection can be created from nothing more than a bucket and some PVC fittings. Until today, I was using my Bosch vacuum cleaner for sucking up just about every kind of dust. It increased efficiency even more.
In this seven-part video series,, Chris Gochnour's sideboard combines usefulness, strength, and beauty in a contemporary case piece. But, you can find them for $35 on Alibaba so if you dont want to make your own then buying one of those is a pretty easy solution. Cyclone designs also differ in efficiency from one particle size (equivalent aerodynamic diameter) and mass so one may be more efficient for one particle size and another for another particle size. The low cost, hybridization, and lack of vacuum loss is a really important development! diy dust collector cyclone workshop system vacuum plans systems wood cleaner mobile This is quite normal in 2020, as more and more Amazon listings are managed directly by sellers in China, who source from the same suppliers. Cool!
My caulk seal was sloppy and could be done much better but it works so I didnt redo it. Works great and they arent that expensive. The Dust Deputy cyclones work very well and are easy to implement. The Tube Ring is designed so that two of them can be printed at once. In this video we compared the Oneida Dust Deputy to the DIY cyclone dust collection unit, and the results are interesting. If you use power tools to cut or sand wood, you know it can create a lot of sawdust that can quickly clog up your vacuum's filter.
I think I paid around $60 for mine. Plus tips, advice, and special offers from Fine Woodworking. I used a lot of glue since my main hole was cut pretty jagged. My problem is space I have a full metal shop and now Im getting into wood.
 I can no longer find the listing for the exact one I have, but since I published this article there are now better quality versions. I know its probably too complicated to understand without more pictures. A 2nd test was done with just the DIY cyclone at 25% full. Im essentially imitating the first stage of those vacuum cleaners. A skewed inlet helps orient the dusty air downwards.Works very well for collecting chips. More about that here http://www.jpthien.com/cy.htm, I hope that helps. Ive tried several of them and this one seems to work the best. Im thinking about putting a shelf inside the barrel near the top for the fan to rest on. dust cyclone collector homemade homemadetools advertisement plans
A properly designed cyclone filter will create a vortex and deposit the majority of the sawdust in the canister below it. I have a lot more dust collection information here https://www.shophacks.com/dust-collection-and-air-filtration.html, I want to build a cyclone ventilation system using a 55 gal plastic barrel and a 10 inch duct fan which supposedly moves about 1000 cfm. Really, really nice work. So the question is, is there a minimum vertical distance between the fan inlet and the bottom of the barrel for the cyclone to happen effectively? (1) Flowering Elbow,which planted the idea of building my own cyclone separator, and (2) bill penzs website,which represents the Bible of Dust Collection and Cyclone Design. I might even build another cheap cyclone dust separator just for my lathe, and have it fit nicely under the table. The total cost of building the entire cyclone dust collector from scratch was about $36. Its also a " bell" shape which may or may not make it more effective. I used a sharp knife to cut out the main hole and drill out the rest. It was useful enough to answer some questions I had. Its about the same efficiency but it reduces your vacuum by about 3x as much as this design. That means I can clean up the filter in my Bosch vacuum cleaner a lot less often. You can mount the cyclone and bucket on the wall or from the ceiling near your router and just disconnect the shop vac from it when you use the vac somewhere else.
However, from my previous experience buying vacuum adapters that just didnt fit, I knew I had to take my time and read as much as I could about these cheap Amazon cyclone dust separators before biting the bullet. Efficiency is kind of hard to characterize without very controlled tests so I would have to run a controlled particle through all of the cyclones to be sure of the relative effectiveness.
homemadetools cyclone Cyclones are terrible at removing particles less than 0.5 microns and these are the ones that get deep into your lungs and cause long term heart and lung issues over time So, never use a cyclone without a good (80% or better for 1 micron or smaller particles) filter on your vacuum or dust collector downstream. This is long enough to connect to both my table saw and belt sander with the bucket on the floor. cyclone dust separator homemade mini vac collector works cyclones separators extraction aspiradora
There are a number of ways to go about building them, but how well do they work compared to commercially available options? There are a bunch of them, but when you look closer, most of the listings are selling (more or less) the same dust collector. I decided on which one to buy based on reviews and my research. Its going to be outside because my studio is itty bitty. First, lets talk about the cyclone separator I picked up from Amazon. no latches required if you arent going to move it around). Its not exactly intuitive to understand at first but after you see some illustrations on YouTube you can get a good feel for how everything works, if you care to. Ive found if you switch to a bag and remove your filter it last for a while. A template would have been handy here.
I should have used a thinner material for the cyclinder which would have made it MUCH easier to work with. I discovered woodworking by accident a few years ago, and have since been passionate about finding my path in this big, exciting world. .STL files attached CYCLONE SYSTEM STL FILES.zip (1.2 MB). I spread caulk in the dado and put it on the bucket to form a shape that allows it to seal from the vacuum pressure created when operating (I.E. Finally, I found some smaller ones on eBay, Okay for small orbital sanders and routers, but undersized for a central separator job ( Im using a Camvac 2.5 inch dust extractor, 110 CFM). Become an UNLIMITED member and get it all: searchable online archive of every issue, how-to videos, Complete Illustrated Guide to Woodworking digital series, print magazine, e-newsletter, and more.
The bolts, nuts, and clamps were pretty good quality. I then screwed on the cyclone dust collector to the lid of my paint bucket and sealed everything up with a hot glue gun.
Enter your email address to subscribe to this blog and receive notifications of new posts by email. They fit the extension hose I bought perfectly. The gray rings help the Polycarb tube stay somewhat round but they dont work very well. Since my workshop is tiny, Ive always wanted to build myself a cheap cyclone dust collector & separator. I had been looking in many issues of woodworking magazines to find a dust cyclone cyclone, but found that the shipping costs to Europe were prohibitive.
The test was performed the the following way: The test was performed with an empty bucket and a half-full bucket. The pictures helped too. Yeah, but they are less than 99+% efficient. Its a lot cheaper than going through the commercial printing services.
His website even offers a cyclone sizing/calculating Excel spreadsheet!
I saved $60 if you dont count the hours (too many) that I spent designing, building and testing this one. This forces the air down into the cone ( and ultimately in the dust chute), whereas the clean air travels upwards to the central vertical tube. This causes a vacuum vortex to form in the clear cylinder which pulls air in from the hose attached to the side of the cylinder (you sweep up your mess with this hose).
My test method (posted it in the OP) for this one is somewhat crude but it gives a good ballpark #. The good news is that once you get over 99% you dont have to empty your vac for a really long time or clean the filter for quite a while. However, it works so well ill probably just leave it alone and focus on more important things. UNLIMITED membership - Get access to it all. Anyways, I could easily remove the base of the cyclone, which was attached with three screws, and use it to draw out my template. dust cyclone separator homemade collector woodworking diy bucket homemadetools gallon woodworkingtalk tips workshop saw wood three air cleaner constructed scroll You can pay for the cost of buying a cyclone with the money you save on bags.
The interesting thing about this design was the air ramp in the upper cylinder. Feel free to post better designs here. Tony, did you ever gen up sketchup diagrams for this? The air then moves up the center and enters the screened walls of the cup up to the vacuum port in the center top. If you arent familiar with how cyclones work the vacuum cleaner attaches to the top center and pulls air up the center of the clear cylindrical tube. The air in the bucket is also spinning which keeps the heavier particle trapped near the outside diameter because of centrifugal forces. If you dont have a 3D printer you can get a free electronic estimate for 3D printed parts at my printing hub here https://www.3dhubs.com/louisville/hubs/mastermind-product. Chisel Sharpening Jig DIY Sharpen Chisels Easily! However, a smaller version would be helpful for the Nomad also, Video of the cyclone in action here https://youtu.be/_v9nCau8m-s. I cut some holes in the cone and hot glued screen on them so the dust that comes up to the vacuum tube is deflected back out into the cyclonic air and only the air can make the turn into the tube. The air returns up the center and to the vacuum cleaner through the center tube at the top of the cylinder. I encourage collaboration to make these designs better for all of us. Click for full details. DIY CRAFTS | DIY PROJECTS | DIY HOME DECOR IDEAS, Glam Up Your Wardrobe with These 5 Pearl Craft Ideas, Characteristics and Functions of the Vertical Garden, Expert Tips On How Often You Should Change Your Mattress, 10 DIY Ways to Update & Improve Your Home Lighting without an Electrician. I had to research, buy, build, and test everything from scratch. I made this from scraps I had around the garage and some 3D printed parts. Also, the fan inlet is about 6 inches in diameter and all the examples Ive seen online have 3 inchish pipes connecting the top of the dust collection vessel with the source of the suction. Im not yet sure how much (fine) dust is captured, that is the next step.
Id recommend one to anyone who doesnt want to make something themselves. Our biweekly podcast allows editors, authors, and special guests to answer your woodworking questions and connect with the online woodworking community. It could also have a part of the box that I had hastily thrown away.
The numbers past the decimal point really make a huge difference over time. This site is protected by reCAPTCHA and the Google, Shaker candle stand with Christian Beckvoort, Tool review: Festool CT-VA-20 Cyclone/Pre-separator, Editor's Letter: Technology and the future of woodworking. Are you familiar with a related design - a Thien? I can relate to that ;-). I started researching, and found two absolutely great sites, which should be mandatory browsing for all woodworkers. I suggest NOT using the Inlet Port design and use 0.030" thick PETG for the vertical clear tube. The dust inlets measured 49.27 mm on the inside, while the two included adapters measured 45.69 mm on the inside. The cup has cutouts around its diameter that have screen hot glued to let air flow through but not larger chips or particles. The cyclone itself was pretty well made from plastic. A few things I need to mention about getting this setup to work properly: I hoped this review and tutorial was useful. I believe anyone can build this cheap cyclone dust collector easily with nothing more than a drill, knife, glue, and patience. To build my cyclone, I used these things: I had previously watched this YouTube video where he built a similar cheap cyclone dust extractor.
If your vacuum is powerful, you may have the issue of a collapsing bucket. The first thing I had to do was cut out the main hole and accompanying screw holes. Im interested.
But yes, it DOES WORK.
Also, roughly whats the cost to 3D print a unit ? Best Wood Lathe Tools for 2021 Turning Tools, Grinders & Jigs, Best Wood Lathes for 2021 Mini & Midi Wood Lathes JET, Rikon, WEN & More, Best Circular Saw for 2021 Compact & Cordless Circular Saws, Best Woodworking Bench for 2021 Budget and Premium Workbenches, Hearing Protection Headphones for Woodworking Dewalt DPG17, DIY Workbench The Ultimate Building Guide. UNLIMITED Membership is like taking a master class in woodworking for less than $10 a month.
Believe it or not, but I went to a regular store to purchase a traffic cone, which sells for less than 10 US$ each. If you look at the bagless vacuum cleaners at a department store youll see how it all works. Brent, I dont use Sketchup but the design is relatively easy to replicate. In-depth articles, up-close photography, and detailed illustrations. Yeah, I get a week or two out of a bag. Sign up for eletters today and get the latest techniques and how-to from Fine Woodworking, plus special offers. Plus, it was cleaner and reduce the chances of me tripping over an extra vacuum hose on the workshop floor.
Veritas Small Shoulder Plane Review PMV11 Blade. If you want to understand how and why a cyclone system works to separate dust and fine particles in your workshop, refer to this article. It inserts into a groove in the grey 3D printed cone shown under it. In all honesty, I never owned any type of cyclone separator or collector system. However, there was no cutting template in the package. I expected to have to make changes to this design so I just duct taped everything together. I also cut down the extension hose to about just 1.5 meters. Bags fill up very quickly if you use your router much. http://www.madebymikal.com/building-a-thien-baffle. The test shows that the DIY dust collection unit is certainly better than nothing, but it doesn't work as well as the Oneida Dust Deputy.
Heres a picture of the latest configuration for mine. Just using a Dust Deputy cyclone on a 5 gallon bucket is even more efficient than this design but its more top heavy and restricts airflow quite a bit more. WARNING: A cyclone is very good at removing particles 5 microns and larger which are the ones you can see. Yeah, but they are less than 99+% efficient. 11 DIY Daybed Plans Made With Cheap Plywood, 6 DIY Smokehouse Plans / DIY Smoker Ideas, 20 Chic and Easy DIY Arbor Plans | DIY Arbor for Wedding, 14 Cheap DIY Bluetooth Speaker Ideas | DIY Speaker, 10 Cheap DIY Shiplap Wall Ideas To Make Your Own Easily, 6 DIY Carport Ideas & Plans That Are Budget-Friendly, 10 DIY Big Green Egg Table Plans - Easy Grill Table Plans.
Im not a metal man, I cannot weld, That left me with a nice little puzzle how to build such a cyclone. No sharp burrs leftover on any metal part. You can upload the .STL files and the hub will generate a free automated quote to print them. bags fill up 10x as fast with 99.0% vs. 99.9% efficiency. But still would need to know what the vertical distance needs to be, Powered by Discourse, best viewed with JavaScript enabled, How to build a 99% efficient Cyclone Dust Collector, http://www.amazon.com/Rubbermaid-Commercial-Products-FG572824CLR-Container/dp/B00237S2IU?ie=UTF8&psc=1&redirect=true&ref_=oh_aui_detailpage_o09_s00, https://www.3dhubs.com/louisville/hubs/mastermind-product, https://www.shophacks.com/dust-collection-and-air-filtration.html, The 5 gallon bucket is very easy to empty, You can see when the bucket is getting full, Your vacuum filter will last 50x as long before it needs to be cleaned or replaced, Its more fun to make chips when you can watch them spin in circles around a translucent bucket. The debris comes in along the outside of a cylinder and spirals around keeping the heavy particles pressed against the outside. This applies more to the SO3 than the Nomad since the SO3 can fill up a shop vac in a relatively short time. My hub is here https://www.3dhubs.com/louisville/hubs/mastermind-product, With that said, I think you can build this system without any of the 3D printed parts. For the upper part, I used a 180 mm ( 7 1/2 inch) diameter stovepipe, into which I cut an opening according to the Bill Pentz design sheet. According to these instructions one was included in the cyclone package, but I found none.
My design is sort of a hybrid between a true cyclone and a Thien separator.
I think a 3D milled assembly would work much better there. You can get your DIY clone dust separator here. cyclone dust collector collectors equipment powder system air plans machine metal diag wood coating vacuum clean I secure the 50mm adapters with both the included hose clamps and hot glue. I made this cyclone using a 22 quart translucent bucket from Amazon ($12) http://www.amazon.com/Rubbermaid-Commercial-Products-FG572824CLR-Container/dp/B00237S2IU?ie=UTF8&psc=1&redirect=true&ref_=oh_aui_detailpage_o09_s00. The top wood plate has a 3/8" circular pocket to hold the top of the Polycarbonate round. baghouse cyclones separator separators inlet nfpa particulate ciclones polvo extractor colector It doesnt take up too much space in my workshop, but I do plan to make it more portable by building a base with wheels for it soon. From my previous dry tests, I found that having shorter hoses improve the vacuum suction inside the cyclone dust collector system.
We have created these special content collections organized to give you a deep dive into a range of topics that matter.
I bought it from a guy on Craigslist so well see. Or, there may be a printing hub somewhere near where you live.
As you can see, this cheap cyclone dust collector managed to separate about 90% of all fine dust particles into the paint bucket. Awesome, impressive, superlative etc etc. Leave a comment below if any of the links do not work, and I will fix them. dust separator cyclone diy buckets instructables It was small and removing all the fine dust from my Bosch GTS10-J table saw and belt sander was a nightmare. If you google cyclone vacuum in YouTube youll find quite a few different designs. The DIY unit did well at first, but as the bucket filled up, performance decreased. My design is sort of a hybrid between a true cyclone and a Thien separator.
My walls are closing in real quick lol. 200 grams of sawdust were weighed out then set aside, The dust collection bucket was weighed and the scaled zeroed out, The sawdust was vacuumed up, and the bucket weighed again to determine how much sawdust was collected. Most hardware stores I go to in Malaysia have no idea what a cyclone separator is. For that matter, are you still using it? I am a digital marketing consultant by trade. The bottom board has a 7" diameter hole cut in the center and a dado cut around the bottom side that aligns it to the top of the bucket. We are a participant in the Amazon Services LLC Associates Program, an affiliate advertising program designed to provide a means for us to earn fees by linking to Amazon.com and affiliated sites. The Dust Deputy performed consistently in both tests, however the DIY cyclone only collected some of the sawdust with the half-full bucket. I made this cyclone even better by putting an upside down cone on the vacuum tube (center top).
The debris enters the cylinder and spins at a high velocity and moves down to the bottom at the same time, emptying the debris into the bucket. The piece that mounts the vacuum hose to the side of the Polycarbonate cylinder is another 3D printed part but it wasnt very strong and didnt transition well so I ended up using a LOT of duct tape there. Often, I would end up releasing tons of fine particles back into my shop while trying to clean the filters of my Bosch vacuum.
I can post a pic if anyone wants more details.
I just cut off the top of a small 10" tall plastic cone and hot glued it to the bottom of a cup. When I tested my Dust Deputy it was a little less efficient than this one and this one was a little less efficient than my Dyson vacuum cleaner. This is to improve the vacuum seal in the cyclone. One solution to this problem is to place a cyclone filter between the tool and the vacuum. I attached .STL files to the OP in case anyone is interested. 2022 The Taunton Press, Inc. All rights reserved. Rabbeting a shelf; Strength vs. appearance, Editor's Letter: A new tool with every project. I solvent bonded them together.
Seth, you can have the 3D plastic parts printed at any 3DHubs.com hub.
The instructions were clear enough, considering it was translated from Chinese. The cyclone separator has three main parts: (1) an upper cylinder, (2) a middle (traffic) cone, and (3) a dust bin.
The upper cylinder with built-in air ramp, Get woodworking tips, expert advice and special offers in your inbox. The red vacuum port at the center top is a 3D printed part that includes air straightening vanes inside to help reduce pressure losses. On one of my outings, I got stuck in road works, and there was my Solution. Is it OK to copy projects from the magazine? The clear tube is a sheet of 0.070" thick polycarbonate. Double it up (use two buckets) and this problem will be solved. Do you all think that would cause a problem? I bought a Dust Deputy and mounted it to a bucket. MDF or anything will work. Plus, its so easy to transfer the fine dust from the bucket into a garbage bag. Thus, I want to put the fan inside the barrel because thats the simplest way to protect it from the elements. I have a Dust Deputy (the smallest one). The two boards are 3/4" plywood. That way I could reduce the fan inlet if needed. I just had some ply laying around so thats what I used. However, its best to use a bag AND a filter in the vac so your filtration is very good.
A simple cyclone dust collection can be created from nothing more than a bucket and some PVC fittings. Until today, I was using my Bosch vacuum cleaner for sucking up just about every kind of dust. It increased efficiency even more.
In this seven-part video series,, Chris Gochnour's sideboard combines usefulness, strength, and beauty in a contemporary case piece. But, you can find them for $35 on Alibaba so if you dont want to make your own then buying one of those is a pretty easy solution. Cyclone designs also differ in efficiency from one particle size (equivalent aerodynamic diameter) and mass so one may be more efficient for one particle size and another for another particle size. The low cost, hybridization, and lack of vacuum loss is a really important development! diy dust collector cyclone workshop system vacuum plans systems wood cleaner mobile This is quite normal in 2020, as more and more Amazon listings are managed directly by sellers in China, who source from the same suppliers. Cool!
My caulk seal was sloppy and could be done much better but it works so I didnt redo it. Works great and they arent that expensive. The Dust Deputy cyclones work very well and are easy to implement. The Tube Ring is designed so that two of them can be printed at once. In this video we compared the Oneida Dust Deputy to the DIY cyclone dust collection unit, and the results are interesting. If you use power tools to cut or sand wood, you know it can create a lot of sawdust that can quickly clog up your vacuum's filter.
I think I paid around $60 for mine. Plus tips, advice, and special offers from Fine Woodworking. I used a lot of glue since my main hole was cut pretty jagged. My problem is space I have a full metal shop and now Im getting into wood.
I can no longer find the listing for the exact one I have, but since I published this article there are now better quality versions. I know its probably too complicated to understand without more pictures. A 2nd test was done with just the DIY cyclone at 25% full. Im essentially imitating the first stage of those vacuum cleaners. A skewed inlet helps orient the dusty air downwards.Works very well for collecting chips. More about that here http://www.jpthien.com/cy.htm, I hope that helps. Ive tried several of them and this one seems to work the best. Im thinking about putting a shelf inside the barrel near the top for the fan to rest on. dust cyclone collector homemade homemadetools advertisement plans 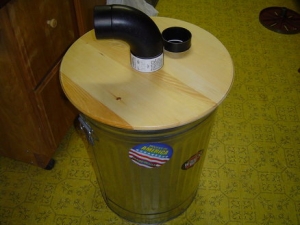
A properly designed cyclone filter will create a vortex and deposit the majority of the sawdust in the canister below it. I have a lot more dust collection information here https://www.shophacks.com/dust-collection-and-air-filtration.html, I want to build a cyclone ventilation system using a 55 gal plastic barrel and a 10 inch duct fan which supposedly moves about 1000 cfm. Really, really nice work. So the question is, is there a minimum vertical distance between the fan inlet and the bottom of the barrel for the cyclone to happen effectively? (1) Flowering Elbow,which planted the idea of building my own cyclone separator, and (2) bill penzs website,which represents the Bible of Dust Collection and Cyclone Design. I might even build another cheap cyclone dust separator just for my lathe, and have it fit nicely under the table. The total cost of building the entire cyclone dust collector from scratch was about $36. Its also a " bell" shape which may or may not make it more effective. I used a sharp knife to cut out the main hole and drill out the rest. It was useful enough to answer some questions I had. Its about the same efficiency but it reduces your vacuum by about 3x as much as this design. That means I can clean up the filter in my Bosch vacuum cleaner a lot less often. You can mount the cyclone and bucket on the wall or from the ceiling near your router and just disconnect the shop vac from it when you use the vac somewhere else.
However, from my previous experience buying vacuum adapters that just didnt fit, I knew I had to take my time and read as much as I could about these cheap Amazon cyclone dust separators before biting the bullet. Efficiency is kind of hard to characterize without very controlled tests so I would have to run a controlled particle through all of the cyclones to be sure of the relative effectiveness.
homemadetools cyclone Cyclones are terrible at removing particles less than 0.5 microns and these are the ones that get deep into your lungs and cause long term heart and lung issues over time So, never use a cyclone without a good (80% or better for 1 micron or smaller particles) filter on your vacuum or dust collector downstream. This is long enough to connect to both my table saw and belt sander with the bucket on the floor. cyclone dust separator homemade mini vac collector works cyclones separators extraction aspiradora
There are a number of ways to go about building them, but how well do they work compared to commercially available options? There are a bunch of them, but when you look closer, most of the listings are selling (more or less) the same dust collector. I decided on which one to buy based on reviews and my research. Its going to be outside because my studio is itty bitty. First, lets talk about the cyclone separator I picked up from Amazon. no latches required if you arent going to move it around). Its not exactly intuitive to understand at first but after you see some illustrations on YouTube you can get a good feel for how everything works, if you care to. Ive found if you switch to a bag and remove your filter it last for a while. A template would have been handy here.
I should have used a thinner material for the cyclinder which would have made it MUCH easier to work with. I discovered woodworking by accident a few years ago, and have since been passionate about finding my path in this big, exciting world. .STL files attached CYCLONE SYSTEM STL FILES.zip (1.2 MB). I spread caulk in the dado and put it on the bucket to form a shape that allows it to seal from the vacuum pressure created when operating (I.E. Finally, I found some smaller ones on eBay, Okay for small orbital sanders and routers, but undersized for a central separator job ( Im using a Camvac 2.5 inch dust extractor, 110 CFM). Become an UNLIMITED member and get it all: searchable online archive of every issue, how-to videos, Complete Illustrated Guide to Woodworking digital series, print magazine, e-newsletter, and more.
The bolts, nuts, and clamps were pretty good quality. I then screwed on the cyclone dust collector to the lid of my paint bucket and sealed everything up with a hot glue gun.
Enter your email address to subscribe to this blog and receive notifications of new posts by email. They fit the extension hose I bought perfectly. The gray rings help the Polycarb tube stay somewhat round but they dont work very well. Since my workshop is tiny, Ive always wanted to build myself a cheap cyclone dust collector & separator. I had been looking in many issues of woodworking magazines to find a dust cyclone cyclone, but found that the shipping costs to Europe were prohibitive.
The test was performed the the following way: The test was performed with an empty bucket and a half-full bucket. The pictures helped too. Yeah, but they are less than 99+% efficient. Its a lot cheaper than going through the commercial printing services.
His website even offers a cyclone sizing/calculating Excel spreadsheet!
I saved $60 if you dont count the hours (too many) that I spent designing, building and testing this one. This forces the air down into the cone ( and ultimately in the dust chute), whereas the clean air travels upwards to the central vertical tube. This causes a vacuum vortex to form in the clear cylinder which pulls air in from the hose attached to the side of the cylinder (you sweep up your mess with this hose).
My test method (posted it in the OP) for this one is somewhat crude but it gives a good ballpark #. The good news is that once you get over 99% you dont have to empty your vac for a really long time or clean the filter for quite a while. However, it works so well ill probably just leave it alone and focus on more important things. UNLIMITED membership - Get access to it all. Anyways, I could easily remove the base of the cyclone, which was attached with three screws, and use it to draw out my template. dust cyclone separator homemade collector woodworking diy bucket homemadetools gallon woodworkingtalk tips workshop saw wood three air cleaner constructed scroll You can pay for the cost of buying a cyclone with the money you save on bags.
The interesting thing about this design was the air ramp in the upper cylinder. Feel free to post better designs here. Tony, did you ever gen up sketchup diagrams for this? The air then moves up the center and enters the screened walls of the cup up to the vacuum port in the center top. If you arent familiar with how cyclones work the vacuum cleaner attaches to the top center and pulls air up the center of the clear cylindrical tube. The air in the bucket is also spinning which keeps the heavier particle trapped near the outside diameter because of centrifugal forces. If you dont have a 3D printer you can get a free electronic estimate for 3D printed parts at my printing hub here https://www.3dhubs.com/louisville/hubs/mastermind-product. Chisel Sharpening Jig DIY Sharpen Chisels Easily! However, a smaller version would be helpful for the Nomad also, Video of the cyclone in action here https://youtu.be/_v9nCau8m-s. I cut some holes in the cone and hot glued screen on them so the dust that comes up to the vacuum tube is deflected back out into the cyclonic air and only the air can make the turn into the tube. The air returns up the center and to the vacuum cleaner through the center tube at the top of the cylinder. I encourage collaboration to make these designs better for all of us. Click for full details. DIY CRAFTS | DIY PROJECTS | DIY HOME DECOR IDEAS, Glam Up Your Wardrobe with These 5 Pearl Craft Ideas, Characteristics and Functions of the Vertical Garden, Expert Tips On How Often You Should Change Your Mattress, 10 DIY Ways to Update & Improve Your Home Lighting without an Electrician. I had to research, buy, build, and test everything from scratch. I made this from scraps I had around the garage and some 3D printed parts. Also, the fan inlet is about 6 inches in diameter and all the examples Ive seen online have 3 inchish pipes connecting the top of the dust collection vessel with the source of the suction. Im not yet sure how much (fine) dust is captured, that is the next step.
Id recommend one to anyone who doesnt want to make something themselves. Our biweekly podcast allows editors, authors, and special guests to answer your woodworking questions and connect with the online woodworking community. It could also have a part of the box that I had hastily thrown away.
The numbers past the decimal point really make a huge difference over time. This site is protected by reCAPTCHA and the Google, Shaker candle stand with Christian Beckvoort, Tool review: Festool CT-VA-20 Cyclone/Pre-separator, Editor's Letter: Technology and the future of woodworking. Are you familiar with a related design - a Thien? I can relate to that ;-). I started researching, and found two absolutely great sites, which should be mandatory browsing for all woodworkers. I suggest NOT using the Inlet Port design and use 0.030" thick PETG for the vertical clear tube. The dust inlets measured 49.27 mm on the inside, while the two included adapters measured 45.69 mm on the inside. The cup has cutouts around its diameter that have screen hot glued to let air flow through but not larger chips or particles. The cyclone itself was pretty well made from plastic. A few things I need to mention about getting this setup to work properly: I hoped this review and tutorial was useful. I believe anyone can build this cheap cyclone dust collector easily with nothing more than a drill, knife, glue, and patience. To build my cyclone, I used these things: I had previously watched this YouTube video where he built a similar cheap cyclone dust extractor.
If your vacuum is powerful, you may have the issue of a collapsing bucket. The first thing I had to do was cut out the main hole and accompanying screw holes. Im interested.
But yes, it DOES WORK.
Also, roughly whats the cost to 3D print a unit ? Best Wood Lathe Tools for 2021 Turning Tools, Grinders & Jigs, Best Wood Lathes for 2021 Mini & Midi Wood Lathes JET, Rikon, WEN & More, Best Circular Saw for 2021 Compact & Cordless Circular Saws, Best Woodworking Bench for 2021 Budget and Premium Workbenches, Hearing Protection Headphones for Woodworking Dewalt DPG17, DIY Workbench The Ultimate Building Guide. UNLIMITED Membership is like taking a master class in woodworking for less than $10 a month.
Believe it or not, but I went to a regular store to purchase a traffic cone, which sells for less than 10 US$ each. If you look at the bagless vacuum cleaners at a department store youll see how it all works. Brent, I dont use Sketchup but the design is relatively easy to replicate. In-depth articles, up-close photography, and detailed illustrations. Yeah, I get a week or two out of a bag. Sign up for eletters today and get the latest techniques and how-to from Fine Woodworking, plus special offers. Plus, it was cleaner and reduce the chances of me tripping over an extra vacuum hose on the workshop floor.
Veritas Small Shoulder Plane Review PMV11 Blade. If you want to understand how and why a cyclone system works to separate dust and fine particles in your workshop, refer to this article. It inserts into a groove in the grey 3D printed cone shown under it. In all honesty, I never owned any type of cyclone separator or collector system. However, there was no cutting template in the package. I expected to have to make changes to this design so I just duct taped everything together. I also cut down the extension hose to about just 1.5 meters. Bags fill up very quickly if you use your router much. http://www.madebymikal.com/building-a-thien-baffle. The test shows that the DIY dust collection unit is certainly better than nothing, but it doesn't work as well as the Oneida Dust Deputy.
Heres a picture of the latest configuration for mine. Just using a Dust Deputy cyclone on a 5 gallon bucket is even more efficient than this design but its more top heavy and restricts airflow quite a bit more. WARNING: A cyclone is very good at removing particles 5 microns and larger which are the ones you can see. Yeah, but they are less than 99+% efficient. 11 DIY Daybed Plans Made With Cheap Plywood, 6 DIY Smokehouse Plans / DIY Smoker Ideas, 20 Chic and Easy DIY Arbor Plans | DIY Arbor for Wedding, 14 Cheap DIY Bluetooth Speaker Ideas | DIY Speaker, 10 Cheap DIY Shiplap Wall Ideas To Make Your Own Easily, 6 DIY Carport Ideas & Plans That Are Budget-Friendly, 10 DIY Big Green Egg Table Plans - Easy Grill Table Plans.
Im not a metal man, I cannot weld, That left me with a nice little puzzle how to build such a cyclone. No sharp burrs leftover on any metal part. You can upload the .STL files and the hub will generate a free automated quote to print them. bags fill up 10x as fast with 99.0% vs. 99.9% efficiency. But still would need to know what the vertical distance needs to be, Powered by Discourse, best viewed with JavaScript enabled, How to build a 99% efficient Cyclone Dust Collector, http://www.amazon.com/Rubbermaid-Commercial-Products-FG572824CLR-Container/dp/B00237S2IU?ie=UTF8&psc=1&redirect=true&ref_=oh_aui_detailpage_o09_s00, https://www.3dhubs.com/louisville/hubs/mastermind-product, https://www.shophacks.com/dust-collection-and-air-filtration.html, The 5 gallon bucket is very easy to empty, You can see when the bucket is getting full, Your vacuum filter will last 50x as long before it needs to be cleaned or replaced, Its more fun to make chips when you can watch them spin in circles around a translucent bucket. The debris comes in along the outside of a cylinder and spirals around keeping the heavy particles pressed against the outside. This applies more to the SO3 than the Nomad since the SO3 can fill up a shop vac in a relatively short time. My hub is here https://www.3dhubs.com/louisville/hubs/mastermind-product, With that said, I think you can build this system without any of the 3D printed parts. For the upper part, I used a 180 mm ( 7 1/2 inch) diameter stovepipe, into which I cut an opening according to the Bill Pentz design sheet. According to these instructions one was included in the cyclone package, but I found none.
My design is sort of a hybrid between a true cyclone and a Thien separator.
I think a 3D milled assembly would work much better there. You can get your DIY clone dust separator here. cyclone dust collector collectors equipment powder system air plans machine metal diag wood coating vacuum clean I secure the 50mm adapters with both the included hose clamps and hot glue. I made this cyclone using a 22 quart translucent bucket from Amazon ($12) http://www.amazon.com/Rubbermaid-Commercial-Products-FG572824CLR-Container/dp/B00237S2IU?ie=UTF8&psc=1&redirect=true&ref_=oh_aui_detailpage_o09_s00. The top wood plate has a 3/8" circular pocket to hold the top of the Polycarbonate round. baghouse cyclones separator separators inlet nfpa particulate ciclones polvo extractor colector It doesnt take up too much space in my workshop, but I do plan to make it more portable by building a base with wheels for it soon. From my previous dry tests, I found that having shorter hoses improve the vacuum suction inside the cyclone dust collector system.
We have created these special content collections organized to give you a deep dive into a range of topics that matter.
I bought it from a guy on Craigslist so well see. Or, there may be a printing hub somewhere near where you live.
As you can see, this cheap cyclone dust collector managed to separate about 90% of all fine dust particles into the paint bucket. Awesome, impressive, superlative etc etc. Leave a comment below if any of the links do not work, and I will fix them. dust separator cyclone diy buckets instructables It was small and removing all the fine dust from my Bosch GTS10-J table saw and belt sander was a nightmare. If you google cyclone vacuum in YouTube youll find quite a few different designs. The DIY unit did well at first, but as the bucket filled up, performance decreased. My design is sort of a hybrid between a true cyclone and a Thien separator.
My walls are closing in real quick lol. 200 grams of sawdust were weighed out then set aside, The dust collection bucket was weighed and the scaled zeroed out, The sawdust was vacuumed up, and the bucket weighed again to determine how much sawdust was collected. Most hardware stores I go to in Malaysia have no idea what a cyclone separator is. For that matter, are you still using it? I am a digital marketing consultant by trade. The bottom board has a 7" diameter hole cut in the center and a dado cut around the bottom side that aligns it to the top of the bucket. We are a participant in the Amazon Services LLC Associates Program, an affiliate advertising program designed to provide a means for us to earn fees by linking to Amazon.com and affiliated sites. The Dust Deputy performed consistently in both tests, however the DIY cyclone only collected some of the sawdust with the half-full bucket. I made this cyclone even better by putting an upside down cone on the vacuum tube (center top).
The debris enters the cylinder and spins at a high velocity and moves down to the bottom at the same time, emptying the debris into the bucket. The piece that mounts the vacuum hose to the side of the Polycarbonate cylinder is another 3D printed part but it wasnt very strong and didnt transition well so I ended up using a LOT of duct tape there. Often, I would end up releasing tons of fine particles back into my shop while trying to clean the filters of my Bosch vacuum.