It is important to strip the damaged material until it reaches sound wood. Thanks for reading, Morris. 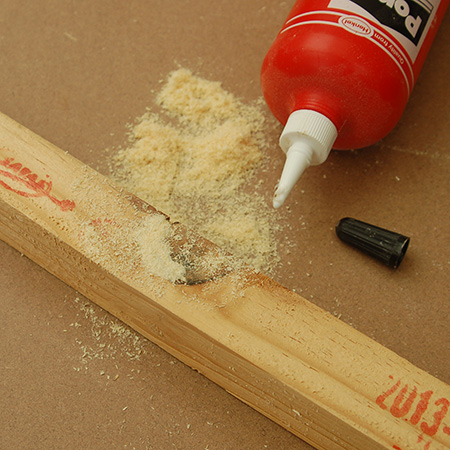 Fill the holes and cracks, overflow a little. Use a repair knife or a sliver of wood to mash your homemade filler into your hole, and then just let it dry. Good luck! The reason I shared six of them with you is because everyone is a little different, and some people prefer doing things in different ways. Answer simple questions about your project to get product recommendations. Did you make this project? If for any reason you are not satisfied with the merchandise you ordered, just return it within 90 days to receive a refund in the manner of original payment for merchandise only. Step 1: Get some Wood Filler. Pick a method, and drill a couple holes on a scrap board to try it out. When in doubt, use the simplest method that gets the job done. Cut off the tip of the applicator, and push some of the putty into the hole. Knowing how to fill those holes and repair the damage can make it very easy to get those hinges or hardware pieces back in place. Step 2: Using a putty knife, smooth it over, but not completely flush to the surface of the door.
  Cheers Woodworking projects, plans and DIY tutorials to built almost ANY woodworking project. on Introduction.
You should also really use gloves to protect your hands, and so you don't get splinters. Step 4: Knead the paste:it must be kneaded carefully before any use in order to have the most homogeneous wood paste possible. Start Woodworking Now is a participant in the Amazon Services LLC Associates Program, an affiliate advertising program designed to provide a means for sites to earn advertising fees by advertising and linking to Amazon.com. Otherwise, any film forming finish will do just fine over sanded epoxy. In this article we present you 5 methods of filling a hole in wood. Mix it according to the instructions and then fill your hole. Here's the easiest way to fix it! Look at the dowel rods that you already have. Its excellent quality means that it does not crack as a result of post-repair treatments. I have about 600 metres of reclaimed Baltic Pine that I got from disassembling long (6m) shipping crates. In the same way as for wood filler, choose the shade closest to the wood to be filled. The next best option is any dry pigment powder, wood swarf, metal flake or pearl powder. You may also return purchases to a Rockler store near you for store credit. See Also:How to be a Modern Renaissance Woodworker. For superior durability and long-lasting beauty, the choice is clear protective clear finishes from Minwax! Have a hole in a piece of wood or in a door that needs filling? JavaScript seems to be disabled in your browser. Next, we mix these sawdust with glue to the consistency of thick sour cream and use a spatula to cover the hole. For international returns, please click here. Then it's simply a case of waiting for it to dry before sanding and then you can paint. Another tried-and-true method that has been used by thousands and thousands of woodworkers over the years is mixing sawdust and wood glue to create your own impromptu filler. Make it protrude slightly from the hole, then spread it with a spatula so that it does not make a dent. Besides wood putty, there are several glue-based fill options. Finishes that offer protection for wood with a soft luster. While the trim carpenters were installing the cabinets, Leigh Ann (below, kneeling) went back out to the stone yard to check on the granite we ordered for the countertops. In addition to being used in restoration, the. Available sizes: 1", 2", 2". After this, you will be a pro at filling holes in wood. For larger holes and cracks, it is better to use a special wood sealant. This stuff tends to stick to things that regular wood glue will not, and though it might be a little bit more involved to work with, it will give you a good feeling when you finish the job. After the epoxy resin hardens, it will gain strength that will exceed the strength of wood, and due to its fluidity and excellent adhesion, it will get into all cavities, and so it will be able to restore the integrity of the structure of the wood product, and will also prevent further holes. Thank you for your Instructable. Items shipped directly from the manufacturer cannot be returned in store. The Resource for New Woodworkers With 1004 Posts and Counting! The wooden hole must be clean, dry and free from materials that could affect adhesion. Next, put together the required number of toothpicks so that they enter the hole as tightly as possible, then dip them in PVA glue and insert them into the hole. My recommendation is to use a two-part reactive wood filler product rather than using the putty that comes in a tub or a tube. 19 Things I Wish I Knew When I Started Woodworking, How to be a Modern Renaissance Woodworker, 19 Incredible Tips on Working With Wood Glue, How to Choose the Best Epoxy Resin for Wood, 20 Easy DIY Woodworking Projects With Tutorials, How to Make the Best Kitchen Helper Learning Tower, More than 20 Years Woodworking Experience, Over 1 Million Words Published About Woodworking, Bachelor of Arts Degree from Arizona State University. Please tell me what we need to do to eliminate the faint thumb print look around the many holes before applying the poly coat. Minwax Stainable (new word, that..) filler goes darker than the wood with the stain, and I cant get a filler that matches the polyshades. If you dont want to go through all of the fuss of creating your own fillers and coloring outside the lines a little bit, then just use regular old wood filler putty. Im not saying its crazy; just missing some parts. With powders, pastes and concentrates, first mix the two parts of the epoxy together thoroughly, then stir in the colorant. Trust me: once you start using those Stain Markers, youll keep finding ways to use them! Leave the filler to sit until it is dry, referring to the instructions on the filler container if you are unsure of how long to wait. Both West System and System Three offer an ideal option: epoxy tinting pastes in several colors. Ideally, such small chips can be sharpened with a file or coarse sandpaper. This is 6 Easy Ways to fill Holes in Wood, your guide to filling in any holes or mistakes you find on your woodworking projects. Wood cracks filled with epoxy can allow you to create an even finish that wouldn't otherwise be possible. Add them to the resin part, usually part A, before mixing in the hardener. Consider your finish, because a lot of these methods are visible in the end. To keep the filler from cracking in middle and sinking in, don't try to fill large space at one application. If not, apply enough so there are no voids. Often this is really the only opportunity to bring life back to workpieces, which, as it may seem, are hopelessly spoiled by through cracks. It works for larger voids and also matches the wood color. Its a common process in woodworking to have to fill holes in your project. Quick Tip: Neatness counts! It is important that the surface to be repaired is. Apply wood filler directly to the hole. Stayed tuned for a complete step-by-step once its complete! Step 6: Eliminate the excess:When the paste has hardened completely, all that remains is to remove the excess using a fine abrasive, sandpaper,steel wool n 000or# 0 steel wool. Share it with us! Remember our kitchen project I mentioned recently? I have made an easy step by step tutorial how you can create your own wood filler at home using sawdust ! Also, drive nails into the putty, which will ensure its fixation. Vacuum then wipe with a rag. After the epoxy is completely cured, it becomes a safe and inert plastic with a high degree of strength. Many here would enjoy those steps added to this posting. As my wife will attest, I love projects, but just as important I love sharing my experiences with others through my books, articles, columns -- and now this blog! The sanding dust, called swarf, combines with the still-wet glue to fill the crack as you sand, making an instant patch quite close to the color of the wood. Would love your thoughts, please comment. You might just need to make a repair as well, which is another reason to fill a hole.
Take the time to wait for the filling paste to dry completely. Well, it is progressing, day-by-day. Knowing the best way to fill various types and sizes of holes is critical in being able to make them less noticeable, so if you think that might be helpful, just keep on reading! Wow. Do you want to make wood filler and dont know how to do it? It is remarkably resistant to shocks without ever crumbling thanks to the great flexibility of its structure. Step 4:When sanding is complete, use a vacuum to get all of the sanding residue off of the wood.
Make sure that the final shade (ie when it has dried) of the wood filler is close to the shade of the wood.
This method of filling wood is the same as the method using ready-made putty for wood, only in this case we actually make the putty ourselves, if it is not at hand and do not want to run to the store. See Also:10 Fun Things to Build With Wood.
This method is not suitable for repairing wide holes and leveling large surfaces, but you will have a more reliable alternative to putties during local repairs. It must be applied in the hole, cavity or crack to be filled. Two-part epoxy is probably one of the most versatile and strong fillers that you have in your shop. Each one of them is very easy, and you are sure to be able to find one that fits your exact needs. This resin can be used to repair defects on items that come into contact with food, as well as repair kitchen countertops, repair holes and cracks inside a cutting board, or even a dining table. For these I reach for Minwax Wood Putty, a non-hardening, color matched putty available in 8 popular wood tone colors, plus white and ebony. If your hole doesn't go all the way through to the other side of the piece of wood, you don't have to pack as much on, and you can scrape it off a little so it is more even with the rest of the wood. For the best experience on our site, be sure to turn on Javascript in your browser. See here exactly how to remove wax from wood with these beginners tips! https://www.youtube.com/watch?v=_epB_1Dmj5E&ab_channel=FixThisBuildThat, 6 Ways to Plug or Fill Pocket Holes | How to (https://www.youtube.com/watch?v=_epB_1Dmj5E&ab_channel=FixThisBuildThat), How to Remove Scratches from Hardwood Floors [ 5 Easy Ways], How To Get Rid Of Wood Stain Smell [10 Fast & Easy Ways], How to Remove Crayon from Wood [5 Quick Ways], How to Waterproof Outdoor Wood [Fast and Effectively], How to Glue a Mirror to Wood (Fast & Effective). Ive about given up with staining.. the filler always goes darker than the wood, and stands out unbearably. It accepts all types of finishes whether it is varnish, wax, oil, paint or stain. Very thin finishes, like a single coat of Watco Danish oil wiped on and off, may appear shinier over the epoxy. I like to use Minwax Polycrylic as the finished coat. Theres an easy way to fix it, and you might already have what you need in the shop. However, like anything there are a few tips that can help you be more successful. Then you will need fine sawdust from the same material that you are going to seal. This is because non-dry wood filler may have a slightly different shade. In a case like this, it might be that you drilled a hole to a certain size and it turns out that it was wrong. In general filling holes and voids in your woodworking is a pretty easy process. I have gather a list with over 32 types of saws and their uses! No one has canceled safety precautions either, so we will definitely arm ourselves with gloves and goggles for the eyes. If youve never use this stuff before, all you do is cut off a slice and kneed it together with your fingers. Join My Woodworking Facebook Group. Whichever method you choose, before work you need to thoroughly clean the wood, as well as clean the holes from debris and dust.if(typeof ez_ad_units != 'undefined'){ez_ad_units.push([[250,250],'startwoodworkingnow_com-large-mobile-banner-1','ezslot_19',160,'0','0'])};if(typeof __ez_fad_position != 'undefined'){__ez_fad_position('div-gpt-ad-startwoodworkingnow_com-large-mobile-banner-1-0')}; Its not just about cleaning off crayon stains on wood. Obviously, it is not possible to repair a material that is not healthy enough beforehand. Bondo is a product its normally use in the automotive industry, and its used as a filler for doing body work. Try a couple of them, because you never know which one will really make you the happiest. It is important to keep in mind that it is a product for indoor use, not suitable for fixing damage to furniture or wooden accessories outdoors. I hope you enjoy it. Follow this step by step beginner guide how you can carve wood like a pro! Many times Ive found that it means you actually have to use a different color of stain on the filler than you used on the wood. I prefer to mound it slightly to allow for shrinkage as it dries. Quick Tip: Taper the blunt end of the wood plug slightly to make it easier to tap into the hole. Filling cracked or knotty wood without using wood putty may seem a difficult task, but there are a few options. There can be cracks in a knot, voids in a burl or other anomalies. See how it makes the hole virtually disappear in the photo above? We are proud of the quality of our products, and we stand behind them 100%. This method has helped many woodworkers get out of a jam and fill holes in their projects. That stuff is fine for weekend warrior types of projects, but theres no match in strength and work ability for a two-part product. It is possible to stain, work, shape or sand it in the same way as natural wood.
I used Elmer's ProBond Wood Filler, and made sure that it could be painted or stained over. Ideally, this wouldve been sanded off in the sanding phase so that you wouldnt have this problem now. Mastic preparation: mix the mastic powder with water, usually one part water for 3 parts powder, however follow the instructions on the mastic packaging. Enjoy. The store will not work correctly in the case when cookies are disabled. Ed. I like the steps you showed at your blog. From furniture to floors, trust Minwax products that beautify and protect wood. Once its all the same color, press it into your holes on your project. Thats how you know youre done. Make sure to use a high-quality wood glue that wont let you down. In about 15 minutes the product will be ready to sand, and your hole will be filled.
You can then remove the scrap and make sure the underside is slightly proud.
Question The holes didn't match up perfectly with the existing ones, so I knew that when I was ready to paint the door, I would have to fill the unused hole. Then this amazing article will help you! Want to protect wood from all the degrading outside factors like Sun Rays, Water, Humidity and Insects Attack? Small amounts of universal colorants or liquid dye concentrates, up to two percent by weight, will also work, provided you leave a week before sanding and finishing to allow the solvents to escape from the cured epoxy. I have found that holes larger and deeper than -inch should be filled with real wood, such as a dowel, glued into the hole. If the rot is not properly removed, the deterioration may start again after the repair.if(typeof ez_ad_units != 'undefined'){ez_ad_units.push([[250,250],'startwoodworkingnow_com-medrectangle-3','ezslot_10',154,'0','0'])};if(typeof __ez_fad_position != 'undefined'){__ez_fad_position('div-gpt-ad-startwoodworkingnow_com-medrectangle-3-0')};if(typeof ez_ad_units != 'undefined'){ez_ad_units.push([[250,250],'startwoodworkingnow_com-medrectangle-3','ezslot_11',154,'0','1'])};if(typeof __ez_fad_position != 'undefined'){__ez_fad_position('div-gpt-ad-startwoodworkingnow_com-medrectangle-3-0_1')}; .medrectangle-3-multi-154{border:none !important;display:block !important;float:none !important;line-height:0px;margin-bottom:15px !important;margin-left:0px !important;margin-right:0px !important;margin-top:15px !important;max-width:100% !important;min-height:250px;min-width:250px;padding:0;text-align:center !important;}. Sawdust from the same material paired with transparent PVA glue will hide the defect from the eyes as much as possible. This is super easy, as long as you use one tool that will make the entire process run smoothly. Turn to Minwax to add rich color and durable protection to your wood project in a single step. Claustrophobic tools: Tough tools for small spaces . To fill a hole withwood paste, you must first prepare the wooden part. Two percent by weight equals about three quarters of a teaspoon per cup of mixed epoxy. Self-taught techie. Once that happens, youll have a noticeably different feeling while youre using the sanding block.
Epoxy is the most reliable method for filling holes and cracks in the wood. Fill the void just slightly proud of the surrounding surface so you can sand the cured epoxy flush. You really only need to be good at a couple of these to be successful. In a pinch, you can also use pigmented artists oils and Japan colors. If you need to fill a large hole which goes all the way through, like in the photograph example, place a scrap piece of wood covered with cling film, silver foil or a plastic bag on the underside of the hole and rest the piece which needs filling on top. Step 2: Eliminate rotten wood:it is advisable to carefully scrape the damaged area. See Also:How to Choose the Best Epoxy Resin for Wood. These pastes can easily be mixed with each other to create intermediate shades. Minwax Design Series washes, wood effects and waxes offer new options for bare wood and wood that's already stained. With Minwax wood stains, theres a color to suit every style. Id also avoid dry dye powders, as they may not show their true color even when mixed thoroughly. If the crack goes all the way through the wood, put masking tape on the bottom so the epoxy doesnt drip out before it cures. By the end of this post, you know six reliable ways to fill holes in your woodworking projects. These can be existing holes that just need to go away, or they can also be from accidents.
You can use this stuff just like any other wood filler to fill holes in your projects, they will just be clear in the end. All the described methods of filling a hole in wood will require the use of tools that every owner should have: Filling a hole in the wood with woodfilleris a good solution when you want to repair a structural defect. Easiest way to do this is to drip wood glue into the hole to where it almost fills to the top. Minwax preparation products are the first step to ensure your wood surfaces show their most beautiful colors and smoothest finishes. Can you clue me up on a method to really hide nail holes with the Polyshades? Since the hole in my door went all the way through to the other side, it was hard to make sure I was keeping as much filler in the hole as possible. Why doesntMinwax use a can that wont rust. Now you know six different ways to fill holes in wood, and one of those will surely be the best way for you to fill holes in your own projects, its time to take action. A hole in a wood can be made by accident very quickly, either by drilling in the wrong spot or doing renovation work. Then, line the edges of the hole with glue, and coat the dowel. With their help, you can easily obtain a composition of the required color and viscosity, which will perfectly fill cracks, dents, chips and provide excellent and durable adhesion. Westfarthing Woodworks LLC is a participant in the Amazon Services LLC Associates Program, an affiliate advertising program designed to provide a means for us to earn fees by linking to Amazon.com and affiliated sites. Find out here more about What is PVA glue? This is another two part product that has resin and activator. It must be able to follow the deformations of the wood without ever crumbling. It works like a natural wood. Always over-fill your hole so that way you have a little bit of material to sand back and make it flush.
Ever since then I have always had a project going, whether it be restoring an old house, keeping up with a new one, bringing old furniture back to life, or working with new wood. If not, select a drill that can widen your existing hole a little bit and accept that dowel rod perfectly. i purchase the quart size cans. Once you arrive at a mixture that is somewhat similar in viscosity to loose wood putty, you are done. I receive Commissions for Purchases Made Through the Links in This Post. This wood paste behaves exactly like wood after complete drying. You might also encounter situations where you need to make a repair to a piece, and your screws just dont grip like they used to. It does not clog the abrasive bands thanks to extremely fine components. Minwax offers a variety of easy-to-use products to help clean and repair wood that is chipped, cracked, scratched, even decayed, to its original beauty. On top of the nails, add a thin layer of putty to hide them. So next time do this; #1. be careful to only pack the wood filler in the hole and not over the area outside the hole, and #2. sand it thoroughly to remove any excess filler. I have had problems with large wood putty plugs that dry with indentations or with cracks and needed to go back for second or third applications to get them smooth and full. Whether you are installing a new hardwood floor, refinishing an old one, or just keeping your existing floor looking as good as new, Minwax has a full range of products to make and keep your floors beautiful. To successfully remove crayon stains from wood, you will need to. Natural and synthetic bristle brushes specifically designed for use with Minwax wood finishing products. We proudly stand behind all of our products. This method is the simplest way to fill a hole in wood and for its implementation we need ordinary PVA glue, matches or wooden toothpicks. Let this sit until it is completely dry. Got a 35mm dia x 12mm deep hole in MDF whats the best filler to use. To seal the hole with this method, it is necessary to drill it to the diameter of the wood plug, which is usually 8 mm. And is easily used on a vertical surface without any unsightly sagging. Two-component resins, which are composed of resin and hardener, can be easily modified to an adhesive filler. Lets face it, no matter how good you are its possible to make mistakes. This filler is strong enough to be be drilled, planed, screwed and suitable for painting and it hardens in 30 minutes (which means by the time you have finished filling the hole, it will almost be ready). Just press it into the hole and wipe away any excess. Prepare the wood before reseal with pulpwood, is a step that should not be overlooked. Combine the Minwax Design Series with other Minwax stains to produce on-trend looks, finishes and special effects. Your order will come with a return form with convenient instructions, or you may send your returns directly to Returns Department, Rockler Woodworking and Hardware, 4365 Willow Drive, Medina, MN 55340. You can cut wooden plugs with many types of saws. Then we moisten the plug with wood glue and hammer it into the hole. Manufacturer guarantees/warranties for power tools, CNC and laser products will supersede the Rockler Guarantee if these items are damaged or defective. Step 1: Control humidity:it is necessary to properly control the humidity contained in the wood. It must be handled quickly because it dries quickly. It is important to work the wood filler well for at least 2 to 3 minutes. Full directions with more details available here:http://rhodylife.blogspot.com/2013/04/diy-repair-hole-in-wood.html. First, the wood must be bare, that is to say it must be dewaxed and stripped if necessary, and then lightly sand it. Then, it must be spread out using a suitable spatula so that there is no protruding bump. As always, test all mixtures and finishes on scrap before you try them on your project. It is better to remove too much rotten wood than not enough. The easiest holes to repair are small, shallow nail holes, such as you might find in your woodwork or like what I found in the joint of one of my chairs. The paste is presented ready to use in a tub and to apply it a spatula or knife is used. One easy way I have found is to use one of the Minwax Stain Markers to add the color needed to the filler that will match the wood. If you have a hole thats really weird looking, or might possibly be contaminated with some substances that dont really agree with wood glue, then two-part epoxy is probably your best option. The other side of the coin is that its not very much more expensive, it works a whole lot nicer, and it lasts far longer. The color can come from wood dust, pigments that either match or contrast with the surrounding wood, or decorative additives, like metallic flake or pearlescent powders. Furthermore, the tools used can be easily cleaned with water.
To prepare homemade putty, you need wood glue or PVA glue, but joiners glue is better. Once the wood filler has completely dried and hardened, remove the excess filler with a fine sandpaper. It never seems to fail: if you have wood in your home, you always end up with unwanted holes. Epoxy resin makes it possible not only to fill the hole and hide cosmetic defects, but also to completely stabilize the wood. Using a razor blade knife, score the outside of the dowel along its length, which will allow the glue to sink in and grip a little better. Happy building.
It remains perfectly suited for possible use on all types of usual wood species. Hi Bruce It is advisable not to neglect the rinsing in order to eliminate all traces of product, grease or dirt. Then start pushing in toothpicks until the hole is full. The last one might be a little bit difficult to get in the place, so use a hammer to press it in. Make sure that when you are sanding down the wood filler, you follow the grain of the wood. For the best experience on our site, be sure to turn on Javascript in your browser. Swab the inside of the hole with woodworkers glue before tapping in the plug. Minwax Water Based Pre-Stain Wood Conditioner, Minwax Performance Series Sanding Sealer, Minwax Express Color Wiping Stain & Finish, Minwax Super Fast-Drying Polyurethane for Floors, Minwax Ultra Fast-Drying Polyurethane For Floors, Minwax Professional Formula Sanding Sealer, See all tips, step-by-step instructions, and helpful Dos and Donts, How to Make a Picture Frame 3 Ways with Brad Rodriguez, Cozy Tray Ceiling Makeover with Thrifty Decor Chick: Sarah Saucedo, DIY Modern Live Edge Waterfall Coffee Table with April Wilkerson, Building A Modern Oak and Metal Side Table with John Malecki, Everything You Need to Know to Refinish Hardwood Floors with Blesser House, Easy & Inexpensive DIY Wall Mount Jewelry Display, Super Fast-Drying Polyurethane for Floors. This patching paste provides a hole repair that is very easy to sand. It was there I fell in love with the beauty of the grain of the wood, either hidden beneath an old dark finish or highlighted with a new coat of stain. Being able to fill them means you can still use that special plank. This is presumably your hole that you filled. Amazon and the Amazon logo are trademarks of Amazon.com, Inc, or its affiliates. The finer the sawdust, the better. Check this guide here! Be more precise than you think, because you don't want any dust to get into your paint or stain. After it cures, you can sand at level and it typically wont shrink after a certain time. If you dont have toothpicks, you can use a knife to shave off a thin slices of wood that are about the same size. I replaced all of the hardware and the locks when we moved in. We wait until the glue dries and clean it with fine sandpaper. This will help create an even surface, and it will focus the sanding pressure on the area that is higher than it should be. I work with mostly small wood working projects. If you then use Ronseal High Performance Wood Filler (mixing the filling compound with the hardener as per the instructions on the tin) you can do the job in one application without worrying about the filler cracking. This is pretty much telling how to follow the instructions written on the back of the woodfiller. For very small cracks, add drops of cyanoacrylate into the crack while sanding the area. Don't risk using too little, so feel free to over-apply. The goal is to replace the missing material in the hole like it was never gone. It is a challenge to get a synthetic filler to accept stain the identical way that the wood does. Sanding in the opposite direction from the wood grain will leave scratches in the wood, which will be visible, especially after painting or staining. See Also:19 Things I Wish I Knew When I Started Woodworking. If one of them matches very closely to the opening that you have, you can use it just like it is.
Fill the holes and cracks, overflow a little. Use a repair knife or a sliver of wood to mash your homemade filler into your hole, and then just let it dry. Good luck! The reason I shared six of them with you is because everyone is a little different, and some people prefer doing things in different ways. Answer simple questions about your project to get product recommendations. Did you make this project? If for any reason you are not satisfied with the merchandise you ordered, just return it within 90 days to receive a refund in the manner of original payment for merchandise only. Step 1: Get some Wood Filler. Pick a method, and drill a couple holes on a scrap board to try it out. When in doubt, use the simplest method that gets the job done. Cut off the tip of the applicator, and push some of the putty into the hole. Knowing how to fill those holes and repair the damage can make it very easy to get those hinges or hardware pieces back in place. Step 2: Using a putty knife, smooth it over, but not completely flush to the surface of the door. Cheers Woodworking projects, plans and DIY tutorials to built almost ANY woodworking project. on Introduction. You should also really use gloves to protect your hands, and so you don't get splinters. Step 4: Knead the paste:it must be kneaded carefully before any use in order to have the most homogeneous wood paste possible. Start Woodworking Now is a participant in the Amazon Services LLC Associates Program, an affiliate advertising program designed to provide a means for sites to earn advertising fees by advertising and linking to Amazon.com. Otherwise, any film forming finish will do just fine over sanded epoxy.
In this article we present you 5 methods of filling a hole in wood. Mix it according to the instructions and then fill your hole. Here's the easiest way to fix it! Look at the dowel rods that you already have. Its excellent quality means that it does not crack as a result of post-repair treatments. I have about 600 metres of reclaimed Baltic Pine that I got from disassembling long (6m) shipping crates. In the same way as for wood filler, choose the shade closest to the wood to be filled. The next best option is any dry pigment powder, wood swarf, metal flake or pearl powder. You may also return purchases to a Rockler store near you for store credit. See Also:How to be a Modern Renaissance Woodworker. For superior durability and long-lasting beauty, the choice is clear protective clear finishes from Minwax! Have a hole in a piece of wood or in a door that needs filling? JavaScript seems to be disabled in your browser. Next, we mix these sawdust with glue to the consistency of thick sour cream and use a spatula to cover the hole. For international returns, please click here. Then it's simply a case of waiting for it to dry before sanding and then you can paint. Another tried-and-true method that has been used by thousands and thousands of woodworkers over the years is mixing sawdust and wood glue to create your own impromptu filler. Make it protrude slightly from the hole, then spread it with a spatula so that it does not make a dent. Besides wood putty, there are several glue-based fill options. Finishes that offer protection for wood with a soft luster. While the trim carpenters were installing the cabinets, Leigh Ann (below, kneeling) went back out to the stone yard to check on the granite we ordered for the countertops. In addition to being used in restoration, the. Available sizes: 1", 2", 2". After this, you will be a pro at filling holes in wood. For larger holes and cracks, it is better to use a special wood sealant. This stuff tends to stick to things that regular wood glue will not, and though it might be a little bit more involved to work with, it will give you a good feeling when you finish the job. After the epoxy resin hardens, it will gain strength that will exceed the strength of wood, and due to its fluidity and excellent adhesion, it will get into all cavities, and so it will be able to restore the integrity of the structure of the wood product, and will also prevent further holes. Thank you for your Instructable. Items shipped directly from the manufacturer cannot be returned in store. The Resource for New Woodworkers With 1004 Posts and Counting! The wooden hole must be clean, dry and free from materials that could affect adhesion. Next, put together the required number of toothpicks so that they enter the hole as tightly as possible, then dip them in PVA glue and insert them into the hole. My recommendation is to use a two-part reactive wood filler product rather than using the putty that comes in a tub or a tube. 19 Things I Wish I Knew When I Started Woodworking, How to be a Modern Renaissance Woodworker, 19 Incredible Tips on Working With Wood Glue, How to Choose the Best Epoxy Resin for Wood, 20 Easy DIY Woodworking Projects With Tutorials, How to Make the Best Kitchen Helper Learning Tower, More than 20 Years Woodworking Experience, Over 1 Million Words Published About Woodworking, Bachelor of Arts Degree from Arizona State University. Please tell me what we need to do to eliminate the faint thumb print look around the many holes before applying the poly coat. Minwax Stainable (new word, that..) filler goes darker than the wood with the stain, and I cant get a filler that matches the polyshades. If you dont want to go through all of the fuss of creating your own fillers and coloring outside the lines a little bit, then just use regular old wood filler putty. Im not saying its crazy; just missing some parts. With powders, pastes and concentrates, first mix the two parts of the epoxy together thoroughly, then stir in the colorant. Trust me: once you start using those Stain Markers, youll keep finding ways to use them! Leave the filler to sit until it is dry, referring to the instructions on the filler container if you are unsure of how long to wait. Both West System and System Three offer an ideal option: epoxy tinting pastes in several colors. Ideally, such small chips can be sharpened with a file or coarse sandpaper. This is 6 Easy Ways to fill Holes in Wood, your guide to filling in any holes or mistakes you find on your woodworking projects. Wood cracks filled with epoxy can allow you to create an even finish that wouldn't otherwise be possible. Add them to the resin part, usually part A, before mixing in the hardener. Consider your finish, because a lot of these methods are visible in the end. To keep the filler from cracking in middle and sinking in, don't try to fill large space at one application. If not, apply enough so there are no voids. Often this is really the only opportunity to bring life back to workpieces, which, as it may seem, are hopelessly spoiled by through cracks. It works for larger voids and also matches the wood color. Its a common process in woodworking to have to fill holes in your project. Quick Tip: Neatness counts! It is important that the surface to be repaired is. Apply wood filler directly to the hole. Stayed tuned for a complete step-by-step once its complete! Step 6: Eliminate the excess:When the paste has hardened completely, all that remains is to remove the excess using a fine abrasive, sandpaper,steel wool n 000or# 0 steel wool. Share it with us! Remember our kitchen project I mentioned recently? I have made an easy step by step tutorial how you can create your own wood filler at home using sawdust ! Also, drive nails into the putty, which will ensure its fixation. Vacuum then wipe with a rag. After the epoxy is completely cured, it becomes a safe and inert plastic with a high degree of strength. Many here would enjoy those steps added to this posting. As my wife will attest, I love projects, but just as important I love sharing my experiences with others through my books, articles, columns -- and now this blog! The sanding dust, called swarf, combines with the still-wet glue to fill the crack as you sand, making an instant patch quite close to the color of the wood. Would love your thoughts, please comment. You might just need to make a repair as well, which is another reason to fill a hole. Take the time to wait for the filling paste to dry completely. Well, it is progressing, day-by-day. Knowing the best way to fill various types and sizes of holes is critical in being able to make them less noticeable, so if you think that might be helpful, just keep on reading! Wow. Do you want to make wood filler and dont know how to do it? It is remarkably resistant to shocks without ever crumbling thanks to the great flexibility of its structure. Step 4:When sanding is complete, use a vacuum to get all of the sanding residue off of the wood.
Make sure that the final shade (ie when it has dried) of the wood filler is close to the shade of the wood.
This method of filling wood is the same as the method using ready-made putty for wood, only in this case we actually make the putty ourselves, if it is not at hand and do not want to run to the store. See Also:10 Fun Things to Build With Wood.
This method is not suitable for repairing wide holes and leveling large surfaces, but you will have a more reliable alternative to putties during local repairs. It must be applied in the hole, cavity or crack to be filled. Two-part epoxy is probably one of the most versatile and strong fillers that you have in your shop. Each one of them is very easy, and you are sure to be able to find one that fits your exact needs. This resin can be used to repair defects on items that come into contact with food, as well as repair kitchen countertops, repair holes and cracks inside a cutting board, or even a dining table. For these I reach for Minwax Wood Putty, a non-hardening, color matched putty available in 8 popular wood tone colors, plus white and ebony. If your hole doesn't go all the way through to the other side of the piece of wood, you don't have to pack as much on, and you can scrape it off a little so it is more even with the rest of the wood. For the best experience on our site, be sure to turn on Javascript in your browser. See here exactly how to remove wax from wood with these beginners tips! https://www.youtube.com/watch?v=_epB_1Dmj5E&ab_channel=FixThisBuildThat, 6 Ways to Plug or Fill Pocket Holes | How to (https://www.youtube.com/watch?v=_epB_1Dmj5E&ab_channel=FixThisBuildThat), How to Remove Scratches from Hardwood Floors [ 5 Easy Ways], How To Get Rid Of Wood Stain Smell [10 Fast & Easy Ways], How to Remove Crayon from Wood [5 Quick Ways], How to Waterproof Outdoor Wood [Fast and Effectively], How to Glue a Mirror to Wood (Fast & Effective). Ive about given up with staining.. the filler always goes darker than the wood, and stands out unbearably. It accepts all types of finishes whether it is varnish, wax, oil, paint or stain. Very thin finishes, like a single coat of Watco Danish oil wiped on and off, may appear shinier over the epoxy. I like to use Minwax Polycrylic as the finished coat. Theres an easy way to fix it, and you might already have what you need in the shop. However, like anything there are a few tips that can help you be more successful. Then you will need fine sawdust from the same material that you are going to seal. This is because non-dry wood filler may have a slightly different shade. In a case like this, it might be that you drilled a hole to a certain size and it turns out that it was wrong. In general filling holes and voids in your woodworking is a pretty easy process. I have gather a list with over 32 types of saws and their uses! No one has canceled safety precautions either, so we will definitely arm ourselves with gloves and goggles for the eyes. If youve never use this stuff before, all you do is cut off a slice and kneed it together with your fingers. Join My Woodworking Facebook Group. Whichever method you choose, before work you need to thoroughly clean the wood, as well as clean the holes from debris and dust.if(typeof ez_ad_units != 'undefined'){ez_ad_units.push([[250,250],'startwoodworkingnow_com-large-mobile-banner-1','ezslot_19',160,'0','0'])};if(typeof __ez_fad_position != 'undefined'){__ez_fad_position('div-gpt-ad-startwoodworkingnow_com-large-mobile-banner-1-0')}; Its not just about cleaning off crayon stains on wood. Obviously, it is not possible to repair a material that is not healthy enough beforehand. Bondo is a product its normally use in the automotive industry, and its used as a filler for doing body work. Try a couple of them, because you never know which one will really make you the happiest. It is important to keep in mind that it is a product for indoor use, not suitable for fixing damage to furniture or wooden accessories outdoors. I hope you enjoy it. Follow this step by step beginner guide how you can carve wood like a pro! Many times Ive found that it means you actually have to use a different color of stain on the filler than you used on the wood. I prefer to mound it slightly to allow for shrinkage as it dries. Quick Tip: Taper the blunt end of the wood plug slightly to make it easier to tap into the hole. Filling cracked or knotty wood without using wood putty may seem a difficult task, but there are a few options. There can be cracks in a knot, voids in a burl or other anomalies. See how it makes the hole virtually disappear in the photo above? We are proud of the quality of our products, and we stand behind them 100%. This method has helped many woodworkers get out of a jam and fill holes in their projects. That stuff is fine for weekend warrior types of projects, but theres no match in strength and work ability for a two-part product. It is possible to stain, work, shape or sand it in the same way as natural wood.
I used Elmer's ProBond Wood Filler, and made sure that it could be painted or stained over. Ideally, this wouldve been sanded off in the sanding phase so that you wouldnt have this problem now. Mastic preparation: mix the mastic powder with water, usually one part water for 3 parts powder, however follow the instructions on the mastic packaging. Enjoy. The store will not work correctly in the case when cookies are disabled. Ed. I like the steps you showed at your blog. From furniture to floors, trust Minwax products that beautify and protect wood. Once its all the same color, press it into your holes on your project. Thats how you know youre done. Make sure to use a high-quality wood glue that wont let you down. In about 15 minutes the product will be ready to sand, and your hole will be filled.
You can then remove the scrap and make sure the underside is slightly proud.
Question The holes didn't match up perfectly with the existing ones, so I knew that when I was ready to paint the door, I would have to fill the unused hole. Then this amazing article will help you! Want to protect wood from all the degrading outside factors like Sun Rays, Water, Humidity and Insects Attack? Small amounts of universal colorants or liquid dye concentrates, up to two percent by weight, will also work, provided you leave a week before sanding and finishing to allow the solvents to escape from the cured epoxy. I have found that holes larger and deeper than -inch should be filled with real wood, such as a dowel, glued into the hole. If the rot is not properly removed, the deterioration may start again after the repair.if(typeof ez_ad_units != 'undefined'){ez_ad_units.push([[250,250],'startwoodworkingnow_com-medrectangle-3','ezslot_10',154,'0','0'])};if(typeof __ez_fad_position != 'undefined'){__ez_fad_position('div-gpt-ad-startwoodworkingnow_com-medrectangle-3-0')};if(typeof ez_ad_units != 'undefined'){ez_ad_units.push([[250,250],'startwoodworkingnow_com-medrectangle-3','ezslot_11',154,'0','1'])};if(typeof __ez_fad_position != 'undefined'){__ez_fad_position('div-gpt-ad-startwoodworkingnow_com-medrectangle-3-0_1')}; .medrectangle-3-multi-154{border:none !important;display:block !important;float:none !important;line-height:0px;margin-bottom:15px !important;margin-left:0px !important;margin-right:0px !important;margin-top:15px !important;max-width:100% !important;min-height:250px;min-width:250px;padding:0;text-align:center !important;}. Sawdust from the same material paired with transparent PVA glue will hide the defect from the eyes as much as possible. This is super easy, as long as you use one tool that will make the entire process run smoothly. Turn to Minwax to add rich color and durable protection to your wood project in a single step. Claustrophobic tools: Tough tools for small spaces . To fill a hole withwood paste, you must first prepare the wooden part. Two percent by weight equals about three quarters of a teaspoon per cup of mixed epoxy. Self-taught techie. Once that happens, youll have a noticeably different feeling while youre using the sanding block.
Epoxy is the most reliable method for filling holes and cracks in the wood. Fill the void just slightly proud of the surrounding surface so you can sand the cured epoxy flush. You really only need to be good at a couple of these to be successful. In a pinch, you can also use pigmented artists oils and Japan colors. If you need to fill a large hole which goes all the way through, like in the photograph example, place a scrap piece of wood covered with cling film, silver foil or a plastic bag on the underside of the hole and rest the piece which needs filling on top. Step 2: Eliminate rotten wood:it is advisable to carefully scrape the damaged area. See Also:How to Choose the Best Epoxy Resin for Wood. These pastes can easily be mixed with each other to create intermediate shades. Minwax Design Series washes, wood effects and waxes offer new options for bare wood and wood that's already stained. With Minwax wood stains, theres a color to suit every style. Id also avoid dry dye powders, as they may not show their true color even when mixed thoroughly. If the crack goes all the way through the wood, put masking tape on the bottom so the epoxy doesnt drip out before it cures. By the end of this post, you know six reliable ways to fill holes in your woodworking projects. These can be existing holes that just need to go away, or they can also be from accidents.
You can use this stuff just like any other wood filler to fill holes in your projects, they will just be clear in the end. All the described methods of filling a hole in wood will require the use of tools that every owner should have: Filling a hole in the wood with woodfilleris a good solution when you want to repair a structural defect. Easiest way to do this is to drip wood glue into the hole to where it almost fills to the top. Minwax preparation products are the first step to ensure your wood surfaces show their most beautiful colors and smoothest finishes. Can you clue me up on a method to really hide nail holes with the Polyshades? Since the hole in my door went all the way through to the other side, it was hard to make sure I was keeping as much filler in the hole as possible. Why doesntMinwax use a can that wont rust. Now you know six different ways to fill holes in wood, and one of those will surely be the best way for you to fill holes in your own projects, its time to take action. A hole in a wood can be made by accident very quickly, either by drilling in the wrong spot or doing renovation work. Then, line the edges of the hole with glue, and coat the dowel. With their help, you can easily obtain a composition of the required color and viscosity, which will perfectly fill cracks, dents, chips and provide excellent and durable adhesion. Westfarthing Woodworks LLC is a participant in the Amazon Services LLC Associates Program, an affiliate advertising program designed to provide a means for us to earn fees by linking to Amazon.com and affiliated sites. Find out here more about What is PVA glue? This is another two part product that has resin and activator. It must be able to follow the deformations of the wood without ever crumbling. It works like a natural wood. Always over-fill your hole so that way you have a little bit of material to sand back and make it flush.
Ever since then I have always had a project going, whether it be restoring an old house, keeping up with a new one, bringing old furniture back to life, or working with new wood. If not, select a drill that can widen your existing hole a little bit and accept that dowel rod perfectly. i purchase the quart size cans. Once you arrive at a mixture that is somewhat similar in viscosity to loose wood putty, you are done. I receive Commissions for Purchases Made Through the Links in This Post. This wood paste behaves exactly like wood after complete drying. You might also encounter situations where you need to make a repair to a piece, and your screws just dont grip like they used to. It does not clog the abrasive bands thanks to extremely fine components. Minwax offers a variety of easy-to-use products to help clean and repair wood that is chipped, cracked, scratched, even decayed, to its original beauty. On top of the nails, add a thin layer of putty to hide them. So next time do this; #1. be careful to only pack the wood filler in the hole and not over the area outside the hole, and #2. sand it thoroughly to remove any excess filler. I have had problems with large wood putty plugs that dry with indentations or with cracks and needed to go back for second or third applications to get them smooth and full. Whether you are installing a new hardwood floor, refinishing an old one, or just keeping your existing floor looking as good as new, Minwax has a full range of products to make and keep your floors beautiful. To successfully remove crayon stains from wood, you will need to. Natural and synthetic bristle brushes specifically designed for use with Minwax wood finishing products. We proudly stand behind all of our products. This method is the simplest way to fill a hole in wood and for its implementation we need ordinary PVA glue, matches or wooden toothpicks. Let this sit until it is completely dry. Got a 35mm dia x 12mm deep hole in MDF whats the best filler to use. To seal the hole with this method, it is necessary to drill it to the diameter of the wood plug, which is usually 8 mm. And is easily used on a vertical surface without any unsightly sagging. Two-component resins, which are composed of resin and hardener, can be easily modified to an adhesive filler. Lets face it, no matter how good you are its possible to make mistakes. This filler is strong enough to be be drilled, planed, screwed and suitable for painting and it hardens in 30 minutes (which means by the time you have finished filling the hole, it will almost be ready). Just press it into the hole and wipe away any excess. Prepare the wood before reseal with pulpwood, is a step that should not be overlooked. Combine the Minwax Design Series with other Minwax stains to produce on-trend looks, finishes and special effects. Your order will come with a return form with convenient instructions, or you may send your returns directly to Returns Department, Rockler Woodworking and Hardware, 4365 Willow Drive, Medina, MN 55340. You can cut wooden plugs with many types of saws. Then we moisten the plug with wood glue and hammer it into the hole. Manufacturer guarantees/warranties for power tools, CNC and laser products will supersede the Rockler Guarantee if these items are damaged or defective. Step 1: Control humidity:it is necessary to properly control the humidity contained in the wood. It must be handled quickly because it dries quickly. It is important to work the wood filler well for at least 2 to 3 minutes. Full directions with more details available here:http://rhodylife.blogspot.com/2013/04/diy-repair-hole-in-wood.html. First, the wood must be bare, that is to say it must be dewaxed and stripped if necessary, and then lightly sand it. Then, it must be spread out using a suitable spatula so that there is no protruding bump. As always, test all mixtures and finishes on scrap before you try them on your project. It is better to remove too much rotten wood than not enough. The easiest holes to repair are small, shallow nail holes, such as you might find in your woodwork or like what I found in the joint of one of my chairs. The paste is presented ready to use in a tub and to apply it a spatula or knife is used. One easy way I have found is to use one of the Minwax Stain Markers to add the color needed to the filler that will match the wood. If you have a hole thats really weird looking, or might possibly be contaminated with some substances that dont really agree with wood glue, then two-part epoxy is probably your best option. The other side of the coin is that its not very much more expensive, it works a whole lot nicer, and it lasts far longer. The color can come from wood dust, pigments that either match or contrast with the surrounding wood, or decorative additives, like metallic flake or pearlescent powders. Furthermore, the tools used can be easily cleaned with water.
To prepare homemade putty, you need wood glue or PVA glue, but joiners glue is better. Once the wood filler has completely dried and hardened, remove the excess filler with a fine sandpaper. It never seems to fail: if you have wood in your home, you always end up with unwanted holes. Epoxy resin makes it possible not only to fill the hole and hide cosmetic defects, but also to completely stabilize the wood. Using a razor blade knife, score the outside of the dowel along its length, which will allow the glue to sink in and grip a little better. Happy building.
It remains perfectly suited for possible use on all types of usual wood species. Hi Bruce It is advisable not to neglect the rinsing in order to eliminate all traces of product, grease or dirt. Then start pushing in toothpicks until the hole is full. The last one might be a little bit difficult to get in the place, so use a hammer to press it in. Make sure that when you are sanding down the wood filler, you follow the grain of the wood. For the best experience on our site, be sure to turn on Javascript in your browser. Swab the inside of the hole with woodworkers glue before tapping in the plug. Minwax Water Based Pre-Stain Wood Conditioner, Minwax Performance Series Sanding Sealer, Minwax Express Color Wiping Stain & Finish, Minwax Super Fast-Drying Polyurethane for Floors, Minwax Ultra Fast-Drying Polyurethane For Floors, Minwax Professional Formula Sanding Sealer, See all tips, step-by-step instructions, and helpful Dos and Donts, How to Make a Picture Frame 3 Ways with Brad Rodriguez, Cozy Tray Ceiling Makeover with Thrifty Decor Chick: Sarah Saucedo, DIY Modern Live Edge Waterfall Coffee Table with April Wilkerson, Building A Modern Oak and Metal Side Table with John Malecki, Everything You Need to Know to Refinish Hardwood Floors with Blesser House, Easy & Inexpensive DIY Wall Mount Jewelry Display, Super Fast-Drying Polyurethane for Floors. This patching paste provides a hole repair that is very easy to sand. It was there I fell in love with the beauty of the grain of the wood, either hidden beneath an old dark finish or highlighted with a new coat of stain. Being able to fill them means you can still use that special plank. This is presumably your hole that you filled. Amazon and the Amazon logo are trademarks of Amazon.com, Inc, or its affiliates. The finer the sawdust, the better. Check this guide here! Be more precise than you think, because you don't want any dust to get into your paint or stain. After it cures, you can sand at level and it typically wont shrink after a certain time. If you dont have toothpicks, you can use a knife to shave off a thin slices of wood that are about the same size. I replaced all of the hardware and the locks when we moved in. We wait until the glue dries and clean it with fine sandpaper. This will help create an even surface, and it will focus the sanding pressure on the area that is higher than it should be. I work with mostly small wood working projects. If you then use Ronseal High Performance Wood Filler (mixing the filling compound with the hardener as per the instructions on the tin) you can do the job in one application without worrying about the filler cracking. This is pretty much telling how to follow the instructions written on the back of the woodfiller. For very small cracks, add drops of cyanoacrylate into the crack while sanding the area. Don't risk using too little, so feel free to over-apply. The goal is to replace the missing material in the hole like it was never gone. It is a challenge to get a synthetic filler to accept stain the identical way that the wood does. Sanding in the opposite direction from the wood grain will leave scratches in the wood, which will be visible, especially after painting or staining. See Also:19 Things I Wish I Knew When I Started Woodworking. If one of them matches very closely to the opening that you have, you can use it just like it is.