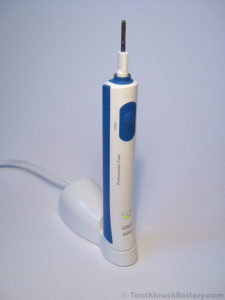
Desoldering braid might also be useful for this. Braun Oral-B Professional Care Type 3754 & 3756 Battery Replacement, Philips Sonicare DiamondClean HX9300 series, Sonicare Toothbrush Spare Parts & Chargers. I have a problem where the pressure light is on all the time. I read your trouble-shooting page. Yes the pressure sensing switch is connected to the PCB very close to the positive solder tag from the battery so these can easily touch each other. You people should be honoured with a Queens Awards for Enterprise and manufacturers who do not commit to the Green Agenda should be levied with crippling sanctions or put in prison IMVHO. All I get is the flashing red light when the power switch is pressed. In case you still have another solution, feel free to post. The battery voltage looks good so if it wont run then it sounds like a problem with components on the board. What a fantastic guide! Another toothbrush saved from the landfill! The pressure sensor LED will only illuminate if the wires are connected with the right polarity. Do You have any ideas how to test that? Hi Martin, It sounds like either the battery is not getting a full charge or that the battery is failing. We had one snag, the two copper wires on the side broke but I think they were long enough to solder back on. Last time I modified the case to take the longer battery, which was easily undertaken with a small drilling/modification tool: eg. Standing this end of the brush in hot water for 5 minutes before bending it back will help to soften the plastic and will make the clip release more easily and be less likely to break. Thanks for the feedback. At first I saw this as a challenge but actually the instructions make the job of replacing the battery quite easy. Basically it works but my wife cant stand the flashing and told me she will buy a new one. Hi Seb, have a read through our troubleshooting tips, mainly checking for short circuits, stray solder blobs, etc. Well done. Ionic is providing a valuable service to consumers and the environment THANKS! After battery replacement same issue. Bought your 2.2AHr NiMH AA and followed the instructions above, didnt need the solder sucker or wire braid Id got to help with the job, but did use copper-pipe plumbing flux to very successfully rejoin the existing soldered parts. This will allow the toothbrush to be used for a week or so until charge runs out again. If it isnt turning on i would be inclined to say the two battery soldering areas are not solid. Ive changed the battery charged it up motor works but the head doesnt vibrate/rotate. Hi. I thought it just a no battery symptoms but when I put it on charging dork, no light what so ever. When soldering make sure you burn the clear insulation coating off the wire to get a good connection. There could be a short circuit somewhere on the PCB caused by a stray blob or whisker of solder. Charges correctly via the coil and I can trigger a reset/lights test via a press & hold but the motor wont run. You should now be able to unclip the circuit board at the motor end of the board and slide it out. charger oral braun toothbrush triumph The guide is perfect and describes all the necessary details. Does it mean another new battery or is the motor just worn out. It sounds like the battery is charging correctly. I followed the instructions and cut across first, this required enough scissor pressure to start the cut which then cut right across. Thanks to John I was able to diagnose and correct the problem although this took some time. Plug the charging unit into an electrical outlet and place the toothbrush handle on the charging unit. Thanks! One was oriented upwards, the other downwards. Thanks a lot, did a battery replacement of 4 different machines and they are all up and running! When I assemble it and place it in the charger the light flashes but every 4-5 flashes the flash is weak or like it does not have contact. Its 2022 and we can repair an electric toothbrush with thanks to TBB.com :-}. Even when I pressed the button, no red light blinking no green light charging. It must be under constant voltage and there must be a short circuit. Plug the charging unit into an electrical outlet and place the toothbrush handle on the charging unit. Thankfully, the base lugs have remained intact through both disassemblies, and the repaired toothbrush is now on charge as I write. I have change the batteries on two toothbrush till now. Dissembled and noted the cam / linkage barely moved. To the EU users, bear in mind some countries now you need to pay taxes upon package arrival. Using the screwdriver carefully press in on the white clips on both sides (one arrowed below) which hold the black coil support in place and unclip the coil, putting it to one side. Initially, I did everything per the steps (except de-soldering the pressure warning light connections, also followed a video). It was obviously charging a bit, but not fully. Having said all this, if you have a toothbrush that doesnt work, what have you got to lose? Only when pausing longer than 30 seconds the timer resets to the initial starting point. Looks to me like a short somewhere but i cant seem to see any. However, I noticed that red light was blinking when I pressed the button on the PCB (before re-assembling) but I do not see it when I pressed the button after I re-assembled. I got my toothbrush back together. These can easily break. Any suggestions.? It sounds like there is a short circuit somewhere, possibly at the side of the PCB where the super-fine wires terminate, the ones that run to the LED near the shaft. You dont actually need to put the bottom in hot water. Thanks for saving me tons of money! Starting with the negative one (nearest the coil of copper wire), use the soldering iron and desolder pump to carefully desolder the two battery terminals on the circuit board (arrowed below, positive on the left and negative on the right) and bend the metal tabs vertical and away from the board with a knife so there is no solder left joining the solder tag to the board. Second was fitting the top ring back into its hole the rubber-like surface of the tootubrush is anything but slippery, the ring just refused to go back in there. I would not, however, recommend this as a first attempt at repairing anything. How I managed it I have no idea because the photos clearly show the orientation. Thanks for all the useful information. The motor is moving the gear from side to side but Im not getting any movement above that. When using the Braun 3756 battery replacement instructions they are excellent by the way I noticed one little remark that needs to be added. I have tried fullyj charging and then letting it run to a stop (about 30 minutes) this short life is repeatable. Everything looks okay and I dont know where I did the mistake. But interestingly, once the toothbush is turned on, the unit would behave normally no flashing pressure sensor light when normally operating the motor. oral 1000 pro toothbrush professional care shavercentre oralb canada It could also be that the charger is faulty but thats a pretty rare occurrence. When put on the charger, BOTH the red and green lights are blinking fast. As a suggestion maybe ensure that all replacement batteries supplied have polarity identification and make reference in the re-assembly information, or if they are supplied without markings then suggest using a voltmeter to determine correct polarity otherwise if reversed, damage could occur. Spot on, run the battery down way beyond the flashy LED nag, be cruel to be kind. Use the screwdriver to pry off the plastic ring from around the shaft. Many thanks for the excellent guide and replacement battery. Dont do as I did and put the battery in the wrong way round! It is not so important for me to have the pressure light working, but okay, it would be complete with it. They are a different voltage and they need different charging circuitry to recharge them correctly. The red charge indicator light starts blinking when the rechargeable battery is low. For me the desoldering took much, much longer than putting it back together. It then charged for about 36 hours (flashing green) being tried for a while. Klaus. And sure enough the new one still flashing green a day later. Very pleased with the result thank you again & keep up the good work. And just to be complete attempts to re-charge when the motor has no more energy to move (but pressure sensing light still flashing) will allow the battery to become charged a little. Seattle Washington USA. light off for a few seconds, red light for half second or so, then off for few seconds repeatedly). Cheers, the tags on my battery were long enough, even with the bends so I am happy I kept the bends. This is clipped in on both sides at the top of the brush, see the arrows below. Feel like its a voltage detection circuit error. Is it just intended to support the battery and therefore is not really vital or does it serve another purpose? One tip in my toothbrush, the seals had been compromised so water had leaked into the body, and there was a lot of crud built up on the circuit board, especially noticeable with a magnifier around the pins of the main chip. In addition to feeling it, you hear a different sound and a red light glows on the back of the handle.Professional TimerA short stuttering sound at 30-second intervals, which you can hear and feel, reminds you to brush the four quadrants of your mouth equally for a thorough consistent clean. Hardest part was getting the bottom off after that the instructions were clear and easy to follow. FAQ Another brush successfully revived! Unclip the carrier for the pressure warning light wires and gently remove the carrier from the top shaft (arrowed below) then put it to one side. The brush is now on charge after fitting the larger battery, all seems to work as it should and Im looking forward to fitting the other replacement battery to my wifes brush as she made me fit mine first. This can be removed by scrubbing with a wooden cocktail stick dipped in meths, or for more stubborn bits, very gentle scraping with the tip of a scalpel blade. So, I checked the troubleshooting guide (this helped too) and reopened to check the soldering points. Not the slightest motor sound. Maybe during disassembly I could have shorted something on the PCB although Im not aware of doing so. 