Put together your V-Flat: put one panel on top of the other. I purchased some vinyl surfaces on Amazon, made by KonPon. Thats kind of big. So theres my DIY reflector, four foot by four foot. So you can make this any size you want. The result will depend on your lighting and the effect you are after. Through The Slanted Lens, Jay P. shares his knowledge about photography and videography. Hence I'd take precautions for a Its going to move around.So these fill cards, a lot of people just throw it on a stand and shove it in there like this and think its done. If you don't have a light meter, then let your camera meter off a gray card using manual settings for everything for consistency. Martha's use of contrast and vibrant colors creates those wow factors. You can do whatever you want with these things. So 36 is going to be about right here for me. And I can give myself a light on her face, a paramount light. So Ive got this four foot by four foot piece left. A four by eight sheet like this by one inch is going to cost you about thirteen dollars. Lysle's photos normally include many complex elements. I believe after you see our set-ups, you might be encouraged to try still life photography with more confidence. Your email address will not be published. And on my Styrofoam its going to be right here at 24 inches. So its just not as efficient of a reflector. Foam core works fine, and is cheap. Find out what it offers and what we think so far. A reflector thatll sit on the counter. Let me share with you my secret for an inexpensive version of a surface you would normally purchase for $75-$100. The DIY setup is simple, but effective. The image above was created in my still life space. Thats what a fill card does on set. They are reversible but I was only interested in one side of each. One of the community's most creative photographers is Lysle Barmby. It's small, inexpensive and incredibly wide. Lori shares her set-up that she used to create these lovely images. It gets me closer to my subject and is a bit easier to adjust my camera angle if Im not fiddling with tripod legs.". Make some fill cards. So get it up where you want it to be.
by Now if I go to the silver side on this its probably way too much for anything because itsjust too small space in here. Her energy and creativity is off the charts. The whole time equipment stayed perfect, dry, and safe. All content, design, and layout are Copyright 19982022 Digital Photography Review All Rights Reserved. Information about their advantages and disadvantages can be found in the article Softbox vs Umbrella product photography.  So there you have it, theres my three DIY solutions for fill cards. It evens out and brightens the lighting making the products look more appealing. First off, how do you use a reflector outside? There it is, get a nice rim light. We load all these cases in and we load our personal bags and me and the guys, you know, weve traveled a lot. I used two of the sheets from Walmart (20x30 inches, I think) hinged on the long side with clear packing tape. What's the best camera for shooting landscapes?
You can use different sides for different photoshots. Every photo can benefit from some light bouncing it gives a nicer quality of light, eliminates harsh shadows, makes the pictures more flattering.
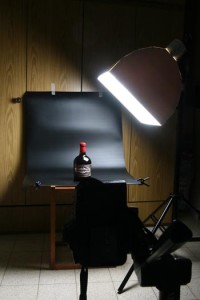
This trick applies to any genre of photography. However you meter it, in digital judge the fimal exposure from the camera histogram and review screen. Its lighting one side. You can order them online or find them in stores. Change it from more of a rim light from behind into more of a fill light from the front. Or as a fill card you can move it in the front to fill the face or more sideways to open up the face or more to the back to open up the hair for more of a rim light. Her settings were: ISO 1000, SS 1/320, f2.8. You see that split light on her face. Lori normally sets up in her bedroom in front of the window. Remember, where you place that fill card, it can be a key light and can be one of the five portrait lighting positions. Anytime you use a silver like this it can be whoa, way too much. A flat, in theater language, is a background that we can easily relocate. Shedding some light on the sources of noise, Canon EOS R7 sample gallery (DPReview TV), Autel EVO Nano+ review: a solid sub-250g drone that lacks the polish of competing models, DPReview TV: Laowa 12-24mm F5.6 C-Dreamer Review, Best cameras for landscape photography in 2021, Best video cameras for photographers in 2022, Portraits of a photographer (me) by another photographer. Large reflectors are like large soft boxes. I paid $12.50 each for them. I realized it had amazing natural light so I have claimed it as a dedicated still life studio of sorts. Go horizontal with it stay on the camera axis as it opens up the side of her face.
And its just going to be so bright on her face. Furthermore the light situation, depending on where the group is set up, might inhibit that enough light hits the reflector in a favourable angle. Just look at this beautiful photo that Martha created Martha explains: "In this setup, theres a window to the left of mycamera, but it was a cloudy day and the light was dreary at best. In this buying guide we've rounded-up several great cameras for shooting landscapes, and recommended the best. There are many assumptions and questions we have when we see a beautiful still life photoin the gallery createdby the talented photographers in our community. You need to keep the knife sharp, as foam core is known to dull blades pretty quickly. It looks absolutely beautiful. Its going to flake off and cause problems. So rather than 20 inches Im going to go probably to a 24 inch. Lets see some great images with the right amount of fill for your creative vision. Of course, you can buy premade V-flats and spare some time. Foam core board works just fine. So theres my first one. Fill cards are about changing the ratio of the face, the shadow side. Theres a friend, theres a mother, a brides groom, theres always somebody to hold the reflector. What we love about it is that it really helps to understand how light works. I like this kind of efficient soft light on her hair, on the side of her face. At the end your V-Flat should open like a book. After that, tape them together. Its a nice size to carry out with you. And especially the closer I get it to the camera its just going to flatten everything out. And so it balances the light in a very soft way.
The good news is that its possible to make them by yourself from cheap materials. Professional photo editing service for wedding & portrait photographers, Lighting for still life photography Make everything right, 13 Best Digital Cameras for Kids to Take on Vacation and More, Choosing the Best Mac for Photo Editing: Pros & Cons, 10 Best Laptops for Photo Editing: Tested Models of 2022, 9 Best Mice for Photo Editing: Buyers Guide, 10 Best Tablets for Photo Editing on The Go, 10 Best Computers for Photo Editing in Photoshop Without Lags. cheers, Peter So this is a one inch by four foot by eight foot piece of Styrofoam insulation that they use in walls, ceilings, all over in houses. However, using it for portrait photography may be problematic, due to the needed size of the board. V-Flats are giant foam core boards taped together. (I have four of them and will often use multiple lights at different angles.) This is not as efficient as the foam core because its a very soft material. Or a short reflector when Im outside reflecting a lot of peoples faces. But its especially useful when we deal with photography of food, jewelry, clothes, etc.The board evens out and brightens the lighting making all products look appealing. And look at the transition of the shadow on her nose. You know, bouncing the light back in. The same as the size of soft box. Also, keep an eye on the white balance unless you're planning to correct in post processing. Its lighting her under her chin. Hi, this is Jay P Morgan. Another thing you need to keep in mind is that foam core can breakdown and puncture with ease, so be careful. Now, you have a perfect foam board photography background. I take two of them and I tape them together just like this. And I wish that one side was white. Its a four foot by four foot reflector. I like these but I feel like theyre a little small. Whats the best camera for around $2000? Although a lot of people only upload images to Instagram from their smartphones, the app is much more than just a mobile photography platform. She uses rich tones and textures to tell her story. Then how to use them and the quality of light that they give. I mean, just downpours. Today on The Slanted Lens Im going to show you my three favorite DIY solutions for reflectors. Here are three images that Lori has created with the same set-up but photographed at different angles. Foam board photography background is an ultimate solution. When you are participating in a 365 photo project, there are some days that you will have to face a still life or flat lay prompt. The Nikon Z30 is the company's latest 'creator' focused mirrorless camera, a 21MP APS-C model made to be more vlogging friendly than ever.
In this article we will find out how to apply white foam board for photography, how to make foam board stand up and reveal some useful lighting techniques using white marble photography backdrop. So placing this fill card is super important. Its always been a go-to beautiful soft light. Theyre not a compromise in any way. And its also a little bit gray. In order to reflect the light, sheuses a white surface behind and on the right side. She adds so much exuberance to the Community! -Gene L. Why such a name? Mind, that the panels should be around an inch or even two inches (in case you want to improve the strength and durability of your V-Flat) in thickness. And with the rigidity of this material thats just easy to look at that reflector in the camera. Its a beautiful reflector and its just simply this, its is an insulation. If the panel is two-sided, its even more fun. The pop-up reflector, if you get one thats white and black on the other side, gives you a great bounce light on a persons face. Black foam core helps to make the outer edges of your subject more distinct. You can do whatever you want with these things because theyre a dollar. Use that same A-clamp. Its a hard surface. Thats a nice size reflector. 35 to 4 x 5 - NPS Member. Do some test with what you have, that's your cheapest road right now. Once youve done with taping on one side, flip the boards over. If you are interested in digging deeper and want to find some more lighting tricks, check out the article Lighting for still life photography Make everything right. Why and why not what are the main differences? But thats an inexpensive pop-up for like eight bucks. We dive deep to find out where it excels and what it's like to fly. Then Im going to go to 36. Her backdrop is a frame that she uses to drape fabric remnants or blankets. Now this is too much Styrofoam. Its a great way to utilize foam core. Using them the photographers can control light in their pictures. Regardless of what I would do, foamcore will work just fine. Thats why foam board photography background is a trick that always pays off. It doesnt have a hard surface. Put it on a stand.Bounce a little white light in there or a little bit of negative fill. All right, so now lets go to the large reflector. Required fields are marked *.  A smaller one won't be of help. Her still life photography is consistently inspiring. Canon's high end APS-C mirrorless camera has plenty of compelling features, but is it worth the price?
Use your imagination! Number one from the Dollar Store, $1.35. But now lets use fill cards as fill cards. A silver card in the back to give yourself a hair light. -- I have a reflector on the right to direct the light that bounces off my white table and to minimize shadows. Most people go like this. Or it has a beautiful bead foam on this side. Is this the gimbal to get? Bristol board bends, and is not as good. If you dont have a studio, foam board photography background is a perfect variant to make it look like you have one. Number three is my favorite. The more I come from behind itll give us a nice soft light. If you're looking for the perfect drone for yourself, or to gift someone special, we've gone through all of the options and selected our favorites. Janice Johnson, one of our community's still life superstars,shares her behind the scenes set up for us. Lysle shares a behind the scenes look at one of her typical set-ups. There are several do-it-yourself techniques you can master to save money and still have well-lit pictures.Here are 5 techniques to utilize foam boards to the fullest extent: In photography, everything boils down to light. Lets be honest, it feels incredibly limiting to realize that you cant afford all the gear you need to receive professional outcomes. Be careful as to make a right. You can put them on a stand. Get Updates, Latest Trends, Specials and other goodies. Its the wrong place. When using flags to obstruct the light from a particular light source, one of the most vital things to keep in mind is the space between the light source and the cutter. I can put it like this on the axis of the camera and start to open up the front. Another popular light and airy photographer in the community is Lori Rowland. Its going to give us more of a light on top of her hair. I have a few different surfaces that I typically use. Use it as a key light in the different five portrait lighting positions. Its a really open one to one ratio. After taking the shots, she edits in Lightroom, mainly tweaking things such as highlights, shadows, contrast, and blacks. Its a great way to utilize it. This pop-up, because its kind of silverish, it gives us a little bounce on her hair. That changes the ratio. If you feel like you have already known your way round how to make foam board stand up and you are eager to deepen your knowledge in photography lighting, another popular great lighting modifiers are umbrellas and softboxes. Its a light thats coming underneath. I can bounce my light into it and it just gives me a beautiful wrap around their face. And buying expensive gear can really bite into your profit. But a dollar piece of foam board. Detailed and well-lit photos will always attract clients! So the silver can come in really handy. Martha was the first to impress me with her use of artificial light that looks very natural. But the way you set it, its really important to understand that there are a lot of different ways to set it. http://www.silvermirage.com. -- If I put it like this all my efficiency is behind her. But this will give us a nice bounce on her face. They have three color temperatures with different levels of brightness and are my go-to source for all kinds of scenarios when natural light is not available, or just not right for the job. How many times did you have outdoor photo sessions in bad weather conditions, and get many pictures where the light damaged the composition and the mood of the photographs? Those techniques will serve you well, and can be used to produce breathtaking photos. The photo below is a beautiful example of the photographs that Janice creates. So in some ways thats why I love these great big four foot by four foot.
If you wanted to make it 36 by 20 you have a big piece here, a four foot by four foot piece. These are a great solution and this one was $7.50 from the automotive store. An easy, but effective way to get true colors, diffuse the light and soften the image. If you want to know how to make foam board stand up, you should know that it is generally recommended purchasing the 25X35 black and white sheets. She doesn't even own an on-camera flash! White foam board for photography or photography black foam core along with white board reflector can assist you in making your own transportable photography studio that will enable you to produce quality pictures on a regular basis. She uses natural light to her advantage. Its going to get all over you like it did me. (Flags are often referred to as cutters.) I mean, this is great. Its because Ive got this whole reflector up front here and its bouncing light back into the side of her face. Because its just so wiggly and wobbly. Arms are just really simple to throw that in on her face there. You can constantly find new and inventive ways to use V-Flat, as the versatility of V-Flats are endless. We suggest you taking the matter into your hands with the help of the foam board backdrops. Do the same on the other side. No big expense no fancy studio and just look at her gorgeous photos! However, V-Flats can be extremely expensive.
Some photographers love them and some hate them! Sometimes you may have one source of light. I think a 24 by 36 is a really nice size. But it gives you a beautiful soft light. As you can see, nothing fancy at all. It is a very small nook under the dormer window in my craft room. Garnett Very simple and taking up no extra room. Because you can get it in close. I use it a lot for single stem flower photography. I don't trust a reflected meter reading except when using a spot meter to read shadows and highlights for calculating exposure latitude (similar to the zone method). They give you a lot of wrap. Filed Under: Beginning Lighting Tutorials, Behind the Scenes, DIY, Equipment, Laws of Light, Lighting Tutorials, Photography & Video Lighting Articles, Photography Tutorial. She alsolikes to add a little bit of haze to soften the photo a bit. Those days are over! Its commonly used yet extremely underestimated for controlling light and shadows in photography.