We start by including the AccelStepper library. We appreciate it. More information about this library can be found on theArduino website. For our next experiment, we will be adding a second 28BYJ-48 stepper set to our Arduino to drive the two motors simultaneously. If we apply power sequentially from A to D the motor turns clockwise while if we apply power sequentially from D to A the motor turns anti-clockwise. The rotation of stepper motors is incremental, slow and precise, while DC motors have a fast, continuous motion. 5v stepper I built up the same setup like you with the ULN2003 board, and using the Stepper library.  In half step mode, one revolution takes 4096 steps, so 500 steps/sec results in roughly7 rpm. stepper
  According to the data sheet, when the 28BYJ-48 motor is operated in full step mode each step corresponds to a rotation of 11.25.
  Please note that step() is a blocking function. * This example code is in the public domain, * Tutorial page: https://arduinogetstarted.com/tutorials/arduino-controls-28byj-48-stepper-motor-using-uln2003-driver, // Pins entered in sequence IN1-IN3-IN2-IN4 for proper step sequence, // set target position: 64 steps <=> one revolution, // change direction once the motor reaches target position, Arduino - Button - Long Press Short Press, Arduino - Potentiometer Triggers Piezo Buzzer, Arduino - Potentiometer Triggers Servo Motor, Arduino - Servo Motor controlled by Potentiometer, Arduino - Ultrasonic Sensor - Piezo Buzzer, Arduino - Ultrasonic Sensor - Servo Motor, Arduino - Temperature Humidity Sensor - LCD, Arduino - Temperature Humidity Sensor - OLED Display, Arduino - Display Temperature from LM35 Sensor on OLED, Arduino - Display Temperature from LM35 Sensor on LCD, Arduino - Cooling System using DHT Sensor, Arduino - Cooling System using DS18B20 Temperature Sensor, Arduino - Button Controls Electromagnetic Lock, Arduino - Door Lock System using Password, Arduino - Controls 28BYJ-48 Stepper Motor using ULN2003 Driver, Arduino - Controls Stepper Motor using L298N Driver, Arduino - Log Data with Timestamp to SD Card, Arduino - Door Open - Send Email Notification, Arduino - Temperature - Send Email Notification, Example - 04.Single Blink Change Frequency, Example - 05.Multiple Blink Without Delay, LDR Darkness and Light Detector Sensor Electronic Circuit, Tutorial using serial LCD screen make Arduino speed curve recording, 28BYJ-48 stepper motor + ULN2003 Driver Module, please give us motivation to make more tutorials, About ULN2003 Stepper Motor Driver Module, How To Program to control a stepper motor, How to control a multiple 28BYJ-48 stepper motors. Select the latest version and then click Install. Would it be possible/advisable to connect another motor to the driver that controls the tilt? The jumper next to power connections on the driver board can be used to disconnect power to the stepper motor.
 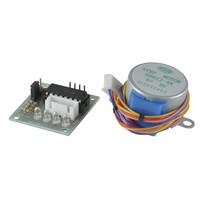 Hi Helen. Note that you also need to connect the GND of the Arduino to the pin on the ULN2003 driver board. VDD pin supplies power to the motor.
While this is not the case, we run the stepper motor at a constant speed as set bysetSpeed(). You could simply add another 28BYJ-48 stepper motor and ULN2003 driver or upgrade to a geared-down NEMA 17 stepper motor with an A4988 or DRV8825. Ivan. Next, we make use of the while loop. The first section of this sketch is the same as in example 1, but the setup and the loop are different. The following sketch can be used to run one or more stepper motors continuously at a constant speed. They provide a splendid effect when stepping. Copyright 2021 ArduinoGetStarted.com. In the rest of the loop, we do exactly the same, just with a different speed and target position. It requires a driver IC like ULN2003 to control the motor so this motor usually comes with a ULN2003 based driver board. Micro-step: divides each full step into many smaller steps. Can you explain or provide any information on how you set up the 5V power supply. The sequence of pulses determines the spinning direction of the motor. From blinds, car side mirror tilts and DVD players to security cameras and precise control machines, stepper motors are closer to us than we actually think. Try connecting a 9V battery, with the positive terminal to the Vin pin and the negative terminal to the GND pin of the Arduino. Some members of theArduino Forumsnoticed that this wasnt correct and so they took some motors apart to check the actual gear ratio. We will post on our Facebook Page when the tutorial is complete. In the setup, you can set the speed in rpm with the functionsetSpeed(rpm). Important Announcement: Helium Award Is Now Added to Seeeds IoT Into the Wild Contest for Sustainable Planet 2022 & Extended Deadline for Free Hardware Application! geared stepper It means it that it actually has 32 x 64 = 2048 steps. Connect it to the external power supply. First, I set the current position of the stepper motor to zero withstepper.setCurrentPosition(0). In the loop, we first set the speed that we want the motor to run at with the functionsetSpeed(). The motor consists of 4 coils that make a ring around the rotor. However, you should still take stepper motors into consideration for its several critical advantages. Although it is not super accurate or powerful, it is a great motor to use for smaller projects or if you just want to learn about stepper motors.
i know this is late so sorry. First of all, lets start with an introduction to the 28BYJ-48 stepper motor and the ULN2003 driver board! It also make motor move smoother at low speeds. Apart from this, the motor has 1/64 reduction gear set. This segment defines the pins connected to each coil. Also, because of this characteristic, if we control properly, the stepper motor can produce musical sounds as if it is a musical instrument. Now we create two motor objects, one for each motor. There is nothing to set in the setup function because the stepper library internally sets the four I/O pins as outputs. This project is based on the arduino UNO microprocessor. Now that we know everything about the motor, we can start connecting it to our Arduino! However, this time, we set the speed to 6 rounds per minute and move the shaft in the other direction by setting a negative number of steps. Finally, we set the new target position back to the 0, so that we return to the origin. 28byj 5v arduino step stepper module uln2003 Wished I could have started with this documentation. For this, we use the functionsetAcceleration(). So start with a few simple codes. Posted on Published: April 22, 2019- Last updated: March 2, 2022, Categories Arduino, Motor Controls, Tutorials, Home > Tutorials > 28BYJ-48 Stepper Motor with ULN2003 Driver and Arduino Tutorial, How to control a Stepper Motor with Arduino Motor Shield Rev3, Control a stepper motor with L298N motor driver and Arduino. This example uses theStepper.h library, which should come pre-installed with the Arduino IDE. Perhaps you may have heard of the servo motors, another motor similar to the stepper motor. And I'm following this since some times. Now as we are going to drive one motor at full steps and the other at half steps, we will define two constants. In this case we will be driving a 4 wire stepper motor inhalf step mode, so we set the interface type to 8. Note that it is possible to power the stepper motor directly from the Arduino. For more details, please refer below datasheet. If you have to power anything more than 5V and 80mA, the ULN2003 driver board should be used. Ultimately I'd like to plug in one cable and power both the board and the motor, but I'll first start with just the power supply's wiring. This is Unipolar Stepper library in Arduino that gives different functionalities and rotates all unipolar type stepper motors. ???? The stepper library takes care of the stepping sequence and makes it easy to control a wide variety of stepper motors, both unipolar and bipolar. The pinout of the ULN2003 stepper driver board is as follows: IN1 IN4 pins are used to drive the motor. So, for our next experiment we will be using an advanced stepper motor library called AccelStepper library. IN1 pin: is used to drive the motor. The Library Manager will open and update the list of installed libraries. So everywhere you mentionmotorPin1, the compiler will replace it with the value 8 when the program is compiled. After some more practice to build up your confidence, be sure to try out more complex codes so that you can get the motor to do more things. This project used 28byj-48 stepper motor and UNL-2003 stepper motor driver. // Defines the number of steps per rotation, // Pins entered in sequence IN1-IN3-IN2-IN4 for proper step sequence, // Nothing to do (Stepper Library sets pins as outputs). We just need to plug it to the connector of ULN2003 motor driver. Hence, we have summarised a guide on how to interface a 28BYJ-48 stepper motor with an Arduino, using a ULN2003 driver board. stepper jaycar You can share the link of this tutorial anywhere.
Once the motor makes one revolution, it changes the direction of spinning. The following illustration shows the wiring. They determined that the exact gear ratio is in fact63.68395:1, which results in approximately4076steps per full revolution (in half step mode). For the first line of the loop, we set the speed of one revolution to one per minute. Here is a sketch that drives one motor at full steps and the other at half steps with some acceleration and deceleration. This depends on the set speed and the time since the last step. Stepper motors are more suitable for applications with lower speeds of less than 2000 rpm (revolutions per minute), and servos are best suited for applications with high speeds greater than 2000 rpm. This segment initializes each pin as output pin. In the setup function we first set the maximum speed of the motor to 1000 which is about as fast as these motors can go. (No acceleration or deceleration is used). The 28BYJ-48 isone of the cheapest stepper motors you can find. The bigger dividend is, the higher resolution and the smoother motion is. Note that the motor consumes power even in stand still state to maintain its position. The board has four LEDs that show activity on the four control input lines (to indicate stepping state). This project is an easy introduction to stepper motors and aims to introduce null-level beginners to stepper motors and their respective drivers. You can create multiple stepper motor objects with different names and pins. Motor Connector: this is where the motor plugs into. In the setup, besides the maximum speed, we also need to define the acceleration/deceleration. When you are done you should have something that looks similar to the illustration shown below. Filter your search by typing accelstepper. Now that you have gotten a gist of how to operate the 28BYJ-48 stepper motor with the ULN2003 driver board and Arduino, have a browse at the Seeed Bazaar here, where you can find quality stepper motors, driver boards, and Arduino microcontrollers for your next project. (view enlarged, it will help a lot!). You can install the library by going toSketch > Include Library > Add .ZIP Libraryin the Arduino IDE. If you want to change the direction of the motor, you can set a negative speed:stepper.setSpeed(-400);turns the motor the other way. To obtain the final number of steps, the gear ratio must be multiplied by the number of steps per revolution, 32. Themaximum speedfor a 28byj-48 stepper motor is roughly 10-15 rpm at 5 V. In the loop section of code, we simply call thestep(steps)function which turns the motor a specific number of steps at a speed determined by thesetSpeed(rpm)function. To power th 28BYJ-48 stepper motor through the ULN2003 driver board, can I use a battery source? If more power is needed, simply connect your driver board to an external voltage supply rather than using the Arduinos onboard power supply. We define the number of steps that will be made for one revolution. ArduinoGetStarted.com is a participant in the Amazon Services LLC Associates Program, an affiliate advertising program designed to provide a means for sites to earn advertising fees by advertising and linking to Amazon.com, Amazon.it, Amazon.fr, Amazon.co.uk, Amazon.ca, Amazon.de, Amazon.es and Amazon.co.jp. This segment will turn the motor one full turn (clockwise). One end of the coil and a center tap together form a Phase. Start by connecting the power supply to the ULN2003 driver. Stepper motors are great motors for position control. AccelStepper liftmotor = AccelStepper(MotorInterfaceType, motorPin1, motorPin3, motorPin2, motorPin4);. The AccelStepper library written by Mike McCauley is an awesome library to use for your project. The sketch starts by including the Stepper.h Arduino library. arduino 1pcs 5v uln2003 stepper 28byj module driver motor test dc Using this sequence repeatedly we generate movement which can be monitored to incredible levels of accuracy without PWM outputs. It MUST connect to both. Stepper motors can be easily controlled with microprocessors like the Arduino. The best part about this motor is that it can be precisely positioned one step at a time. The ULN2003 consists of an array of seven Darlington transistor pairs, each pair capable of driving a load of up to 500mA and 50V. In this case, the stepper motor turns 1 revolution clockwise with 500 steps/sec, then turns 1 revolution counterclockwise at 1000 steps/sec, and lastly turns 2 revolutions clockwise at 1000 steps/sec. Fortunately, there are many libraries did it for us. The GIF below illustrates how the rotation works. The stepper motor does have its disadvantages as compared to the aforementioned two. The 28BYJ-48 typically consumes around 240mA. I am very inexperienced with electronics, I been looking this project and the one part that is missing is how to power the project. We then set the regular speed to 200 and set the number of steps to 2038 (since the 28BYJ-48 with its gearing takes 2038 steps per revolution). This method allows the motor move with higher resolution. One of the advantages is that it supports acceleration and deceleration, but it has a lot of other nice functions too.