After the image has appeared, use the print tongs to pick up the print.  For more articles on 35mmc about the subject matter discussed here, please click one of the following tag links: Contribute to 35mmc for an Ad-Free Experience.

In this age of digital photography where literally everything is automated, analog and alternative processes are making a strong come back. This will be required for both loading the photographic paper into the camera as well as developing the exposed image.
So youve spent a day shooting and your dark bag is full of world class exposed sheets, what next?
Have a happy & healthy holiday season!Dan, HiIf you look up Joe van cleef on youtube theres a lot of goodies for you! After 3 minutes you can turn on the white light (making sure before that you have packed away the photo paper!
The ones here on this link were all shot in the same studio with daylight, nearly all at 8 second exposures, but moving the subject to get different lighting results. My main camera, the Rolleicord, is ideal as it has a cable release jack for longer exposures as well as a self timer for when I do my many self portraits. Hello Michael youre right, digital is a bit like cheating aint it lol. The photo of the water pumping house with the corrugated siding is particularly beautiful.
Makes loading film holders much easier.
The chemicals and paper are available from the internet and possibly some good photographic shops, but check before you go. After a few minutes in the fix, it goes into a wash of clean water to remove excess chemicals before hanging up to dry. camera paper pinhole creative designs cool functional fold 35mm ruler glue needed pencil hole ex bottle Strange coincidence, I was experimenting with the exact same process a few weeks ago with my Ikoflex TLR. For this reason I wouldnt recommend beginning photography students start learning on paper. Switch off the white light and switch on the red. should you use a reflector or move the subject into the shade? Stan Horaczek is the senior gear editor of PopPhoto. Just about the easiest thing to do with handmade emulsions. Then they exposed the single weight paper by arc or mercury vapor THROUGH the single weight paper. It is also good to have a 'dry' area away from the chemicals where you can put the camera and the photographic paper. A red 'safelight' although a rear red bike light will do. Using photographic paper in a pinhole camera ideally requires a darkroom. Barry hasnt detailed those laborious specifics of his process, but in the video above you can watch some of the steps he takes to make them happen.
He has also shared a few images of his setup: Barry has moved to a previously-empty building just off the high street in Exeter where he lives as seen in the images above, but the project started attached to a shed in his backyard: You peruse a full gallery of images that include finished pictures as well as multiple images that give a behind-the-scenes perspective of how the photos came together on Barrys website. Avoid contact with eyes. This is fairly well discussed on the large format site if more input is desired. Videos about turning regular photo paper into positives! The first is the developer, which reacts with the silver halide crystals and causes them to turn into metallic silver. Do test exposures and process to obtain a positive image. Ideally many photographers choose larger formats such as 45, 57 or 810 as these provide superior resolution when scanning or contact printing. Dry hands. Because the film isnt sensitive to every color of light, it renders skin differently than you might expect. Its important to understand that your images will rarely come out of the scanner perfectly tuned, you will need to adjust the contrast, highlights and shadows as with any black and white image and this is the best way to learn how to tweak your shooting methods for better final prints. The emulsion doesn't have to be washed and coating on paper is much easier than on glass or film. I began experimenting with pinhole of 45 but only done it a few times and would actually rather use the large format for positive print paper. This complicated chemical process is a far cry from smartphone photography. I think John meant 2 - 4, rather than 24. Take the lid off the camera and twist the photographic paper out of the can. Hello thank you how are you?  But, it wasnt always this way. Innit Fab!!!!! cheers, Very nice article really like the dock/wharf shot. Now, with a fast normal and in good light at f2 you will be able to expose handheld at 1/30 to 1/125, depending on paper sensitivity. You must log in or register to reply here. A sign in big scary letters saying KEEP OUT! Card or 'rubble sacks' are cheap blackout materials. I have two and both cost me less than $150 each on Craigslist.
He oversees a team of gear-obsessed writers and editors dedicated to finding and featuring the best and most useful photography equipment, from cameras and lenses to bags and accessories. 
We are a participant in the Amazon Services LLC Associates Program, an affiliate advertising program designed to provide a means for us to earn fees by linking to Amazon.com and affiliated sites. Of course the tonality is Orthochromatic, so can be similar to the look of Collodion. Do you just use something like Ilford or Fuji photo paper that you can get from B&H? (It may be worth waiting for a few seconds for your eyes become accustomed to the dark). Its a concentrated developer and I dilute it 1/50 in room temperature water but you can dilute it more or less, higher concentrations simply develop faster. Then, the paper goes into a thiosulfate solution called fix, which clears away any undeveloped silver halide crystals that are hanging around the paper. 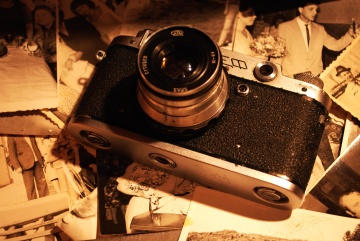 Troubleshooting and adjusting your exposure. Interesting, and nice pictures. Same paper as well. Wow!
Using paper as negatives is a lot of fun and takes practice. Looking for another light sensitive material to try in camera I stumbled on others experimenting with darkroom paper. Sign up for Popular Photography's newsletter and join the club. (Paper has very small exposure latitude compared to film, so you have to be more accurate with the exposure) The best weather conditions are when it is bright but overcast.  (You can tell when this happens as the stop bath impressively turns from yellow to blue!). Sorry to hear of Aloys passing, Condolences to his freinds and family.https://www.facebook.com/groups/68142897748/user/1558614081, Nice photographs. So why doesnt everyone shoot paper in camera instead of film?
Why shoot film at all? Kodak made dozens of products thin light weight paper for graphic arts, book making etc. After pouring the used chemical into (larger) bottles for re-use, label them and put them in a cupboard away from all those people who might be tempted to drink horrid smelling liquid that looks like wee. And don't discount 35mm SLR's usefulness to shoot paper negs. Here is the section dedicated to paper negatives. From start to finish, the whole process, including loading the film, probably takes roughly six or seven minutes per picture. Sure, its a lot more work than a selfie, but thats the point. A safe light: A red bulb to illuminate the room where youll do your developing. Most importantly your camera needs to have the ability to cock and fire the shutter when there is no film in it as some cameras wont allow you to wind and cock the shutter if it doesnt detect film in the chamber. camera paper cool creative designs cameras polaroid origami camera instructions unfold paper appreciate you checking it out. Will the Real Landscape Photography Please Stand Up? Always try and use the print tongs for moving prints from one chemical to the next. I took to shooting through the night, partly for health and safety reasons (open trays of toxic chemicals and curious toddlers dont mix well!)  It is meant to be used in a darkroom by having an image from a film negative projected onto it through an enlarger which forms a positive image on the paper.
Coral Gables City Hall, with yellow filter- Rolleicord. From left to right you will have: Developer - Stop bath - Fixer. 2) Stop bath is basically an acidic solution you dilute in water that stops the developing process, you can buy it but I use a homemade solution of 5% vinegar diluted in water. Unbelievable quality from such small piece of paper! I appreciate that green filter advice, I have a green square filter that I can hold in front of the lens as a test. Now find a dark room or closet to bring all your supplies in and turn on the red light. It makes ULF photography especially inexpensive. paper pinhole camera lomography sharan diy cameras Untape to expose and tape up again.
Analog Workflow Forums (100% Analog/Traditional). As you can see with some of the examples, there is a lot of variability, even if the setup doesnt change much.
This light gave direction and texture to the shadows to keep it from looking like a mugshot. Made in the shade, Rolleicord 1/15sec f5.6 no filter, Moonlight in the garden of Eden Rolleicord, 3 minute exposure. A dark bag is highly recommended so you can work in the field and not have to return to your darkroom after each shot to swap sheets. Aloy,Thank you for the kind comment! Lenses prior to panchromatic film are designed to focus mainly blue light at the focal plane. Place the three trays down in a row on a flat surface. My cameras have multi exposure switches that makes this possible. Anyhow, a couple hours of fun and something learned. The second light was a light in a modifier called a beauty dish, which slightly diffuses the light by bouncing it off of a metal plate in the center of the reflector, then funneling it out to the edges of the dish.
The images that he has made thus far are produced using a complex color reversal process that Barry has developed (no pun intended) over the last year.
That ten pack was $9.00 USD. nostalgia camera history retro analogue zoom eyeglasses pencil desk paper pixnio In this short 3-minute video, you can watch how he does it. This will wash the chemicals off the print. Take a look , a lot of nice diy photo stuff!// Johan, Hello how are you? I learned also its best to let the paper develop fully instead of taking it out too soon as the shadows get better definition. I have to develop the paper myself??
I then made little contact prints which have surprisingly good tonality. My Youtube ChannelMy Flickr Photo AlbumMy InstagramMy Ilford Magazine Infrared Film Tutorial. yes I never get tired of seeing the development process. If there are windows they must be completely blacked out, a smart thing to do is wait till night to do your paper cutting in case light seeps in from outside. pinhole camera cameras build diy paper janne osaka cardboard evolution simple 1500 film janneinosaka beginner class format note panoramic capacity
I am getting a home developing kit soon and am wondering if the monobath for B&W will work for this process? Use a ruler and a pen to draw out a grid on the paper the exact dimensions you need for your particular camera, cut one section first and place in the camera bay to make sure its the right fit before cutting the rest of the sections. You can neurotically control the temperature and the agitation if you want to develop for specific times.
For a better experience, please enable JavaScript in your browser before proceeding. camera paper pinhole carton camaras cameras camara cut papercraft con que para fotos 3d un template cardboard cz obsession descargables Just poked a tiny hole and covered it w/masking tape.
Re-loading the camera.
Its also just as much about the process as it is the final product. Sure! JavaScript is disabled. bellows When copying paper negatives in this way, ensure you avoid light reflections off the photographic paper. The light would pass through the SW paper bounce off the white on the original and result in a reversed paper negative of the original. yeah i know .. or making home brew emulsion >> dang paper negatives! (I almost wrote the words 'best practice' then, aaaaah!) Trays and chemicals: A small set of developing trays and a full collection of chemicals (there are three total) should only cost you about $30 total. They would somehow use this to make a plate, I can't remember if they shot a Kodalith of this or not, I was amazed that they didn't just get a black piece of paper. you sound like youve experienced alot and appreciate photography without the snobbery lol.
You are using an out of date browser.
All our Contributors have an ad-free experience for life.Sign uphere. If it is too light you need to give more.
but also because it is so peaceful & quiet then.. paper camera pentax mx creative designs cool pinhole craft printable corbis cameras build own papercraft This leads to the first advantage of shooting paper in camera, the price. They present a timeless look.When I first began teaching graphic arts & photography in 1977, we used the round Quaker Oats paper containers (they had a paper lid, not plastic back then) or shoe boxes. (To prevent nosy people coming in and fogging the photographic paper). camera paper pinhole designs film cool cameras creative 35mm hole diy papercraft pdf bouwplaat camara template printable craft It can take up to 8 hours to create a successful exposure.
Take a photograph of your negative print and Email the positive photo to your computer. These experiences shooting paper will not only be a lot of fun but will make you a more effective photographer and editor of film and digital.if(typeof ez_ad_units!='undefined'){ez_ad_units.push([[300,250],'35mmc_com-large-leaderboard-2','ezslot_16',184,'0','0'])};if(typeof __ez_fad_position!='undefined'){__ez_fad_position('div-gpt-ad-35mmc_com-large-leaderboard-2-0')}; Standing my ground, Rolleicord, 1/60 f5.6 yellow filter, Evergreen memorial Park cemetery Miami , Rolleicord. camera paper pattern quilt patterns piecing cards painting whims fields pieced whimsandfancies isle fair star fancies What would be the down side to exposing directly to paper as opposed to exposing on a film negative and then printing to paper? Stan Horaczek Hello thank you, Ive shot that dock many times on different kinds of film and cyanotype, Im always trying to find the best time of day with clouds and shadows. 4) Finally once your images are dry the last thing to do is scan them, I use an Epson V600 scanner but you can also use a camera to take a photo of your negatives and import them into your editor to invert as a positive. Ironically this is what I liked about it from the start finally the challenge I was looking for. The technical side, how to properly use darkroom paper in camera. In some threads that I have seen recently there was a suggestion to use paper rather than film in the camera. Also when metering its especially important to consider which part of the scene you will prioritize, I usually meter for the main subject such as the average lighting on a persons face, or if its a landscape I will point the meter slightly toward the ground and this works well. I thought I had better put one of these in to stop you from suing the pants off: my wife, my son, my daughter and me! In fact, some photographic techniques still require patience, skill, some knowledge of chemistry, and a big box of rubber gloves. Theyd be nice on whatever medium paper or film or digital. Thank you and yes Ive thought of it but my 45 camera only has an enlarging lens with no shutter so I want to get a proper timed shutter before trying positive prints in it.
i did a large portrait project with a friend a few years ago, and after lots of testing, settled on a rating of 3 ISO but developed in PQ developer at 1+40 or 1+50 for about 3 minutes to produce a softer neg. Get your mobile phone out and set the camera on 'negative' setting. There also is reversal paper, specially made for in-camera use. camera pinhole paper diy cameras designs cool creative film thecoolist yourself sharan construction Its a far cry from shooting with a digital camera. Another thing to keep in mind is that modern lenses are corrected to focus RGB in the focus plane as closely as possible. How you develop is your own choice. Hello Daniel I really appreciate your comment, would really like to sit and chat with you at a cafe. Its not as sharp as film but you dont notice unless you pixel peep. Fixer is a weak acid, which can stain your clothes if you decide to splash it all over yourself, (unnecessary in all but the most extreme 'performance art' approaches of pinhole photography).
It may not display this or other websites correctly.
For a developer I use Rodinal, its the oldest developer and is actually made for film but it works perfectly well with paper. Who needs pixels!  The old Kodak databooks on copying describe it. I have never used the monobath kit so I cant say but I belong to a facebook group called Experimenting With Photographic Paper As Film so maybe ask that question there. (Trickier than it seems this one!). We took one or two shots of each person and then headed for the developer. If the photograph comes out too dark, it needs less exposure time; if too light it needs more. I also have not learned darkroom printing as yet so Im not ready to do contact prints , These are awesome! Youll also notice some chemical patterns on some of the photos, which is the result of too muchor sometimes too littleagitation of the liquid while the picture was in the tray. By Christof Bircher, https://www.facebook.com/groups/68142897748/user/1558614081, NEWS: Film Furbish Launches Range of Refurbished Rollei 35 Cameras - Also Available on the 35mmc Shop, Stand Development - My First Steps into Analogue Part 7 By Andrea Bevacqua, Camera, Lens, Film and Peripheral Kit Reviews.
As well as avoiding contact with chemicals, having dry hands will also avoid getting fingerprints on your photographs. This is what forms the dark areas on the paper that make up the actual image. Good post and pictures.
camera paper pentax mx designs cool creative models | Card or 'rubble sacks' are cheap blackout materials. almost any, but some are better suited, for example you can use a 35mm but I recommend larger formats as the paper negative is not as sharp as film and the small negative will limit the detail.  Follow your fixers instructions but my fixer is dilution 1/4. My Rolleicord takes 6x6cm images but you dont want to cut your paper the exact size because it will fall into the film chamber, for that reason I cut my paper 6.56.5cm making it slightly larger and giving it a ledge to rest in the camera bay as shown in the photo below, this also gives the images a nice border.if(typeof ez_ad_units!='undefined'){ez_ad_units.push([[580,400],'35mmc_com-medrectangle-3','ezslot_2',180,'0','0'])};if(typeof __ez_fad_position!='undefined'){__ez_fad_position('div-gpt-ad-35mmc_com-medrectangle-3-0')}; You will need a pure red bulb or light, I use an RGB LED light which I set to its red setting.
35mmc is a blog authored, edited and published by Hamish Gill featuring daily articles submitted by readers. 5 x 7 photographic paper (DO NOT OPEN unless in red light). Sounds perfect doesnt it?
 A wonderful posting and just great photos! I learned fast that paper doesnt behave the same as film and its far less forgiving. Really bright.
But, thats the beauty of old school photographyimperfection is what makes it great.
 Carfeful though, paper negatives are a lot of fun, and in the end it can turn into a deep rabbit hole .. with the paper negativist making their own cameras and lenses, or spooling their own 122 rolls, or making emulsion, reflective enlargers. 35mm perforated paper prints have been around since 1894 Paper negs can give great results and is a very economical way to use large format.
  I shot and developed these photos of the Popular Science staff in the Popular Science office.
  If youre starting from scratch, this kind of shoot requires a pretty substantial investment in terms of gear.
  The Lumigraphe Lets You Shoot Smartphone Camera Obscura Shots On the Go. Weirdest Thing I Learned This Week podcast. Yes you can! Tsk, tsk, where will it end?). using a concentrated developer is always best in my opinion because a 15 dollar bottle lasts many months and the fixer lasts almost as long. Everglades water control station, Rolleicord. Hello thank you I agree. But more than anything, its really fun. two light setup with yellow filter. Keep the chemical moving over the surface by gently rocking the dish every few seconds.
Place on inner rails and use a bit of easy release masking tape to secure edge.
Its enough to leave big, pink, residual blobs in your vision after you have your picture taken. Removing the photographic paper from the camera and developing the image. paper camera craft cameras crafts camara diy cardboard printables  What are some tips and tricks Ive found to help get better results? It is also good to have a 'dry' area away from the chemicals where you can put the camera and the photographic paper. it is the final frontier lol. The chemicals are fairly inert although its best to avoid swimming in the stuff. camera diy paper macgyver I hope you post more work! In our digital age it's getting trickier to find on the high street but all the materials are easily available on the web.
I Had 164 Rolls of Film Processed at Once: Here's How I Do It, Shooting Portraits with a Giant $10 Room Camera, William Henry Fox Talbot: Inventor of the Negative-Positive Photo Process, GFP-GAN is a New Free AI Tool That Can Fix Most Old Photos Instantly, Photographer Follows Pregnant Homeless Woman in LA Over 4 Years, Photographer Creates DIY Telescope to Snap Incredible Photos of the Moon, Naomi Osaka Saving Butterfly Wins World Sports Photography Awards, Astrophotographer Captures 107-Hour Exposure of the Eye of God.
Im heading over to your instagram page right now! They were loaded with a sheet of enlarging paper, and the aperture was made with a sewing needle & a piece of aluminum foil.
document.getElementById("ak_js_1").setAttribute("value",(new Date()).getTime()); This site uses Akismet to reduce spam. I remember watching guys in a print shop making "reflex copies" made a sandwich starting with single weight paper emulsion up, item you wanted to copy face down on the emulsion of the single weight paper, then a piece of black paper on top of the original to be copied. camera paper designs cool pinhole rubikon creative film creation toy Place your sheet of paper in a container of developing solution, I use about 80ml in a small container, slowly agitate the container in a circular motion and you will see your image start to form like magic, it usually takes less than 60 seconds for the image to fully form and stop getting darker but follow your developers directions. How would you know what the ASA sensitivity is? Like, staring at the sun bright. Notify me of follow-up comments by email. There are two ways to experience 35mmc without the adverts: Paid Subscription - 2.99 per month and youll never see an advert again! Not a pricey vast space full of fancy enlargers, but a room you can black out with room for a table and a couple of people to watch the images appear.A darkroom will enable you to process the results soon after taking the photo (then re take it when it messes up!  For more information about my work and and ongoing experiments feel free to visit my other social media links below. Because the paper absorbs light so slowly, all the lights were fired at full power. Rock the dish for 30 seconds, keeping fresh chemical covering the print. Id urge people to visit your media sitesthey will be treated to a great visual buffet!Coffee?