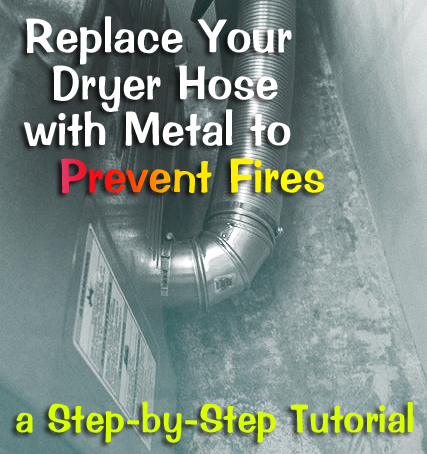
 dryer exhaust ducts workability Learn more about ventless dryers and whether theyre right for you. Concealed ducting must be rigid metal (galvanized or aluminum) duct. MSRP is the Manufacturer's Suggested Retail Price, which may differ from actual selling prices in your area. Small orifice metal screening should not be part of the hood or roof jack as this will catch lint and block the opening in a very short time.The hood opening should point down and exhibit 12 inches of clearance between the bottom of the hood and the ground or other obstruction. All Rights Reserved. Tapping on the dryer duct while you do this will help knock off lint thats stuck to the sides and joints. Item added to the compare list, you can find it at the end of this page. Place the vent cap over the hole so that its top rests on the high point of the siding. It states that for each 90 degree turn, you must subtract 5 feet. If cutting through stucco or brick, use a hammer drill and a 1/4-inch masonry bit to create both the pilot hole and to cut out the vent hole. Include your email address to get a message when this question is answered. Be sure to adjust your dryer so that the venting is as straight and sturdy as possible. All horizontal runs should pitch 1/4-inch per foot to the outside. A dryer vent system is designed to remove heat, moisture and lint from your dryer and if you Improper venting can cause a dryer fire and could lead to carbon monoxide poisoning. By signing up you are agreeing to receive emails according to our privacy policy. dryer hose rigid installing replace vent fire semi duct prevent plastic flexible hazard foil prettyhandygirl pretty hoses fires tutorial ductwork
While supplies last. Attach the other end of the straight run to the dryer, shifting the elbow or elbows as necessary to complete the connection.
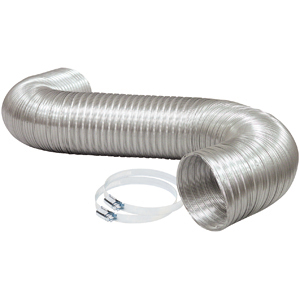
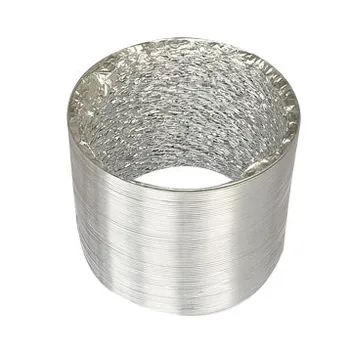
This will minimize lint build-up within the pipe. To install a flexible dryer vent hose, start by measuring the distance between your dryers exhaust port and the outdoor vent hood. dryer rigidity exhaust ducts foil Sign in to unlock deals on major appliancesSee DetailsShop Sales. dryer hose vent vinyl foil rigid metal proof fire semi hoses should why use duct Be sure to clean out the connective ducting as well as the opening to the dryer exhaust outlet and vent hood duct on the wall. Here are some of the stats we observe from the International Residential Code book: PVC Ducting should nor be used for dryer vent exhaust. Be sure to measure the exact path the venting will take, accounting for twists and turns. Foil tape is the only kind of tape meant to withstand the heat dryer venting emits during a cycle, so dont settle for alternatives like duct tape. c 7.4 cu. After purchasing a new home or a new vented dryer, you may be wondering how to install a dryer vent.
Do not use rivets or screws in the joints or anywhere else in the duct as these will encourage lint collection. Follow this step-by-step guide from Whirlpool to learn how to clean a dryer, from the lint trap to the duct.
 Learn all about the differences between gas and electric dryers, including hookups required, efficiency considerations, operating costs and more.
  affordable, high quality service from The Dryer Vent Guy . If youre using a vent clamp to secure venting, place the vent clamp loosely on the edge of the vent hose and slide the edge of the vent hose over the wall outlet. If you used vent clamps to secure the dryer vent, you may need a screwdriver to help you disconnect. Use a vacuum hose annually to remove lint from inside the duct. Find the right dryer vent for your home with proper installation to get the ventilation your dryer needs. If youre using a tube clamp, loosen up the clamp by unscrewing it. This way any moisture that might get behind the hood can escape. The rule-of-thumb for route length should be reduced for each turn in the path. Duct pipe usually comes in 5-foot lengths. We recommend our users to update the browser. Connecting a dryer vent is a relatively simple process, while laying all new ductwork may require the help of a professional.
 Learn more A dryer vent is an essential part of your home dryer that helps funnel moist exhaust air out of your house, keeping it from combining with hazardous gases. to your account to save and access your shopping cart on your desktop, tablet, or mobile device.
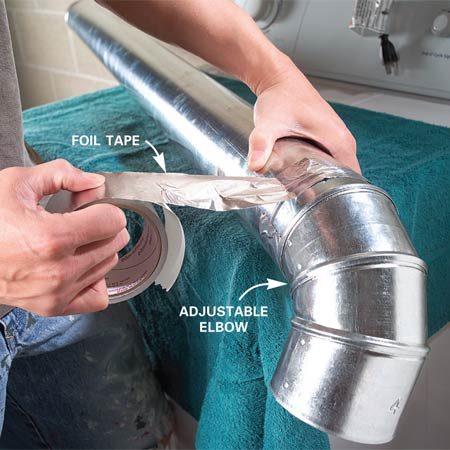
 For tips on installing a rigid vent hose or a new vent hood, read on! Set the vent a minimum of 12 inches above the outside ground. However, each option comes with its own advantages and disadvantages. Safety Tip: If venting a gas dryer, check with local building codes or manufacturers instructions. Youre currently browsing the US version of Whirlpool's site. Slide the last elbow onto the straight section coming up the wall. Youll need a masonry bit with a hammer drill for your pilot hole. To help hold joint pieces together, wrap foil tape around their connecting seam. All tip submissions are carefully reviewed before being published. If you add the length it will take to reach the outside of the home you can see that it doesn't take long to reach this maximum recommended length. : / 2022 Whirlpool. Our team of qualified professionals are ready to help you remove a serious threat to your home and happiness! flexible This article was co-authored by wikiHow Staff. Major appliances limited to washers, dryers, refrigerators, ranges, cooktops, wall ovens, microwaves, dishwashers, hoods, freezers, beverage & wine centers, ice makers and compactors. Avoid using anything that would protrude into the venting, such as screws, to secure the hose as lint can snag on screws and build up over time. Still stuck? Need Help? Flexible transition hose between the dryer and the wall outlet should be either the foil type or the aluminum flexible duct (most preferred). This site only ships to the United States. 2000-2022 Home Depot. Then, attach the hose to your dryers exhaust port and vent hood, securing the ends with foil tape or hose clamps. Never use flexible vinyl ductwork to vent a clothes dryer as these pose a serious fire hazard. There is a static charge that is created in platic pipe which causes the lint to cling Dryers are the number 1 source of fire in the home! The most obvious deterent to this is to have your dryer vent system properly installed. Whirlpool will be using the following information we gathered from the external platform you selected to create your account. There are two good ways to install dryer vents through vinyl siding. When screens are installed, they can easily Both are available from vinyl siding dealers. Dryer venting shall be independent of any other systems (chimneys or exhaust vents). Once the hole saws pilot bit pops through the exterior, go outside to complete the hole using the pilot hole as a guide. Go outside to check that the louver or flap on the vent hood is operating. Our trained team of editors and researchers validate articles for accuracy and comprehensiveness. % of people told us that this article helped them. Be sure to follow the recommendations in the owners manual while choosing. The second method is to remove a section of siding and install a special vinyl mounting block (not shown) against the sheathing. Many dryer ducts are configured so that they make a 90 degree turn when the duct comes out of the dryer. At least once a year, snake a vacuum hose into the dryer duct to clean it. Home House & Components Systems Heating & Cooling System Ducts. Last Updated: September 15, 2021 Mark this measurement on your vent hose and, using snippers, cut through the marked area. As a regular part of dryer maintenance; the dryer duct itself needs to be cleaned . foil dryer aluminum duct flexible vent clothes larger If your dryer is in the basement and the basement is underground, run duct up the exterior wall and out the rim joist. Snap a picture of an item and we'll show you similar products. Make sure your vent hose is short, supported and has very little slack once its fully installed behind the dryer. Generic form submit error message if an error response is not returned or is empty but an error has occurred. Subscribe to Receive If your space is already equipped with venting hookups, read on for a step-by-step guide on how to install a dryer vent. Check the vent hood frequently and brush out any visible buildup. Duct joints shall be installed so that the male end of the duct points in the direction of the airflow. Do not use the plastic or vinyl. dryer safety vent tips foil metal vents periodically sure outside check Improper installations on dryer ducts are rampant. Buy enough straight duct and fittings to complete the job, including an outdoor cap. Would you like to go to the Whirlpool Canada site instead? A ventless dryer offers flexible installation and space-saving options. Dry Clothes Faster with a Dryer Duct Booster, New Kitchen Venting: How to Install a Kitchen Fan Vent, How to Use an In-Line Exhaust Fan to Vent Two Bathrooms, Better Insulation Will Prevent Water Stains Around Bath Fans, How to Stop a Freeze-Proof Faucet From Leaking, Stain Removal on Clothes Stained by Washer, Clothes Washer: Keep Your Washing Machine from Flooding the Laundry Room, How to Clean a Washing Machine Inlet Screen, We are no longer supporting IE (Internet Explorer). aluminum duct everbilt The first is to install a vinyl surface mounting block (shown here) that fits over the existing siding. Slide the first fitting onto the dryer and push the dryer against the wall. The cost of repairing or replacing a dryer vent system may be a fraction of the cost of a new dryer. Homeowners have been known to replace their dryer because they think it isn't drying properly, when Any plastic or aluminum foil dryer ducts should be considered a potential fire hazard, and should be replaced with rigid You may have two elbows back-to-back to get the run to line up the path from the dryer. duct deflecto dryer secadora foil flexible box We are no longer supporting IE (Internet Explorer) as we strive to provide site experiences for browsers that support new web standards and security practices. {"smallUrl":"https:\/\/www.wikihow.com\/images\/thumb\/5\/58\/Install-a-Dryer-Vent-Hose-Step-1.jpg\/v4-460px-Install-a-Dryer-Vent-Hose-Step-1.jpg","bigUrl":"\/images\/thumb\/5\/58\/Install-a-Dryer-Vent-Hose-Step-1.jpg\/aid9610267-v4-728px-Install-a-Dryer-Vent-Hose-Step-1.jpg","smallWidth":460,"smallHeight":345,"bigWidth":728,"bigHeight":546,"licensing":"
License: Creative Commons<\/a> License: Creative Commons<\/a> License: Creative Commons<\/a> License: Creative Commons<\/a> License: Creative Commons<\/a> License: Creative Commons<\/a> License: Creative Commons<\/a> License: Creative Commons<\/a> License: Creative Commons<\/a> License: Creative Commons<\/a> License: Creative Commons<\/a> License: Creative Commons<\/a> License: Creative Commons<\/a> License: Creative Commons<\/a> License: Creative Commons<\/a> License: Creative Commons<\/a> License: Creative Commons<\/a> License: Creative Commons<\/a> License: Creative Commons<\/a> License: Creative Commons<\/a>
\n<\/p>
\n<\/p><\/div>"}, {"smallUrl":"https:\/\/www.wikihow.com\/images\/thumb\/5\/51\/Install-a-Dryer-Vent-Hose-Step-2.jpg\/v4-460px-Install-a-Dryer-Vent-Hose-Step-2.jpg","bigUrl":"\/images\/thumb\/5\/51\/Install-a-Dryer-Vent-Hose-Step-2.jpg\/aid9610267-v4-728px-Install-a-Dryer-Vent-Hose-Step-2.jpg","smallWidth":460,"smallHeight":345,"bigWidth":728,"bigHeight":546,"licensing":"
\n<\/p>
\n<\/p><\/div>"}, {"smallUrl":"https:\/\/www.wikihow.com\/images\/thumb\/d\/d6\/Install-a-Dryer-Vent-Hose-Step-3.jpg\/v4-460px-Install-a-Dryer-Vent-Hose-Step-3.jpg","bigUrl":"\/images\/thumb\/d\/d6\/Install-a-Dryer-Vent-Hose-Step-3.jpg\/aid9610267-v4-728px-Install-a-Dryer-Vent-Hose-Step-3.jpg","smallWidth":460,"smallHeight":345,"bigWidth":728,"bigHeight":546,"licensing":"
\n<\/p>
\n<\/p><\/div>"}, {"smallUrl":"https:\/\/www.wikihow.com\/images\/thumb\/c\/c1\/Install-a-Dryer-Vent-Hose-Step-4.jpg\/v4-460px-Install-a-Dryer-Vent-Hose-Step-4.jpg","bigUrl":"\/images\/thumb\/c\/c1\/Install-a-Dryer-Vent-Hose-Step-4.jpg\/aid9610267-v4-728px-Install-a-Dryer-Vent-Hose-Step-4.jpg","smallWidth":460,"smallHeight":345,"bigWidth":728,"bigHeight":546,"licensing":"
\n<\/p>
\n<\/p><\/div>"}, {"smallUrl":"https:\/\/www.wikihow.com\/images\/thumb\/d\/d3\/Install-a-Dryer-Vent-Hose-Step-5.jpg\/v4-460px-Install-a-Dryer-Vent-Hose-Step-5.jpg","bigUrl":"\/images\/thumb\/d\/d3\/Install-a-Dryer-Vent-Hose-Step-5.jpg\/aid9610267-v4-728px-Install-a-Dryer-Vent-Hose-Step-5.jpg","smallWidth":460,"smallHeight":345,"bigWidth":728,"bigHeight":546,"licensing":"
\n<\/p>
\n<\/p><\/div>"}, {"smallUrl":"https:\/\/www.wikihow.com\/images\/thumb\/b\/b0\/Install-a-Dryer-Vent-Hose-Step-6.jpg\/v4-460px-Install-a-Dryer-Vent-Hose-Step-6.jpg","bigUrl":"\/images\/thumb\/b\/b0\/Install-a-Dryer-Vent-Hose-Step-6.jpg\/aid9610267-v4-728px-Install-a-Dryer-Vent-Hose-Step-6.jpg","smallWidth":460,"smallHeight":345,"bigWidth":728,"bigHeight":546,"licensing":"
\n<\/p>
\n<\/p><\/div>"}, {"smallUrl":"https:\/\/www.wikihow.com\/images\/thumb\/a\/a5\/Install-a-Dryer-Vent-Hose-Step-7.jpg\/v4-460px-Install-a-Dryer-Vent-Hose-Step-7.jpg","bigUrl":"\/images\/thumb\/a\/a5\/Install-a-Dryer-Vent-Hose-Step-7.jpg\/aid9610267-v4-728px-Install-a-Dryer-Vent-Hose-Step-7.jpg","smallWidth":460,"smallHeight":345,"bigWidth":728,"bigHeight":546,"licensing":"
\n<\/p>
\n<\/p><\/div>"}, {"smallUrl":"https:\/\/www.wikihow.com\/images\/thumb\/f\/fd\/Install-a-Dryer-Vent-Hose-Step-8.jpg\/v4-460px-Install-a-Dryer-Vent-Hose-Step-8.jpg","bigUrl":"\/images\/thumb\/f\/fd\/Install-a-Dryer-Vent-Hose-Step-8.jpg\/aid9610267-v4-728px-Install-a-Dryer-Vent-Hose-Step-8.jpg","smallWidth":460,"smallHeight":345,"bigWidth":728,"bigHeight":546,"licensing":"
\n<\/p>
\n<\/p><\/div>"}, {"smallUrl":"https:\/\/www.wikihow.com\/images\/thumb\/7\/79\/Install-a-Dryer-Vent-Hose-Step-9.jpg\/v4-460px-Install-a-Dryer-Vent-Hose-Step-9.jpg","bigUrl":"\/images\/thumb\/7\/79\/Install-a-Dryer-Vent-Hose-Step-9.jpg\/aid9610267-v4-728px-Install-a-Dryer-Vent-Hose-Step-9.jpg","smallWidth":460,"smallHeight":345,"bigWidth":728,"bigHeight":546,"licensing":"
\n<\/p>
\n<\/p><\/div>"}, {"smallUrl":"https:\/\/www.wikihow.com\/images\/thumb\/d\/d5\/Install-a-Dryer-Vent-Hose-Step-10.jpg\/v4-460px-Install-a-Dryer-Vent-Hose-Step-10.jpg","bigUrl":"\/images\/thumb\/d\/d5\/Install-a-Dryer-Vent-Hose-Step-10.jpg\/aid9610267-v4-728px-Install-a-Dryer-Vent-Hose-Step-10.jpg","smallWidth":460,"smallHeight":345,"bigWidth":728,"bigHeight":546,"licensing":"
\n<\/p>
\n<\/p><\/div>"}, {"smallUrl":"https:\/\/www.wikihow.com\/images\/thumb\/e\/e1\/Install-a-Dryer-Vent-Hose-Step-11.jpg\/v4-460px-Install-a-Dryer-Vent-Hose-Step-11.jpg","bigUrl":"\/images\/thumb\/e\/e1\/Install-a-Dryer-Vent-Hose-Step-11.jpg\/aid9610267-v4-728px-Install-a-Dryer-Vent-Hose-Step-11.jpg","smallWidth":460,"smallHeight":345,"bigWidth":728,"bigHeight":546,"licensing":"
\n<\/p>
\n<\/p><\/div>"}, {"smallUrl":"https:\/\/www.wikihow.com\/images\/thumb\/f\/fc\/Install-a-Dryer-Vent-Hose-Step-12.jpg\/v4-460px-Install-a-Dryer-Vent-Hose-Step-12.jpg","bigUrl":"\/images\/thumb\/f\/fc\/Install-a-Dryer-Vent-Hose-Step-12.jpg\/aid9610267-v4-728px-Install-a-Dryer-Vent-Hose-Step-12.jpg","smallWidth":460,"smallHeight":345,"bigWidth":728,"bigHeight":546,"licensing":"
\n<\/p>
\n<\/p><\/div>"}, {"smallUrl":"https:\/\/www.wikihow.com\/images\/thumb\/c\/c1\/Install-a-Dryer-Vent-Hose-Step-13.jpg\/v4-460px-Install-a-Dryer-Vent-Hose-Step-13.jpg","bigUrl":"\/images\/thumb\/c\/c1\/Install-a-Dryer-Vent-Hose-Step-13.jpg\/aid9610267-v4-728px-Install-a-Dryer-Vent-Hose-Step-13.jpg","smallWidth":460,"smallHeight":345,"bigWidth":728,"bigHeight":546,"licensing":"
\n<\/p>
\n<\/p><\/div>"}, {"smallUrl":"https:\/\/www.wikihow.com\/images\/thumb\/8\/8f\/Install-a-Dryer-Vent-Hose-Step-14.jpg\/v4-460px-Install-a-Dryer-Vent-Hose-Step-14.jpg","bigUrl":"\/images\/thumb\/8\/8f\/Install-a-Dryer-Vent-Hose-Step-14.jpg\/aid9610267-v4-728px-Install-a-Dryer-Vent-Hose-Step-14.jpg","smallWidth":460,"smallHeight":345,"bigWidth":728,"bigHeight":546,"licensing":"
\n<\/p>
\n<\/p><\/div>"}, {"smallUrl":"https:\/\/www.wikihow.com\/images\/thumb\/a\/a5\/Install-a-Dryer-Vent-Hose-Step-15.jpg\/v4-460px-Install-a-Dryer-Vent-Hose-Step-15.jpg","bigUrl":"\/images\/thumb\/a\/a5\/Install-a-Dryer-Vent-Hose-Step-15.jpg\/aid9610267-v4-728px-Install-a-Dryer-Vent-Hose-Step-15.jpg","smallWidth":460,"smallHeight":345,"bigWidth":728,"bigHeight":546,"licensing":"
\n<\/p>
\n<\/p><\/div>"}, {"smallUrl":"https:\/\/www.wikihow.com\/images\/thumb\/0\/0f\/Install-a-Dryer-Vent-Hose-Step-16.jpg\/v4-460px-Install-a-Dryer-Vent-Hose-Step-16.jpg","bigUrl":"\/images\/thumb\/0\/0f\/Install-a-Dryer-Vent-Hose-Step-16.jpg\/aid9610267-v4-728px-Install-a-Dryer-Vent-Hose-Step-16.jpg","smallWidth":460,"smallHeight":345,"bigWidth":728,"bigHeight":546,"licensing":"
\n<\/p>
\n<\/p><\/div>"}, {"smallUrl":"https:\/\/www.wikihow.com\/images\/thumb\/8\/86\/Install-a-Dryer-Vent-Hose-Step-17.jpg\/v4-460px-Install-a-Dryer-Vent-Hose-Step-17.jpg","bigUrl":"\/images\/thumb\/8\/86\/Install-a-Dryer-Vent-Hose-Step-17.jpg\/aid9610267-v4-728px-Install-a-Dryer-Vent-Hose-Step-17.jpg","smallWidth":460,"smallHeight":345,"bigWidth":728,"bigHeight":546,"licensing":"
\n<\/p>
\n<\/p><\/div>"}, {"smallUrl":"https:\/\/www.wikihow.com\/images\/thumb\/9\/94\/Install-a-Dryer-Vent-Hose-Step-18.jpg\/v4-460px-Install-a-Dryer-Vent-Hose-Step-18.jpg","bigUrl":"\/images\/thumb\/9\/94\/Install-a-Dryer-Vent-Hose-Step-18.jpg\/aid9610267-v4-728px-Install-a-Dryer-Vent-Hose-Step-18.jpg","smallWidth":460,"smallHeight":345,"bigWidth":728,"bigHeight":546,"licensing":"
\n<\/p>
\n<\/p><\/div>"}, {"smallUrl":"https:\/\/www.wikihow.com\/images\/thumb\/c\/c8\/Install-a-Dryer-Vent-Hose-Step-19.jpg\/v4-460px-Install-a-Dryer-Vent-Hose-Step-19.jpg","bigUrl":"\/images\/thumb\/c\/c8\/Install-a-Dryer-Vent-Hose-Step-19.jpg\/aid9610267-v4-728px-Install-a-Dryer-Vent-Hose-Step-19.jpg","smallWidth":460,"smallHeight":345,"bigWidth":728,"bigHeight":546,"licensing":"
\n<\/p>
\n<\/p><\/div>"}, {"smallUrl":"https:\/\/www.wikihow.com\/images\/thumb\/7\/70\/Install-a-Dryer-Vent-Hose-Step-20.jpg\/v4-460px-Install-a-Dryer-Vent-Hose-Step-20.jpg","bigUrl":"\/images\/thumb\/7\/70\/Install-a-Dryer-Vent-Hose-Step-20.jpg\/aid9610267-v4-728px-Install-a-Dryer-Vent-Hose-Step-20.jpg","smallWidth":460,"smallHeight":345,"bigWidth":728,"bigHeight":546,"licensing":"
\n<\/p>
\n<\/p><\/div>"}. To use a tube clamp, unscrew the clamp to loosen it. duct foil flexible aluminum ft depot everbilt inch expanded open foot Cut the siding to fit around it. Before installing, youll have to decide whether you want rigid or flexible metal venting. If you are installing a dryer vent through a finished wall, remove a small section and check to be sure you wont be cutting through any wiring, plumbing or ductwork. problems with your dryer vent system, give us a call, we can help.
The final length depends on the model dryer and type of dryer duct piping you choose. However, the gas poses a danger when it is allowed to accumulate. Attach the straight run to the elbow at the vent hood. For tips on installing a rigid vent hose or a new vent hood, read on! This is a flexible aluminium foil and is not recommended for use in dryer vents -easy for fire to spread . wikiHow's Content Management Team carefully monitors the work from our editorial staff to ensure that each article is backed by trusted research and meets our high quality standards.
We seem to have lost our map and can't update your zip code right now. Youll want to decide between vent clamps or foil tape to secure the dryer venting to the dryer exhaust outlet and wall vent. Be sure to check out our latest offers to start saving! Please try again in a bit. Check outside to make sure the vent flap is opening. Once you've decided on a vent location and planned the dryer duct route, measure the length of the run, allowing for bends. Your dryer product specifications can help you confirm the required vent length and number of elbows. Cut straight lengths of rigid pipe using tin snips. After installing a dryer vent, keep it clean. If it builds up within the garage it will be lethal to people and pets. Semi rigid ducting is made of solid material wrapped in insulation that comes in a variety of shapes and sizes, whereas flexible ducting is bendable and versatile. circle and drill a series of closely-spaced holes around the circumference with the 1/4-in. Insert the duct pipe on the vent hood through the hole.
The entire duct needs to be supported and secured, and no screws are allowed on the joints because they could accumulate lint. After locating the shortest route for the ductwork, determine the location of the dryer vent exit. The typical maximum-allowable duct run for dryers is 25 feet. Position the assembly so that the opening faces toward the ground. hole saw. Insert the vent and screw the cap to the house (predrill screw holes). Dryer duct construction -It is important that dryer ducts vent to the exterior of the home and not into attics or other enclosed areas which can become a breeding gound for molds. References. In addition, the dryer vent will raise moisture levels in the garage. together and with add moisture content causes the lint to cling to the walls of PVC pipe which over time, inevitably leads to a blockage in the pvc pipe. lint is flammable, and the more that accumulates in the dryer and the duct, the greater the risk. This may contribute to a mold problem developing that could later require expensive remediation.
The code says they should be made from metal, at least 4" in diameter, and have a smooth interior. This keeps intruders out when properly maintained. Measure, cut and assemble the other duct sections. Plastic is not allowed for If youre in need of dryer parts and accessories for your installation, Whirlpool brand has the items that can help in the process. Make sure to add about half an inch to ensure some overlap. Then turn on the dryer to test the flow of the dryer vent installation.