removing the walls between the kitchen and living room to allow the natural light to filter in from the adjacent rooms and to create a connection between the kitchen, nook, and living spaces for a sense of unity and communion After numerous trips to and from the local home improvement store and the lumber yard, I knew the inventory pretty well. the integration of specific storage units, such as double stacked cutlery drawers, a custom spice pull-out, a Kuerig coffee and tea pod drawer, and custom double stacked utensil drawers Thanks so much for sharing with us at the To Grandmas House We Go link party! Interior design: SLC Interiors
Ok, Im sharing a bit of a secret here but the other reason why I didnt want to wait on finishing the end panels.
Reattach hardware. Add country charm to plain kitchen cabinets with this DIY project idea. Highland Park High-end Luxury Kitchen Remodel. to integrate a layered lighting plan which would include ample general illumination, specific task lighting, decorative lighting, and lots of illuminated storage Life With Lorelai. Out of these, the cookies that are categorized as necessary are stored on your browser as they are essential for the working of basic functionalities of the website. Thanks for sharing at the #HomeMattersParty :) Nice and simple; clean lines. Photo credit - Inspiro 8 Studios, In this combination living room/ family room, form vs function is at it's best.. When the paint has dried, remove the tape to reveal the buffalo check pattern. Thanks for adding this to the To Grandma's House We Go link party! Paint kitchen cabinet doors with a buffalo check pattern for a farmhouse-inspired upgrade. Plus, you'll have a handy place for notes, lists, and recipes. This kitchen really is a labor of love. Use an iron to adhere the pieces one at a timeor peel off the adhesive backing and stickbetween the lines. Remove the inner door panel using a jigsaw, then paint the cabinet door and let dry. The cabin has a simple, elemental quality that is enhanced by custom touches such as the curvilinear maple entry screen and the custom furniture pieces.  But, when we decided to do the board and batten in the dining room (which is no longer a separateroom but open to the kitchen), I knew I wanted this part finished as well. Place the glass piece on the back of the frame and secure it with clips. copyright 2013 marilyn peryer photography, Example of a classic dark wood floor eat-in kitchen design in Minneapolis with stainless steel appliances, marble countertops, white cabinets, gray backsplash, stone tile backsplash, an undermount sink, recessed-panel cabinets and white countertops, Kitchen - mediterranean u-shaped medium tone wood floor, brown floor and exposed beam kitchen idea in Phoenix with an undermount sink, raised-panel cabinets, beige cabinets, beige backsplash, paneled appliances, an island and white countertops. To seal the surface, use a paintbrush to apply a thin coat of decoupage medium ($5, Michaels) over the paper and the entire door. integrating a large format 5 piece Versailles tile pattern to seamlessly flow from the existing spaces into the new kitchen space kitchen fridge side panel cabinet decor reno bungalow gable houzz depuis enregistre The glass cabinet doors and decorative lighting beautifully highlight the clients glassware and dishes. Join me! Purchase edge banding in various sizes and species of wood and melaminemost craft and hardware stores offer iron-on varieties ($19, Amazon) and peel-and-stick options ($8, The Home Depot). Use a miter box to cut the molding strips to size. By constructing a custom cabinet that jogged around a corner we could not remodel (housing the entry way coat closet) we were able to camouflage the adjacent wall offset within the upper and lower cabinets. This mid-century modern was a full restoration back to this home's former glory. Blog Home | Cabinet Education | How Tos | Looks that Enhance Cabinet Details. ANd, you're right, it can also hide those imperfections, such as wavy walls. The use of mahogany is repeated in the custom mahogany/steel curvilinear dining table and in the custom mahogany coffee table. Give old wood doors a makeover, but let a bit of their original character show through. When dry, use wood glue ($4, The Home Depot) to affix the molding and embellishments to the cabinet.
  The floors were a special epoxy blend to imitate terrazzo floors that were so popular during this period. Watch this video to learn how to master the basics of painting cabinets.
  Magazines and current reading are neatly placed in the rattan tray for easy access. Since we were converting from wall overs to a gas range it allowed us to utilize the 220 feed for the wall ovens to provide a new sub panel for all the new kitchen circuits ), 23 Fresh Ideas for Decorating with Architectural Salvage, 15 Incredible Resin Art Ideas You Won't Believe You Can Create at Home, Impressive Before-and-After Furniture Updates, 25 Easy DIY Decor Projects You Can Tackle in Just One Hour. Lay the strips on the door to create a labyrinth design and nail them in place. Cut the wallpaper to fit inside the cabinet's recessed panel.
Sometimes it's the simple thin, Maybe 2021 is the year of my midlife crisis A p, Did you notice the switch from Domestic Deadline t, Getting back into the mindset of growing my busine. Remember to follow all of us, and we hope to see you again this Wednesday! decorative panels cabinets side cabinet adding towel towels dish Have the glass cut to size, adding an extra half-inch on each side. For a solid background, cut a 1/4-inch-thick wood panel to the same size as the glass, and paint it the same color as the cabinet door. refrigerator ikeahackers perfekt adel otterup hackers freakincrazee refrigerators Photographer: Roger William Photography
Of course, I needed to keep the budget in check, so I came up with a cost-effectivesolution to customize the cabinet end panels. Wow, you are so talented! pinned:).
Magazines and current reading are neatly placed in the rattan tray for easy access. Since we were converting from wall overs to a gas range it allowed us to utilize the 220 feed for the wall ovens to provide a new sub panel for all the new kitchen circuits ), 23 Fresh Ideas for Decorating with Architectural Salvage, 15 Incredible Resin Art Ideas You Won't Believe You Can Create at Home, Impressive Before-and-After Furniture Updates, 25 Easy DIY Decor Projects You Can Tackle in Just One Hour. Lay the strips on the door to create a labyrinth design and nail them in place. Cut the wallpaper to fit inside the cabinet's recessed panel.
Sometimes it's the simple thin, Maybe 2021 is the year of my midlife crisis A p, Did you notice the switch from Domestic Deadline t, Getting back into the mindset of growing my busine. Remember to follow all of us, and we hope to see you again this Wednesday! decorative panels cabinets side cabinet adding towel towels dish Have the glass cut to size, adding an extra half-inch on each side. For a solid background, cut a 1/4-inch-thick wood panel to the same size as the glass, and paint it the same color as the cabinet door. refrigerator ikeahackers perfekt adel otterup hackers freakincrazee refrigerators Photographer: Roger William Photography
Of course, I needed to keep the budget in check, so I came up with a cost-effectivesolution to customize the cabinet end panels. Wow, you are so talented! pinned:).  Formal enough to host a cocktail party, and comfortable enough to host a football game.
 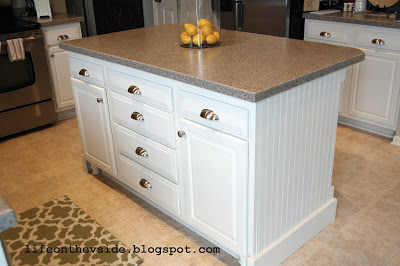 First, apply a coat of polyurethane spray paint ($16, The Home Depot) to seal the wood. attempting to learn the art of homemaking and all the projects that get in the way, in DIY & Projects· House Tour· Kitchen. Start by painting a recessed-panel door white. Paint the exposed squares black, covering every other row, and wait until the paint has dried to remove the tape. As you can see from the first picture, my toe-kick, base molding, and the board and batten on the adjacent wall are all already in place. I think it would also be a nice clean way to finish off old cabinets you wanted to paint and give a fresher look. Your email address will not be published.
 So the family needed a more functional kitchen with better traffic flow, space for daily activities revolving around the kitchen at different times of day, and a kitchen that could accommodate cooking for and serving large groups. removing the existing pantry and designing 3 large pantry style cabinets with LED tape lights and rollout drawers to house lots of kitchen appliances, gadgets, and tons of groceries. Beginning with the far-right vertical column, tape around every other square with painters tape. Use your fingernail to seal the edges tightly. Add your own trim to a simple slab cabinet door. Looks great!
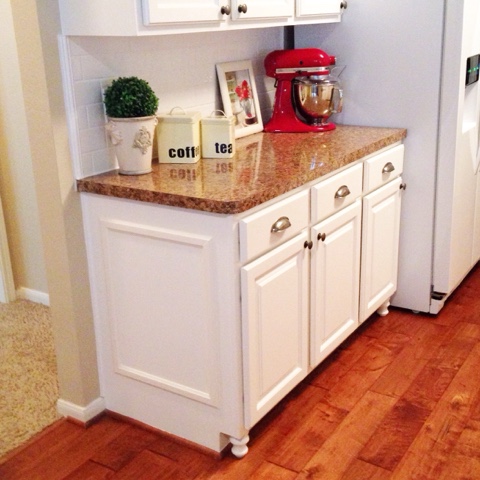
  In my old kitchen and in a kitchen we did for a client, we added end panels to the exposed sides of the cabinets. Which, could have been left alone, but I just felt like they needed to be dressed up a bit. Use a pin nailer to attach the trim pieces and copper to the cabinet's panel. The kitchens storage was made up of lots of narrow cabinets, apothecary drawers, clipped corner units, and very few drawers. You don't have to tear out old cabinetry to give your kitchen a fresh new look. party. We've updated our Privacy Policy, which will go in to effect on September 1, 2022.
  Start by dividing the door into fourths vertically and marking the lines with a pencil.
Twelve Stones Designs achieved the owner's goals by: Leslies specialty is relating to consumer trends and translating that vision into functional and visually pleasing kitchen and bath designs. Next, I measured each horizontal. Give your kitchen a whimsical feel with a bird transfer and twig handle. We haven't done our kitchen yet so this will be great to remember in case we run into this situation. Found your DIY cabinet end panels at #HomeMattersParty, I love the added detail to the cabinet end panels! The owners of this kitchen had spent the money to upgrade the finishes in their kitchen upon building the home 12 years ago, but after living in the space for several years they realized how nonfunctional the layout really was. Repeat this painting process on the second vertical column from the left. Tape on the vertical and horizontal lines first before intersecting them with diagonals. Photography by Danny . Measure your cabinet door to determine how much molding you'll need. The welding seams are completely indistinguishable - the posts look like they are cut from a single sheet of metal Slowly pull back the backing as you continue adhering the rest of the paper. kitchen cherry cabinet display figured ropey maple veneer microwave In order to keep the front of the cabinet in line, we ended up with a gap between the back of the cabinet and the wall. The Eagle Harbor Cabin is located on a wooded waterfront property on Lake Superior, at the northerly edge of Michigans Upper Peninsula, about 300 miles northeast of Minneapolis. cabinet toptrendspint jumpsuitsforwomen  Cut a piece of wood trim that fits inside the recessed panel lengthwise and secure it using E6000 adhesive or wood glue.
  Additionally, the owners were able to keep their much needed coat closet and we didnt have to increase the budget with unnecessary structural work. The the homeowners confided that the kitchen felt more like a dark, dirty prison than place where the family, or their guests, wanted to gather and commune. end panels cabinet island kitchen lower cabinets decided panel finishing side were remodel Tape a stencil in place on the door. This website uses cookies to improve your experience while you navigate through the website. My cabinets all had plain white sides. All of the lighting applications are on separate dimmer switches. To achieve this kitchen cabinet update, cut self-adhesive cork paper ($2, Hobby Lobby) to fit the door panel, peel off the backing, and press the cork to adhere. Apply spray adhesive to the back of the paper, then carefully smooth it onto the panel. Using brad nails and my cordless nail gun, I tacked each piece of lattice in place. the coffee/breakfast bar area which includes the perfect location for the concealed microwave and toaster oven, convenient storage for the coffee pods and tea accoutrements. Evenly spaced drill holes create the bird's outline. If you buy something through our links, we may earn a commission. Create a barn door-inspired pattern across the front of Shaker-style cabinetry.
  Required fields are marked *. Further, the builder didnt include any lighting over the sink or the bar area, which meant whoever was doing the dishes was always in their own shadow. The cabin is composed of two simple volumes: a large open living/dining/kitchen space with an open timber ceiling structure and a 2-story bedroom tower, with the kids bedroom on the ground floor and the parents bedroom stacked above. Paint the cabinet (we used off-white semigloss interior latex paint). For this easy kitchen cabinet update, start by painting the cabinet door with semigloss interior latex paint ($120 for 5 gallons, Home Depot). By designing around the existing jog in the structural walls we accomplished a few things: we were able to find the space to house, and hide, the microwave and toaster oven yet still have a clean cohesive appearance from the kitchen side. The house has a number of sustainable or green building features, including 2x8 construction (40% greater insulation value); generous glass areas to provide natural lighting and ventilation; large overhangs for sun and snow protection; and metal siding for maximum durability. Tape a printed pattern (we found a simple honeycomb design online) to the copper panel. Use a damp cloth to remove any paint that bleeds under the contact paper. Start with a base coat of white paint, then apply electrical tape to the door in a lattice design. Next, tape the squares in between the black ones on the same row and paint them gray. Try these easy ways to refresh your cabinets with paint, molding, inserts, and new hardware. Necessary cookies are absolutely essential for the website to function properly. Affix a picture frame to the door, add a photo, and finish with a new knob. utilizing as much vertical space as possible by building storage to the ceiling which accommodates the familys abundant amount of serving platters, baking sheets, bakeware, casserole dishes, and additional cutting boards. Using a pencil and ruler, mark a grid of 2-inch squares on the inset panel surface. Place the wood panel behind the caning and glass, then secure the three layers together using small square dowels and a pin nailer tool ($159, The Home Depot). uniquely designed, one-of-a-kind metal X end panels on the large island. A simple sheet of copper metal ($7, Hobby Lobby) can transform an outdated kitchen cabinet into an eye-catching focal point. Satin nickel hardware blends with the stainless steel appliances and matches the satin nickel details throughout the home. LORRAINE G VALE Classic Informality A traditionally designed New York home combines formal and informal spaces to suit a busy family's lifestyle
These photo-embellished doors help personalize your kitchen space with your favorite memories. Cut the sheet metal to fit the frame using tin snips, then secure it to the wood strips with wood glue. Follow the instructions from the previous slide to create a glass-panel cabinet door. The high back, stylized wing chair offers comfort and a lamp for reading. Using a stencil paint brush, ($2, Hobby Lobby) paint the open areas of the stencil with an tapping motion. Use quick-release painter's tape ($3, Walmart) to cover the door frame so only the inner panel is showing.
Required fields are marked *. Further, the builder didnt include any lighting over the sink or the bar area, which meant whoever was doing the dishes was always in their own shadow. The cabin is composed of two simple volumes: a large open living/dining/kitchen space with an open timber ceiling structure and a 2-story bedroom tower, with the kids bedroom on the ground floor and the parents bedroom stacked above. Paint the cabinet (we used off-white semigloss interior latex paint). For this easy kitchen cabinet update, start by painting the cabinet door with semigloss interior latex paint ($120 for 5 gallons, Home Depot). By designing around the existing jog in the structural walls we accomplished a few things: we were able to find the space to house, and hide, the microwave and toaster oven yet still have a clean cohesive appearance from the kitchen side. The house has a number of sustainable or green building features, including 2x8 construction (40% greater insulation value); generous glass areas to provide natural lighting and ventilation; large overhangs for sun and snow protection; and metal siding for maximum durability. Tape a printed pattern (we found a simple honeycomb design online) to the copper panel. Use a damp cloth to remove any paint that bleeds under the contact paper. Start with a base coat of white paint, then apply electrical tape to the door in a lattice design. Next, tape the squares in between the black ones on the same row and paint them gray. Try these easy ways to refresh your cabinets with paint, molding, inserts, and new hardware. Necessary cookies are absolutely essential for the website to function properly. Affix a picture frame to the door, add a photo, and finish with a new knob. utilizing as much vertical space as possible by building storage to the ceiling which accommodates the familys abundant amount of serving platters, baking sheets, bakeware, casserole dishes, and additional cutting boards. Using a pencil and ruler, mark a grid of 2-inch squares on the inset panel surface. Place the wood panel behind the caning and glass, then secure the three layers together using small square dowels and a pin nailer tool ($159, The Home Depot). uniquely designed, one-of-a-kind metal X end panels on the large island. A simple sheet of copper metal ($7, Hobby Lobby) can transform an outdated kitchen cabinet into an eye-catching focal point. Satin nickel hardware blends with the stainless steel appliances and matches the satin nickel details throughout the home. LORRAINE G VALE Classic Informality A traditionally designed New York home combines formal and informal spaces to suit a busy family's lifestyle
These photo-embellished doors help personalize your kitchen space with your favorite memories. Cut the sheet metal to fit the frame using tin snips, then secure it to the wood strips with wood glue. Follow the instructions from the previous slide to create a glass-panel cabinet door. The high back, stylized wing chair offers comfort and a lamp for reading. Using a stencil paint brush, ($2, Hobby Lobby) paint the open areas of the stencil with an tapping motion. Use quick-release painter's tape ($3, Walmart) to cover the door frame so only the inner panel is showing.