In most instances, this will involve inserting the Fine Point Blade and clicking the flashing Go button to cut out the remaining elements of your design. In the event that you arent satisfied with a particular part of your project, you can attempt to re-foil itonly if you havent unloaded your machine. I have a bunch of Deco Foil Sheets, which are designed to be heat activated. It is possible to add more than one color to your designs! document.getElementById( "ak_js_1" ).setAttribute( "value", ( new Date() ).getTime() ); This site uses Akismet to reduce spam.  Sometimes the tape/foil transfer sheet can be hard to remove (mid-project) if they end up under the machines feeders/rollers. This post may contain Amazon Associate and other partner affiliate links. All models of the Cricut Explore and Cricut Maker can use. Copyright 2022, Hey, Let's Make Stuff. Lets talk about how to use these designs as well as other designs with the foil transfer system! Thank you for this information I bought the Cricut foil tip set and am always looking for other foils to use. Hi Jill! What am I doing wrong? Apply one side first (there is a slight static cling so be careful! officeworks Do your best to follow the prompts in Cricut Design Space before ever clicking the flashing Go button. This system is easy to use, works with both the Cricut Explore Family of machines as well as the Cricut Maker, and requires no heat, cords, or external power supplies! For this test, I am using five different foils with my Cricut Explore Air 2: If you have an additional foil youd like me to test, let me know in the comments! 2022 The Homes I Have Made Design by Purr. Lay a fresh piece of foil in the correct areas and click the flashing Go button to re-start the entire project again. In the example below, notice that I have each word and matching flourish set to each weight. I am not sure why the Minc foil transferred a bit and Deco Foil didnt transfer at all. Carefully peel the mat away from the cardstock and separate the cut design from the excess cardstock sheet. It is very important that you designate the correct Operation for each and every layer. Once the foiling is complete, unload the mat without running the cut/draw operations of the project. Thanks for the tutorial also. Photos of my children are prohibited from use, unless you want to pay for their collegethen let's chat! Because the Cricut Foil Tip is pressure reactive, I was actually surprised by the resultsIll talk about that a bit at the end of this post. To insert a foil tip simply place it in the opening. Notice in the right-hand layers panel that that specific layer is now set to Foil., Finally, if your design is not already attached, you will need to select both your base layer and any foil details and Attach them together (learn why, Cricut Explore, Cricut Maker, or Cricut Joy, Cricut Foil Transfer Kit be sure to get the correct kit for your machine, Base material Usually paper, cardstock, posterboard, but you can also use this tool on, Let the entire project finish with the Foil Transfer Tool or no tool inserted. I have a pack of gold sheets and it would be neat if they would work with my Explore Air and the foil transfer tool. As always, Id love to see your projectstag me @heyletsmakestuff on Instagram! Without unloading your mat, un-tape and remove the foil sheet from your project. Happy crafting! I love it when you share however please keep in mind all images and text on this site are property of That's What Che Said. Ive spent countless hours playing with this fun new product, and today I am breaking down everything (and I mean EVERYTHING!) cricut I was ready to pass on my foiling kit after some disastrous results last fall. Ranger foil works with adhesive I guess, not pressure. Ive done heat-transferred foiling before (see the full tutorial HERE), but the Cricut Foil Transfer Kit actually relies on pressure to add foil to your projects. Press the flashing C to cut the design. So you can easily override these settings (intentionally or accidentally) by placing whatever tip into the Foil Tool Housing. They can also be stored in the Cricut Tool Caddy. Carefully remove the adhesive strip and the foil sheet from the cardstock on the mat. Start the foil transfer by clicking the flashing C. When complete use the flashing arrow button again to unload the mat. comprehensive When prompted, then insert the Fine Point Blade to finish cutting the project. foil When it was done scoring the carriage moved all the way to the right so I could add my foil sheets (without removing the mat from the machine) and I clicked the flashing C to foil the aqua layer. It didnt curl up and was pretty easy to tape it down flat even though I cut it from a roll. You cannot re-use areas of a Foil Transfer Sheet that have been used, meaning there is no longer foil on the area the machine drew. Hi! To complete your project, continue to follow the prompts in Cricut Design Space. I have not had time to check that out but was really hoping to use my Glimmer foil. No heat, cords or external power supply needed! These ultra-thin, film-like papers have a metallic surface (they are practically reflective) and come in a wide variety of colors including basic metallics (e.g., gold, silver, bronze), but also jewel and pastel hues too. foil
The spellbinders glimmer foil I bought off Amazon didnt work with the cricut machine!!! Your Cricut machine will ALWAYS foil first (before any other operation), so you will need to do the following: Place your base material onto the correct mat for your project (e.g., Cardstock onto a Green mat, paper onto a Blue mat, etc). Remove the Foil Housing and replace it with the fine tip blade. These are just my results and thoughts. Very spotty and not vivid at all. TIP! I love this foilits really shimmery and pretty. peel Once your project is ready to be created, you need to prepare your mat in a very specific way for foiling. If you cut the foil down smaller, cut the adhesive strips down also. In this post I am going to show you how to make the cutest birthday card and birthday gift tags using the new system!
I tried my absolute best to cover everything you need to know when using the Cricut Foil Transfer Kit. If so, click CONTINUE in the lower right corner. Im always learning new things and want to share some of that info with you. I think the foil sheet is little heavier than the Cricut brand. For this reason, do your best to get the Foil Transfer Sheet perfectly flat against your base material.
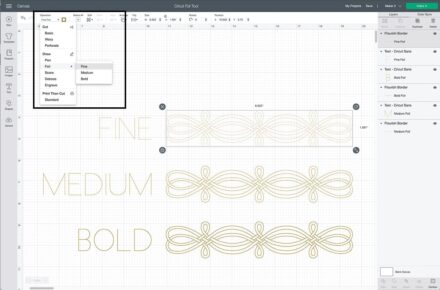
 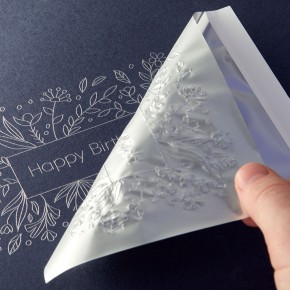 Cricut really needs to step up their game with foil color choices. When you are just getting started with using the Cricut Foil Transfer Kit, the easiest way to find good images is to look for either Draw Only or Cut+Draw designs. Your email address will not be published. Any image that already has a Draw layer (typically designed for pens) can be easily changed to Foil. Ive spent a lot of time over the last few weeks experimenting with the Cricut Foil Transfer Kit on a variety of projects. Your email address will not be published. In order for the pressure and settings of the Cricut Foil Transfer Kit to work properly, Cricut recommends stabilizing any Smart Materials on a mat first. The foil is essentially pressed (or transferred) into your paper. I was prompted to then remove the gold sheet and exchange the foil housing and tip for the fine tip blade so my machine could cut my card. All free printables offered are for personal use only. Whether you are making a gift tag or a card or anything else, its important to select your foil design and the base of your project and click ATTACH. Your email address will not be published. However, if you give it a try, please let us know! No. Is there any way to solve this issue without transferring foil in alternate ways? Start by creating your foil project in Cricut Design Space. What Foil Works with the Cricut Foil Transfer System? As mentioned above you will change the linetype of the design you want to foil, from CUT to FOIL, and select the tip size (Fine, Medium or Bold). My understanding is that Glimmer foil requires heat and pressure. Foil details are elements on paper projects that truly look metallic. officeworks cricut In the project below, notice how my words are set to Foil and the outside shape of my labels set to Cut.. The Cricut Foil Transfer System has a special foil specifically designed for a pressure transfer. Im going to use my recent master closet labels as an example.
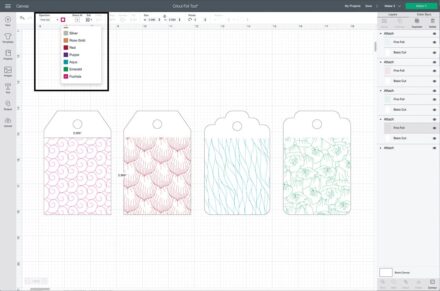
You can find my design to use in Design Space here. foiling Ive been struggling to use the foil transfer sheets on different types of cardstock papers, like textured linen cardstock paper. Happy foiling! To get the best/cleanest results, tape all the way around the foil transfer sheet. Next, Design Space Prompted me to remove the aqua layer of foil and add the green layer to the cardstock, again without removing the mat. But everyone is askingwill other brands work? Thanks,Megan. Read more about the We R Memory Keepers Foil Quill. Place the trimmed Foil Transfer Sheet on top of your base material, ensuring that it is in the exact same area(s) as the foiled elements of your design (refer to your Cut Preview screen in Design Space if necessary). any space can be transformed into a place you love! For example: if a card has a Draw element, you can change that to Foil. Instead of creating that fine line detail with a Cricut Pen, it will instead create it with the Foiling Tool. They are labeled as hot foils, not pressure sensitive, but other people have been getting good results with them, so I thought I would give them a try. cricut If your foil lines dont end up clean and smooth, it is most likely due to a wrinkle/bubble in the Foil Transfer Sheet. Get all the latest fun projects + gain access to the FREEBIE LIBRARY ! Minc foil is adhesive reactive, which means that it needs something to bond it to the base material. When possible, adhere the tape directly to the mat (off your project). You should also change the color of the foil to the appropriate color you are using. Then, use the included tape to secure the Foil Transfer Sheet to the mat all the way around. to get that true, shiny metallic detail on your projects. Simply use a Scraper to remove the foil and continue to use your mat as normal. Easy crafts, simple recipes, life hacks, and free SVG files and printables! Click on the Operation dropdown menu in the top toolbar. Just ordered mine this morning. As such, if you arent paying attention, theres a chance youll forget to swap your blade. You did it! Please try again. If you purchase something through the link, I may receive a small commission at no extra charge to you. For this tag we are using 80lb Cricut Cardstock. I have used bold tip for first time, and it was working very well, but in second time to make same thing, it didnt transferred image as it should be, and it outputted very weak (it is not complete image, some outlines are missing), and I tried for several times to make it, and in every time I taut my foil sheet very well to ensure no any winks or any bulges , putted all star wheels on right side, and putted tape around all 4 sides with whole pieces of tape strips, and although I have tried to replace tip with new one, but the problem is still as it, form where the problem do you think? Although glitter pens do provide a nice sheen, their weight is fine enough that you cant really see the details on labels or home decor projects. The only drawback I have found so far is the 5 inch width of the roll. Links in the article may be affiliate links. Please do not remove any watermarks, crop or edit any of my images without obtaining written permission from me. The fine & medium tips gave results that I could barely differentiate from Cricut foil. My blog is full of things to help you create a life you love: easy crafts, fun printables, SVG files for cutting on your Cricut, DIY home and decor ideas, and so much more. If you havent heard yet, the new Cricut Foil Transfer System is adding yet another layer of creative genius to your projects! Once again, probably due to the thickness of my lines. Only once all the various operations are complete (e.g., foil, draw, cut, etc), you can unload the mat from the machine and finish/assemble your project! The Minc reactive foil transferred some foil, but not enough to make this an option I would go for. Images may not be used without approval. Check your inbox to confirm! Now that Ive found some good black cardstock and decent pressure settings, Ive been experimenting more and more with my Cricut Foil Transfer tool. The foil sheets are laid over a base material. For both the text and the flower I found that the Fine Tip and the Medium Tip were not perfect but gave good results. Yes! I could not get the Ranger foil to work. It may be the cardstock, but also may just be the foil or the pressure, like you mentioned. For the price point of the Glimmer hot foil and the selection of colors I am perfectly happy to use the Glimmer hot foil. Im using the Cricut Foil Transfer Fine Point tip. Assigning these weights on the canvas forces Design Space to prompt you to swap tips at the right time (see below). Although these specific images will quickly and easily yield you gorgeous foil designs, you can really set ANY layer on ANY project to be foiled. Connect your machine and choose your base material. I hope they might be helpful to others. Once you place an image on your canvas, here is how to change it to Foil to be used with the Cricut Foil Transfer Kit: NOTE: Although I am showing how to change from Draw to Foil, you can technically change pretty much any layer (e.g., Engrave, Cut, etc) to Foil as well. NOTE: If you are doing a large design, you might not need to trim down the foil. I also bought a set of iridescents that contains a roll of silver, gold, purple, and teal. In the meantime, well add it to the list to try also. Deco Foil is also adhesive reactive. Please do not remove any watermarks, crop or edit any of my images without obtaining written permission from me. I really love the foil tool kit and how it looks on my designs, but it sucks that I am limited to one type of texture. Under Foil, select the weight tip you want to use (more on this below). Explore Users: turn the knob to Cardstock (or the dot between cardstock and Fabric, Cardstock+) Maker Users: select 80lb Cardstock from the Material list in DS. You thought of everything! Since you must remove the Foil Transfer Sheet from your project without unloading the mat, I found it best to position your design on the lower part of the mat (when possible). It didnt transfer as well as the Cricut or Spellbinders foil, but would work in a pinch if you have used the Foil Quill in the past. Lets walk through a project from start-to-finish so you can see how the Foil Transfer Tool actually works on a project! @Jill I forgot to mention that I have never tried the Cricut foiling kit on leather, but I have used iron-on metallic vinyl on leather to make a bunch of personalized gift tags for a womens group and they turned out awesome! Im so glad you found this post helpful and that it motivated you to try the Foil tool again. If desired, click on the colored square and change it to the foil color you want to use (more on this below). Hi Rebecca, Unsurprisingly, the Cricut foil worked perfectly with the Cricut Foil Tip. The foil is typically transferred to paper by either glue/adhesive or heat. Next up was the We R Memory Keepers heat reactive foil. Thanks so much for sharing your results, Deborah! Like the foil weight, this is really helpful if you want to use different foil colors within a single project (e.g., like the four gift tags below). Next, use a scissors or paper trimmer to trim down a single Foil Transfer Sheet to a size that will perfectly cover your design. If you ever experiment with foiling on leather or fabric, please share your findings, tips and tricks. eject Cards score as the first step for example, so its important to follow the directions on Design Space moving forward. Select just the layer you want foiled in the right-hand layers panel. Happy crafting! Ive been researching other foils to use and came across some people having success with the Spellbinders Glimmer Hot Foils. Over the years, Ive attempted several times to get the metallic look on my project via Cricut Pens (specially these gold ones and these glitter ones). Although the line thickness is exactly the same, the foil details show up much better on the darker paper. Cori hasnt tried them, but if you do, please let us know! }, You're In the Cool Club! But it shouldnt be that much of an issue if I plan my designs accordingly. If you want different parts of a single design in different colors, be sure to set the color by layer. The tips essentially have different size points, resulting in different line widths on your project. To add foil to any project, you will need the same set of materials: * The Foil Transfer Kits DO come with 12 foil transfer sheets in gold and silver so you can make some projects without buying additional foil sheets. Check your inbox to confirm! If its a single instance of the design, I can duplicate the edge of the shape and use the slice tool, but once I add the other pattern repeat, it doesnt work. In the upper right hand corner of Design Space, click the green MAKE IT button. But if you do forget to replace the blade, you can try the following: If the Foil Transfer Sheet accidentally comes into contact with a mat, the stickiness of the matwill pull the foil off and onto the mat. The tape that comes with the Cricut Foil Transfer Sheets is super sticky. I also plan on trying this foil with my WRMK foil quill. Why didnt I think of that . Now, Im going to try a couple of the colors from the iridescent set. Feel free to use one photo, provided that link back to my original post is included. you need to know about how to use the Cricut Foil Transfer Kit.
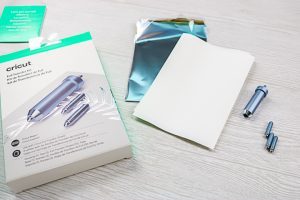
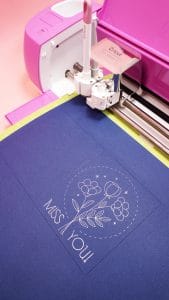
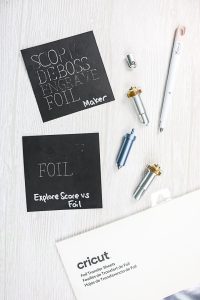
But the results were either dull or tricky and tedious to execute. Three tips in one housing means three times the creative opportunities! Most non-Cricut foil sheets are heat activated (rather than pressure activated) and will likely not give you good results. Also, select the color of the foil you will be using. consumables pennen goud snijmachines werkzeuge transfer There were some skips. Keep the adhesive tape about 1/4 inch on the foil. I am so excited about this new capability to add gorgeous metallic details to my projects. All Rights Reserved. The bold tip was not as good for either the text or the flower. Were you able to get this figured out? To correctly place Cricut Foil on your base material, remember these things: Easily embellish your projects with the new Cricut Foil Transfer System. I did a test on Smart Label (writable vinyl) and my sample label turned out pretty good (below); and Ive also seen it used on Faux Leather. Hi Everyone! In addition to all the steps outlined above, here are some other things to try in order to get your projects to turn out perfectly! As an Amazon affiliate, I earn a small commission from these links at no additional cost to you. Again, it transferred nicely, but the iridescent effect gets lost. On the Mat Screen, verify that your foil design and your base design are on the same mat. I made 4 copies of the design, one for each color layer, and used the contour tool to separate the design into color layers. The Foil Transfer Kit is best used on paper products. Since I use gold a lot, Im first going to test the gold from the essential metallics set. The housing and the tip are both magnetic and they will attract. How to Use the Cricut Foil Transfer Kit | A Comprehensive Guide. And while you can technically see the gold foil on any color when the light shines a certain way, I did find that you get the best results when there is high contrast between the foil and the base material. For years, Ive tried to add true metallic details to my Cricut projects using a variety of pens, shiny papers, and even my laminator. You have given me the confidence to give it another try! Essentially, if you are foiling a single color, the color designation is not important. For our tag we will load our mat with the cardstock applied and the foil applied to the top of the cardstock. If not, Im having a bit of troublepicturing your project. (Detailed directions on foil sheet application above) Press the flashing arrows to load mat. If you closely follow the prompts of design space you will get flawless long-lasting results! Following Design Space Prompts, I inserted the scoring stylus, medium foil tip in housing and scored the card fold. Finally, I removed the purple layer, added a scrap of gold foil (left over from another project) and foiled that layer. The Cricut Foil Transfer Kit is compatible with ALL Cricut Explore and Cricut Maker models (original, 2, and 3-level machines), and includes everything you need to add foil to your projects. The Ultimate Guide to the Cricut Foil Transfer System, Foiling with the Cricut Foil Transfer System, Fonts for Writing, Foiling, Engraving and More, What Foils Work with the Cricut Foil Transfer System, Paper Fruit Slice Banner with Your Cricut. Im sure others would be interested to know if they work also! Thank you for the tip to place the project at the bottom of the mat. Help! transfer The adhesive strips are cut to the size of the foil. Can you send me some more details? You can also try increasing the Default pressure for the Foil Tool setting. Foil accents (at least on paper) are most typically created using foiling sheets. Hi However, its important to note that your machine does not know which tip you have inserted. You can certainly cut away clean/un-used areas on bigger sheets to use on smaller projects.
Sometimes the tape/foil transfer sheet can be hard to remove (mid-project) if they end up under the machines feeders/rollers. This post may contain Amazon Associate and other partner affiliate links. All models of the Cricut Explore and Cricut Maker can use. Copyright 2022, Hey, Let's Make Stuff. Lets talk about how to use these designs as well as other designs with the foil transfer system! Thank you for this information I bought the Cricut foil tip set and am always looking for other foils to use. Hi Jill! What am I doing wrong? Apply one side first (there is a slight static cling so be careful! officeworks Do your best to follow the prompts in Cricut Design Space before ever clicking the flashing Go button. This system is easy to use, works with both the Cricut Explore Family of machines as well as the Cricut Maker, and requires no heat, cords, or external power supplies! For this test, I am using five different foils with my Cricut Explore Air 2: If you have an additional foil youd like me to test, let me know in the comments! 2022 The Homes I Have Made Design by Purr. Lay a fresh piece of foil in the correct areas and click the flashing Go button to re-start the entire project again. In the example below, notice that I have each word and matching flourish set to each weight. I am not sure why the Minc foil transferred a bit and Deco Foil didnt transfer at all. Carefully peel the mat away from the cardstock and separate the cut design from the excess cardstock sheet. It is very important that you designate the correct Operation for each and every layer. Once the foiling is complete, unload the mat without running the cut/draw operations of the project. Thanks for the tutorial also. Photos of my children are prohibited from use, unless you want to pay for their collegethen let's chat! Because the Cricut Foil Tip is pressure reactive, I was actually surprised by the resultsIll talk about that a bit at the end of this post. To insert a foil tip simply place it in the opening. Notice in the right-hand layers panel that that specific layer is now set to Foil., Finally, if your design is not already attached, you will need to select both your base layer and any foil details and Attach them together (learn why, Cricut Explore, Cricut Maker, or Cricut Joy, Cricut Foil Transfer Kit be sure to get the correct kit for your machine, Base material Usually paper, cardstock, posterboard, but you can also use this tool on, Let the entire project finish with the Foil Transfer Tool or no tool inserted. I have a pack of gold sheets and it would be neat if they would work with my Explore Air and the foil transfer tool. As always, Id love to see your projectstag me @heyletsmakestuff on Instagram! Without unloading your mat, un-tape and remove the foil sheet from your project. Happy crafting! I love it when you share however please keep in mind all images and text on this site are property of That's What Che Said. Ive spent countless hours playing with this fun new product, and today I am breaking down everything (and I mean EVERYTHING!) cricut I was ready to pass on my foiling kit after some disastrous results last fall. Ranger foil works with adhesive I guess, not pressure. Ive done heat-transferred foiling before (see the full tutorial HERE), but the Cricut Foil Transfer Kit actually relies on pressure to add foil to your projects. Press the flashing C to cut the design. So you can easily override these settings (intentionally or accidentally) by placing whatever tip into the Foil Tool Housing. They can also be stored in the Cricut Tool Caddy. Carefully remove the adhesive strip and the foil sheet from the cardstock on the mat. Start the foil transfer by clicking the flashing C. When complete use the flashing arrow button again to unload the mat. comprehensive When prompted, then insert the Fine Point Blade to finish cutting the project. foil When it was done scoring the carriage moved all the way to the right so I could add my foil sheets (without removing the mat from the machine) and I clicked the flashing C to foil the aqua layer. It didnt curl up and was pretty easy to tape it down flat even though I cut it from a roll. You cannot re-use areas of a Foil Transfer Sheet that have been used, meaning there is no longer foil on the area the machine drew. Hi! To complete your project, continue to follow the prompts in Cricut Design Space. I have not had time to check that out but was really hoping to use my Glimmer foil. No heat, cords or external power supply needed! These ultra-thin, film-like papers have a metallic surface (they are practically reflective) and come in a wide variety of colors including basic metallics (e.g., gold, silver, bronze), but also jewel and pastel hues too. foil 
The spellbinders glimmer foil I bought off Amazon didnt work with the cricut machine!!! Your Cricut machine will ALWAYS foil first (before any other operation), so you will need to do the following: Place your base material onto the correct mat for your project (e.g., Cardstock onto a Green mat, paper onto a Blue mat, etc). Remove the Foil Housing and replace it with the fine tip blade. These are just my results and thoughts. Very spotty and not vivid at all. TIP! I love this foilits really shimmery and pretty. peel Once your project is ready to be created, you need to prepare your mat in a very specific way for foiling. If you cut the foil down smaller, cut the adhesive strips down also. In this post I am going to show you how to make the cutest birthday card and birthday gift tags using the new system!
I tried my absolute best to cover everything you need to know when using the Cricut Foil Transfer Kit. If so, click CONTINUE in the lower right corner. Im always learning new things and want to share some of that info with you. I think the foil sheet is little heavier than the Cricut brand.
Cricut really needs to step up their game with foil color choices. When you are just getting started with using the Cricut Foil Transfer Kit, the easiest way to find good images is to look for either Draw Only or Cut+Draw designs. Your email address will not be published. Any image that already has a Draw layer (typically designed for pens) can be easily changed to Foil. Ive spent a lot of time over the last few weeks experimenting with the Cricut Foil Transfer Kit on a variety of projects. Your email address will not be published. In order for the pressure and settings of the Cricut Foil Transfer Kit to work properly, Cricut recommends stabilizing any Smart Materials on a mat first. The foil is essentially pressed (or transferred) into your paper. I was prompted to then remove the gold sheet and exchange the foil housing and tip for the fine tip blade so my machine could cut my card. All free printables offered are for personal use only. Whether you are making a gift tag or a card or anything else, its important to select your foil design and the base of your project and click ATTACH. Your email address will not be published. However, if you give it a try, please let us know! No. Is there any way to solve this issue without transferring foil in alternate ways? Start by creating your foil project in Cricut Design Space. What Foil Works with the Cricut Foil Transfer System? As mentioned above you will change the linetype of the design you want to foil, from CUT to FOIL, and select the tip size (Fine, Medium or Bold). My understanding is that Glimmer foil requires heat and pressure. Foil details are elements on paper projects that truly look metallic. officeworks cricut In the project below, notice how my words are set to Foil and the outside shape of my labels set to Cut.. The Cricut Foil Transfer System has a special foil specifically designed for a pressure transfer. Im going to use my recent master closet labels as an example. 
You can find my design to use in Design Space here. foiling Ive been struggling to use the foil transfer sheets on different types of cardstock papers, like textured linen cardstock paper. Happy foiling! To get the best/cleanest results, tape all the way around the foil transfer sheet. Next, Design Space Prompted me to remove the aqua layer of foil and add the green layer to the cardstock, again without removing the mat. But everyone is askingwill other brands work? Thanks,Megan. Read more about the We R Memory Keepers Foil Quill. Place the trimmed Foil Transfer Sheet on top of your base material, ensuring that it is in the exact same area(s) as the foiled elements of your design (refer to your Cut Preview screen in Design Space if necessary). any space can be transformed into a place you love! For example: if a card has a Draw element, you can change that to Foil. Instead of creating that fine line detail with a Cricut Pen, it will instead create it with the Foiling Tool. They are labeled as hot foils, not pressure sensitive, but other people have been getting good results with them, so I thought I would give them a try. cricut If your foil lines dont end up clean and smooth, it is most likely due to a wrinkle/bubble in the Foil Transfer Sheet. Get all the latest fun projects + gain access to the FREEBIE LIBRARY ! Minc foil is adhesive reactive, which means that it needs something to bond it to the base material. When possible, adhere the tape directly to the mat (off your project). You should also change the color of the foil to the appropriate color you are using. Then, use the included tape to secure the Foil Transfer Sheet to the mat all the way around. to get that true, shiny metallic detail on your projects. Simply use a Scraper to remove the foil and continue to use your mat as normal. Easy crafts, simple recipes, life hacks, and free SVG files and printables! Click on the Operation dropdown menu in the top toolbar. Just ordered mine this morning. As such, if you arent paying attention, theres a chance youll forget to swap your blade. You did it! Please try again. If you purchase something through the link, I may receive a small commission at no extra charge to you. For this tag we are using 80lb Cricut Cardstock. I have used bold tip for first time, and it was working very well, but in second time to make same thing, it didnt transferred image as it should be, and it outputted very weak (it is not complete image, some outlines are missing), and I tried for several times to make it, and in every time I taut my foil sheet very well to ensure no any winks or any bulges , putted all star wheels on right side, and putted tape around all 4 sides with whole pieces of tape strips, and although I have tried to replace tip with new one, but the problem is still as it, form where the problem do you think? Although glitter pens do provide a nice sheen, their weight is fine enough that you cant really see the details on labels or home decor projects. The only drawback I have found so far is the 5 inch width of the roll. Links in the article may be affiliate links. Please do not remove any watermarks, crop or edit any of my images without obtaining written permission from me. The fine & medium tips gave results that I could barely differentiate from Cricut foil. My blog is full of things to help you create a life you love: easy crafts, fun printables, SVG files for cutting on your Cricut, DIY home and decor ideas, and so much more. If you havent heard yet, the new Cricut Foil Transfer System is adding yet another layer of creative genius to your projects! Once again, probably due to the thickness of my lines. Only once all the various operations are complete (e.g., foil, draw, cut, etc), you can unload the mat from the machine and finish/assemble your project! The Minc reactive foil transferred some foil, but not enough to make this an option I would go for. Images may not be used without approval. Check your inbox to confirm! Now that Ive found some good black cardstock and decent pressure settings, Ive been experimenting more and more with my Cricut Foil Transfer tool. The foil sheets are laid over a base material. For both the text and the flower I found that the Fine Tip and the Medium Tip were not perfect but gave good results. Yes! I could not get the Ranger foil to work. It may be the cardstock, but also may just be the foil or the pressure, like you mentioned. For the price point of the Glimmer hot foil and the selection of colors I am perfectly happy to use the Glimmer hot foil. Im using the Cricut Foil Transfer Fine Point tip. Assigning these weights on the canvas forces Design Space to prompt you to swap tips at the right time (see below). Although these specific images will quickly and easily yield you gorgeous foil designs, you can really set ANY layer on ANY project to be foiled. Connect your machine and choose your base material. I hope they might be helpful to others. Once you place an image on your canvas, here is how to change it to Foil to be used with the Cricut Foil Transfer Kit: NOTE: Although I am showing how to change from Draw to Foil, you can technically change pretty much any layer (e.g., Engrave, Cut, etc) to Foil as well. NOTE: If you are doing a large design, you might not need to trim down the foil. I also bought a set of iridescents that contains a roll of silver, gold, purple, and teal. In the meantime, well add it to the list to try also. Deco Foil is also adhesive reactive. Please do not remove any watermarks, crop or edit any of my images without obtaining written permission from me. I really love the foil tool kit and how it looks on my designs, but it sucks that I am limited to one type of texture. Under Foil, select the weight tip you want to use (more on this below). Explore Users: turn the knob to Cardstock (or the dot between cardstock and Fabric, Cardstock+) Maker Users: select 80lb Cardstock from the Material list in DS. You thought of everything! Since you must remove the Foil Transfer Sheet from your project without unloading the mat, I found it best to position your design on the lower part of the mat (when possible). It didnt transfer as well as the Cricut or Spellbinders foil, but would work in a pinch if you have used the Foil Quill in the past. Lets walk through a project from start-to-finish so you can see how the Foil Transfer Tool actually works on a project! @Jill I forgot to mention that I have never tried the Cricut foiling kit on leather, but I have used iron-on metallic vinyl on leather to make a bunch of personalized gift tags for a womens group and they turned out awesome! Im so glad you found this post helpful and that it motivated you to try the Foil tool again. If desired, click on the colored square and change it to the foil color you want to use (more on this below). Hi Rebecca, Unsurprisingly, the Cricut foil worked perfectly with the Cricut Foil Tip. The foil is typically transferred to paper by either glue/adhesive or heat. Next up was the We R Memory Keepers heat reactive foil. Thanks so much for sharing your results, Deborah! Like the foil weight, this is really helpful if you want to use different foil colors within a single project (e.g., like the four gift tags below). Next, use a scissors or paper trimmer to trim down a single Foil Transfer Sheet to a size that will perfectly cover your design. If you ever experiment with foiling on leather or fabric, please share your findings, tips and tricks. eject Cards score as the first step for example, so its important to follow the directions on Design Space moving forward. Select just the layer you want foiled in the right-hand layers panel. Happy crafting! Ive been researching other foils to use and came across some people having success with the Spellbinders Glimmer Hot Foils. Over the years, Ive attempted several times to get the metallic look on my project via Cricut Pens (specially these gold ones and these glitter ones). Although the line thickness is exactly the same, the foil details show up much better on the darker paper. Cori hasnt tried them, but if you do, please let us know! }, You're In the Cool Club! But it shouldnt be that much of an issue if I plan my designs accordingly. If you want different parts of a single design in different colors, be sure to set the color by layer. The tips essentially have different size points, resulting in different line widths on your project. To add foil to any project, you will need the same set of materials: * The Foil Transfer Kits DO come with 12 foil transfer sheets in gold and silver so you can make some projects without buying additional foil sheets. Check your inbox to confirm! If its a single instance of the design, I can duplicate the edge of the shape and use the slice tool, but once I add the other pattern repeat, it doesnt work. In the upper right hand corner of Design Space, click the green MAKE IT button. But if you do forget to replace the blade, you can try the following: If the Foil Transfer Sheet accidentally comes into contact with a mat, the stickiness of the matwill pull the foil off and onto the mat. The tape that comes with the Cricut Foil Transfer Sheets is super sticky. I also plan on trying this foil with my WRMK foil quill. Why didnt I think of that . Now, Im going to try a couple of the colors from the iridescent set. Feel free to use one photo, provided that link back to my original post is included. you need to know about how to use the Cricut Foil Transfer Kit.
But the results were either dull or tricky and tedious to execute. Three tips in one housing means three times the creative opportunities! Most non-Cricut foil sheets are heat activated (rather than pressure activated) and will likely not give you good results. Also, select the color of the foil you will be using. consumables pennen goud snijmachines werkzeuge transfer There were some skips. Keep the adhesive tape about 1/4 inch on the foil. I am so excited about this new capability to add gorgeous metallic details to my projects. All Rights Reserved. The bold tip was not as good for either the text or the flower. Were you able to get this figured out? To correctly place Cricut Foil on your base material, remember these things: Easily embellish your projects with the new Cricut Foil Transfer System. I did a test on Smart Label (writable vinyl) and my sample label turned out pretty good (below); and Ive also seen it used on Faux Leather. Hi Everyone! In addition to all the steps outlined above, here are some other things to try in order to get your projects to turn out perfectly! As an Amazon affiliate, I earn a small commission from these links at no additional cost to you. Again, it transferred nicely, but the iridescent effect gets lost. On the Mat Screen, verify that your foil design and your base design are on the same mat. I made 4 copies of the design, one for each color layer, and used the contour tool to separate the design into color layers. The Foil Transfer Kit is best used on paper products. Since I use gold a lot, Im first going to test the gold from the essential metallics set. The housing and the tip are both magnetic and they will attract. How to Use the Cricut Foil Transfer Kit | A Comprehensive Guide. And while you can technically see the gold foil on any color when the light shines a certain way, I did find that you get the best results when there is high contrast between the foil and the base material. For years, Ive tried to add true metallic details to my Cricut projects using a variety of pens, shiny papers, and even my laminator. You have given me the confidence to give it another try! Essentially, if you are foiling a single color, the color designation is not important. For our tag we will load our mat with the cardstock applied and the foil applied to the top of the cardstock. If not, Im having a bit of troublepicturing your project. (Detailed directions on foil sheet application above) Press the flashing arrows to load mat. If you closely follow the prompts of design space you will get flawless long-lasting results! Following Design Space Prompts, I inserted the scoring stylus, medium foil tip in housing and scored the card fold. Finally, I removed the purple layer, added a scrap of gold foil (left over from another project) and foiled that layer. The Cricut Foil Transfer Kit is compatible with ALL Cricut Explore and Cricut Maker models (original, 2, and 3-level machines), and includes everything you need to add foil to your projects. The Ultimate Guide to the Cricut Foil Transfer System, Foiling with the Cricut Foil Transfer System, Fonts for Writing, Foiling, Engraving and More, What Foils Work with the Cricut Foil Transfer System, Paper Fruit Slice Banner with Your Cricut. Im sure others would be interested to know if they work also! Thank you for the tip to place the project at the bottom of the mat. Help! transfer The adhesive strips are cut to the size of the foil. Can you send me some more details? You can also try increasing the Default pressure for the Foil Tool setting. Foil accents (at least on paper) are most typically created using foiling sheets. Hi However, its important to note that your machine does not know which tip you have inserted. You can certainly cut away clean/un-used areas on bigger sheets to use on smaller projects.