27 Jun 2016. The 35 pages Microcontroller Datasheet Playbook contains the most useful information of 14 Arduino, ESP8266 and ESP32 microcontroller boards. To use the serial interface of the Raspberry Pi, it must be enabled in the configuration menu. This submission enables serial communication between Arduino and Raspberry Pi.
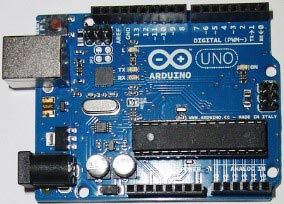
But in this tutorial you connect the Raspberry Pi instead of the PC or Laptop. Because the code is very short we create the python file directly on the Raspberry Pi. Save it as receive_ints_from_raspberrypi.ino. How to Control Multiple Servo Motors Using Arduino, How to Build a DIY Aluminium 6-DOF Robotic Arm From Scratch, Send a String From Arduino to Raspberry Pi, Send a String From Raspberry Pi to Arduino, Send Integers From Arduino to Raspberry Pi, Send Integers From Raspberry Pi to Arduino, How to Install Ubuntu and VirtualBox on a Windows PC, How to Display the Path to a ROS 2 Package, How To Display Launch Arguments for a Launch File in ROS2, Getting Started With OpenCV in ROS 2 Galactic (Python), Connect Your Built-in Webcam to Ubuntu 20.04 on a VirtualBox. Both sides need to be set to the same baud rate to be able to understand each other. Now, plug the USB (Universal Serial Bus) cable into your Arduino and connect that to the USB port of your Raspberry Pi. sites are not optimized for visits from your location. We will see how to wire a Raspberry Pi and an Arduino Uno to form an I2C connection and exchange data between the two systems. File , line 1, in This article showed the essential steps to establish an I2C connection from a Raspberry Pi, acting as the server, to and Arduino Uno, acting as the client. It will become hidden in your post, but will still be visible via the comment's permalink. We will then have the Arduino repeat those integers back to the Raspberry Pi. First we have to connect the DHT11 sensor to digital Pin 7 of the Arduino Uno as well as power and ground.The script is pretty easy.
A camera is mounted above the robotic arm. # you need to change %d based on the type your variable, //conveting the value of chars to integer, https://classes.engineering.wustl.edu/ese205/core/index.php?title=Serial_Communication_between_Raspberry_Pi_%26_Arduino&oldid=12333. 
I previously tried to run it with python com-test.py, New try with python3 com-test.py and that error is no more! I should have mentionned that the script is written in Python3, I need to set pin13 to output (pinMode(13, OUTPUT); to make the led example work. The code in this post seems much simpler and would be easier to modify and use. Templates let you quickly answer FAQs or store snippets for re-use. You can connect your Arduino boards to the Raspberry Pi using a USB cable.
By doing this, you provide the Arduino supply voltage, and you can also transfer your information between Arduino and the Raspberry Pi through the serial interface. I will try to find the correct python code to write > in log.txt, 2021 DIYI0T. It is also possible to create serial communication by using the Rx/Tx pins of both components.
arduino pi raspberry uno serial interfacing With the simple call of Wire.begin() it will start an IC2 client that can react on messages. Please i will like to know how i can separately split the two values i receive in the raspberry pi from the arduino. I get commissions for purchases made through links in this table. Did you activate the serial com in raspi-config? k}}nfH06fgx=/f8G4DC!1^VTx3;:J&7`z%KYq[v n^eueH; vu[zwO;Nr(D!g'ICJXb6@ Gg]Zj=-LSdh7 S6Fbp'Q{6k h0oYQ(8YhE:. Type in the following command in your terminal without Arduino plugged into Raspberry Pi. every two seconds, just like the picture on the right shows. Save the file as send_ints_to_raspberrypi.ino. Did you redefined the function input?
For other projects you could use 38400, 57600, 115200, etc.
uart electropeak For the Arduino, we use the built-in library Wire.h, which handles the concrete I2C message details, and exposes methods to start, listen and handle I2C communications from the server.
The Raspberry Pi boards that have Bluetooth/Wireless module, use the PL011 for UART communication by default.  In my case I found the serial connection with the name /dev/ttyACM0. bidirectional Prerequisite: Serial communication with Arduino,Remote access to Raspberry Pi with VNC. If you have any problems for the serial connection or questions regarding this tutorial, feel free to use the comment section below to ask your questions.
its urgent as im stuck.. What do you mean? The serial monitor of the Arduino IDE shows the output. arduino serial communication uno binaryupdates Add the following lines to the end of the file. Connect with me onLinkedIn if you found my information useful to you.
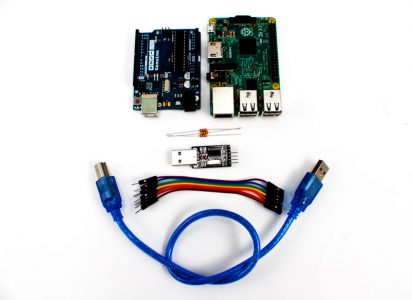
Updated title to better describe submission. 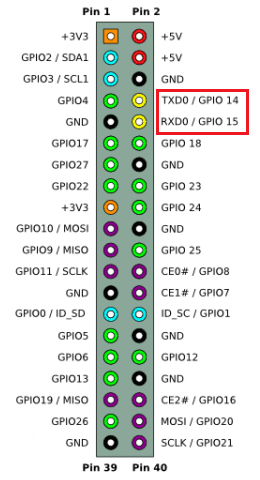 To establish a serial communication between the Raspberry Pi board and your PC you need a serial to USB converter.
  A sample arduino code is created below. Once youve rebooted the computer, type the command again in the terminal window on your Raspberry Pi: You see the new port? With the simple call of Wire.begin() it will start an IC2 client that can react on messages.
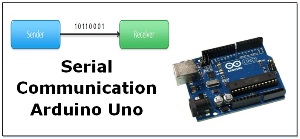
Also, there are many other functions for the serial module; you can check the documentation. 1) Arduino model: Transmits a character via the TX pin. Keep building! They can still re-publish the post if they are not suspended.
The Raspberry Pi sends the order Hello Arduino to the Arduino, and the Arduino replies with its name and the order received. can you describe what you mean by splitting the values? The script is the following: First we import the serial library. 2) Raspberry Pi model: Receives the character via the RX pin. The Raspberry Pi will start I2C node in the server role. Once unsuspended, admantium will be able to comment and publish posts again. And on another terminal, check that a new I2C hardware device is registered. I tried some 2-way serial examples from another site and they work fine. Your email address will not be published. In this role, it can actively write messages to the bus, and read data from the clients. Another way to see all the USB devices connected to your Raspberry Pi is to use this command: Set the baud rate of that port (i.e. I know you have C++ tutorial on raspberry pi but in this tutorial I need the C++ code in place of python code on raspberry pi side. On the Raspberry Pi, we use the Python SMBus library, with which it is easy to start an IC2 server bus and actively send messages to its connected clients. The library of choice is Wire.h, and it comes bundled with the Arduino IDE or a third-party IDE like plattform.io. Here you have to insert your serial address along with the baud rate. *&?dB#;d+}x4ka]o. When you want to build complex microcontroller projects in which data needs to be exchanged between different devices, you need a fast and reliable way to exchange data. How to solve this issue? That is your Arduino. ElectroPeak Inc. 2019. Traceback (most recent call last): You had to find the name of the port in the last messages. On the Raspberry Pi, we need to install a I2C Raspian package, and a library for Python. So we need a USBA Male to USB B Male cable.
Click Ctrl + X, then Y to confirm to save and hit the enter button to save to the existing file.Start the python script from the terminal with python arduino_communication.py. In the next part we setup the Raspberry Pi to receive the temperature and humanity from the Arduino. Hey, im trying to do this with ESP32. The power supply for the Pi is not restricted by the serial communication. We remind you that in order to be able to use your Raspberry Pi without screen or keyboard, the VNC remote connection must be configured. You should see a new port with a name like /dev/ttyACM0. Which model of Arduino is it (Uno or Due etc.) The server controls the speed of the clock (clock stretching not withstanding) and how many bytes are read. In this tutorial you learn how to send data from an Arduino to a Raspberry Pi. The Raspberry Pi will print out the integers it received from the Arduino. Go to the Device Manager and find the port number that is connected to the converter. Make sure that the communication speed is the same for both devices (baudrate=9600) otherwise the communication will not work.
I have tried some tutorials but that didnt work.
Once the two codes have been uploaded and launched, it can be seen that when the data command is entered into the terminal, Arduino returns many bytes containing the sensor values. Required fields are marked *. Web site by Kaizen Web. So what should we do? It is a bit more complicated (and takes up almost double the amount of memory), but the output is exactly the same. This article showed the essential steps to establish an I2C connection from a Raspberry Pi, acting as the server, to and Arduino Uno, acting as the client. arduino serial
5V probably won't work with a pi (as pi is 3V3) unless there is some level shifter. Hello, | Privacy Policy | Disclaimer.
Nevertheless the wired connection is not at work in my daily IoT live, because I use the Arduino or ESP8266 based micro-controllers as satellites in my home where in the center is the Raspberry Pi in a server rack. If you want to send a integer, float, or double constant, you can encode it as the folowing shows: If you want to send a string, you can encode it as the folowing shows: If you want to send a integer, float, or double variable, you can encode it as the folowing shows: Here I write a python program to write integer 3, 5, 7 to Arduino.
Raspberry Pi and Arduino Serial Communication (https://www.mathworks.com/matlabcentral/fileexchange/54601-raspberry-pi-and-arduino-serial-communication), MATLAB Central File Exchange. File /usr/lib/python3/dist-packages/serial/serialposix.py, line 268, in open Lets check the baud rate to see if it is set properly. the speed of data communication over that port/channel). Now the nano text editor opens an empty python file called arduino_communication. 9600 isnt set in stone. If you want know how to setup the Pi very quickly and without any monitor, mouse or keyboard, than check out my step by step tutorial for the Raspberry Pi headless setup. Thank you! You can terminate the script by clicking Ctrl + C. In this tutorial we learned how to use an Arduino to Raspberry Pi serial USB communication to send data from the Arduino to the Raspberry Pi. If you want to see the commands you write in the minicom terminal, you need to enable the Echo mode by pressing Ctrl+A and then entering E in the minicom terminal.
instructables For the Arduino, no additional setup is required.
It is not possible to actively send data from clients to the server. I have raspberry pi 3B and I want to build open CV in C++. We are sorry that this post was not useful for you! The serial address is stored in the following folder /dev.
In our case the port name is ttyACM0. To install the Arduino IDE on Raspberry Pi, it is best to go through the terminal.
We will send a block of integers from the Raspberry Pi to the Arduino.
At no time should the clients try forcing the data line when the server did not tell it to. self.open() In this example, we will define different commands: The Arduino returns data when it receives the data command and switches the LED connected to pin 13 on and off according to the led0 and led1 commands. Then connects the two devices with your USB cable, and type in the command above again. Then I will download the file with Realvnc.
At what baud rate is the Arduino communicating at?
Write the following program and upload it to your Arduino.
Hi Clerk, Upload your Arduino sketch first and then run the Ptyhon program. Getting Started with CSSBeginner Roadmap!! Now go over to your Raspberry Pi, and open a new Python file. To do this, enter the following command in a terminal: In the menu, select 5 Interfacing Options then P6 Serial and validate. Everything is looking good. First, each client needs to buffer its status messages.
DEV Community 2016 - 2022. Retrieved July 30, 2022. Now, we open a new sketch of python program on your Raspberry Pi. Using the following command you can open the minicom terminal at 9600 bit/sec baud rate. In this article we use the Arduino UNO card but it can be adapted to other types of cards with a serial connection (Nano, Mega, Feather, EPS32, ESP8266, etc.). File com-test.py, line 17, in Then plug the Raspberry Pi supply and connect the converter to your PC. RPi Basics: SSH into your Pi (a.k.a. We first need to figure out the port that connects the Arduino and the Raspberry Pi. In general we have to differ between two use cases. In I2C, the server controls all the communication, it actively requests data from its clients, and only when requested, are the clients answering. Serial communication not working properly between Raspberry and Arduino, Re: Serial communication not working properly between Raspberry and Arduino, http://abyz.me.uk/rpi/pigpio/piscope.html. by Xukyo | 27 Sep 2020 | Tutorials | 16 comments. FileNotFoundError: [Errno 2] No such file or directory: /dev/ttyACM0, During handling of the above exception, another exception occurred: The voltage level of all Raspberry Pi pins, including the RX and TX pins, is 3.3 volts. How To Make a Basic TikTok Scraping Tool In Python!
If you also prefer a wireless connection than you find here the tutorial. On the Raspberry Pi, we use the Python SMBus library, with which it is easy to start an IC2 server bus and actively send messages to its connected clients. Second, the server needs to call the clients periodically, collect the status information, and act on this information. Your email address will not be published. We can exchange I2C messages between the Raspberry Pi and Arduino. Remember the Golden Rule of Selling: Do not resort to violence.McGlashan. Lets create programs to send integers from Arduino to Raspberry Pi. The command means to list out all the ports with the beginning of "tty". Then we are creating an object with port name of "/dev/ttyUSB0" (the port name you just found out)and baud rate of 9600. To install all required software, execute the following commands to install the required libraries.
We're a place where coders share, stay up-to-date and grow their careers. You can check theRaspberry Pi website for more information about the Raspberry Pi serial communication. The Arduino program will import the