I then used the hammer to loosen the molding by hitting in an upward motion.
Okay, so maybe that does not truly count as being green, but it is better to have less waste and cost. You also have a choice of taping plastic sheeting over your countertops and backsplash, or using brown paper.
Well, now that is going to be put to use. If you are DIYing this and cutting glass is an issue, you can even opt for plexiglass, as Christy of Confessions of a Serial DIYer shows in her tutorial. Latex, water based paints only though. Who can handle something so unrewarding and still stay motivated?!
Again, I am old school and my anal retentiveness requires me to put on not one, but TWO coats of primer. If you buy from a link, we may earn a commission. Thank you everyone! The blogger removed the recessed panels and added chicken wire for a rustic touch. I am proud of her and I will always be there to support all of her projects! Your choice. Excellent! Now I just cannot wait until we redo the backsplash and countertops. Then place them in a convenient area of your house or garage where they are not going to come in contact with your paint or primer. I used 120 grit sand paper. Well, what do you think of this kitchen cabinet makeover tutorial? You can never go wrong with white kitchen cabinets. Get the tutorial at AllThingsWithPurpose.com. Hope you have enjoyed my first Instructable. On the bottom doors, number goes across the very bottom edge. She has way more patience to paint than I do. It is tempting to just rip it all off in one satisfying fell swoop. Again, if you don't paint over it, no one will ever see it even if they are laying on the floor (lol).
Yes this is my wife's first instructable. cabinets cabinet kitchen doors trim door adding diy makeover dimension Everyone ever so happy. Are you ready for a kitchen cabinet makeover? It also dusted nearby items in our kitchen with white paint. Dinner Recipes, Dad Jokes To Keep the Whole Family Laughing, Before: All-White Kitchen Cabinet Makeover, After: All-White Kitchen Cabinet Makeover, Before: Budget-Friendly Kitchen Cabinet Refresh, After: Budget-Friendly Kitchen Cabinet Refresh, Before: Simple Fix Kitchen Cabinet Renovation, After: Simple Fix Kitchen Cabinet Renovation, Before: Chalk Paint Kitchen Cabinet Renovation, After: Chalk-Paint Kitchen Cabinet Renovation, Before: Modern Farmhouse Kitchen Cabinet Renovation, After: Modern Farmhouse Kitchen Cabinet Renovation, Before: Modern Farmhouse Kitchen Cabinet Update, After: Modern Farmhouse Kitchen Cabinet Update, Before: Beadboard Wallpaper Cabinet Refresh, After: Beadboard Wallpaper Cabinet Refresh, Before: Paint and Hardware Cabinet Refresh, After: Paint and Hardware Cabinet Refresh, Before: Kitchen Cabinet Makeover With Only Paint, After: Kitchen Cabinet Makeover With Only Paint, Before: Bright and Cheery Cabinet Refresh, Before: Chalk Paint Kitchen Cabinet Update, After: Chalk Paint Kitchen Cabinet Refresh, The Best Kitchen Remodel Ideas You'll Want to Try, This content is created and maintained by a third party, and imported onto this page to help users provide their email addresses. Start with your kitchen cabinets. You make me feel much better about my work. Im all about creating a space YOU love.
If you purchase any cabinet fronts from Nieu, you can use code ANGELAROSEHOME5 for 5% off! One of the most daunting tasks of any kitchen remodel is taking a stab at trying to redo your kitchen cabinets. Great job! REJOICE!!! Then all you have to do is attach the doors and hardware. And guess what? While repainting your kitchen cabinets is a go-to refresh, the not-so-obvious option is to strip away all those layers of trendy paint colors and reveal your cabinet wood's natural beauty. ;) I am glad that you liked my Instructable! Its when you replace all of your cabinet door and drawer faces with new ones in a fresh style and color.
And guess what?
They're light, fresh, airy, and will make your space seem bigger and brighter. Remember how I said it gets tacky quickly? Not ready to paint your kitchen cabinets or just looking for a rental-friendly option? Simply remove the center panel and add a plexiglass window.
I used the color Dream Dusk in my own kitchen and Winter White in my kids loft playroom. I bought the Rustoleum Kitchen transformation package that comes with a deglosser that does all that and more. Perhaps you're looking for more than just a paint refresh or hardware switch. Thank you! Whats refacing you ask? I usually do that whenever I work on something. Changing out the hardware on your cabinets and drawers is a quick, easy refresh. Meaning, dont go back and paint over areas that are already starting to dry. Modular kitchen Chennai.
I can't wait to share more! Our next adventures in the kitchen will include a new ceiling with metal tiles and recessed lighting; bamboo floors in the kitchen, living room, and dinning room; and last, but not least counter tops with a subway tile backslash. Then all you have to do is match the door color to the color youre painting the rest of the cabinets with. Well, now you know the origin. But here are a few things I did to create a more modern look in my kitchen. Adding new hardware to your cabinets is an easy way to take your cabinets from blah to stunning. No budget for new cabinets?
Take these dark wood kitchen cabinets for example, which got a much-needed makeover inspired by Fixer Upper. She began writing for MyDomaine in 2021 and is now a senior home product reviews writer for the Meredith Corporation. So pick up the power tools and lets do this thing! It took a lot of scraping and scrubbing to get it off all of my floors and countertops. We have simply been using them for inspiration and have no affiliation with them.
Bold cabinet colors are a fun way to show off your personality, but maybe you'd rather use bold accents somewhere else in your space. If so, dont forget to tag me @angelarosehome on, of course. I would prefer to do a little extra work in the beginning than to have to redo everything later. You dont even have to rip everything out. very well detailed written instruction. Thanks to a fresh coat of white paint and new hardware that blends in better with the cabinets, this kitchen has a whole new look. Life is too short to not create a space you love. I did not want to add more work, and I did not have my heart set on knobs. 15 DIY Ideas to Redo Kitchen Cabinets for a Stunning Makeover. You don't feel like doing anything exceptionally crafty, you just want a cabinet refresh that will last for a long time. Maybe you're not ready to invest that much money into your kitchen, but you do want to do a refresh that will make a big visual impact. Fresh, white cabinets, new brass hardware, and some open shelving turned this kitchen into a gorgeous space. Make sure to get a good degreaser cleaner.
I've combed the internet for clear instructions on how to give my cabinets a makeover (BTW my cabinets look like yours, the old 60s yuk look) and I found that your instructions are the most complete and descriptive. Not all of your cabinets doors and drawers are the same size, and this can save you from doing a Tetris version of trial and error.
For future reference, wrap your rollers and brushes well in plastic wrap or bags, and toss them in the freezer until tomorrow morning, while the paint dries.
I devised a plan to give our kitchen a mini renovation with minor inputs from my loving, supporting husband. For this project, I partnered with, to design a line of beautiful cabinet fronts in a variety of colors. This step should easier than the first time you had to clean. I am doing the exact opposite. In my old kitchen, my cabinet molding was making my heart sad.
I tried to make smooth brush strokes and to keep the grooves that the bristles form in the paint to flow and transition beautifully from one stroke to the next.
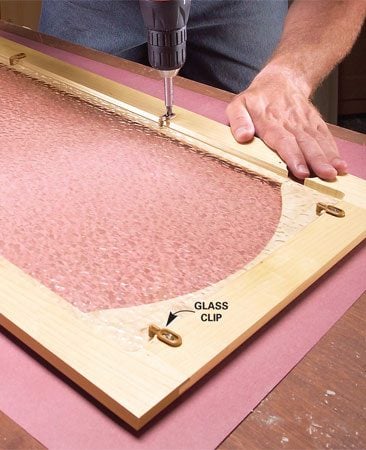
After I had all sides cut for each box, I made pocket holes and attached everything together. cabinet doors glass kitchen diy wood cabinets convert step into handyman door turn panel insert familyhandyman furniture inserts panels sink Bonus! Before I jump into painting, here is a tip that will make your kitchen cabinet project so much easier. The first real step is to make sure you have good materials with which to work. 29 Painted Kitchen Cabinet Ideas You Can Easily Copy, 25 Beautiful Blue Kitchen Ideas You'll Want to Recreate, 13 Lovely White Kitchen Cabinet Ideas We'll Always Love, 20 Ways to Make Your Kitchen Look More Expensive, 17 Kitchen Cabinet Hardware Ideas You Can Easily Recreate, 20 Gorgeous Kitchen Cabinet Paint Colors Designers Love, 30 Stylish Two-Toned Kitchen Ideas (From an Expert), 12 Easy Hacks for the IKEA EKET Cabinet Series, 14 1960s Kitchen Ideas We Still Love Today, Designers Show Us How to Give a Dated Kitchen a Drool-Worthy Makeover, 51 Kitchen Renovation Ideas to Help You Achieve the Space of Your Dreams, 50 Absolutely Beautiful Small Kitchens That Prove Size Doesn't Matter, This Designer Collab Is Here to Elevate Your Favorite IKEA Finds, 15 Midcentury Modern Dcor and Design Ideas, 20 Green Bathrooms Ideas That Will Make You Want to Redo Yours, Hoping to Remodel Your Kitchen?
Share it with us!
Good luck in the contest, you have my vote! Great idea to paint the inside of the cabinets, too. He thought this would be a good starting point on the insides, and it was quick and easily filled all those nooks and crannies that are hard to get to with a brush. I just plod away at it and hope that one in 700 looks great. The lid of the trashcan was a lost cause and is now just a novelty and a great story piece. So make sure to allow it sufficient time to dry. This time it worked beautifully! Thanks for sharing this adventure. It didnt take long for the molding to loosen up enough for me to pull it the rest of the way off by hand.
Why not try a mix?
Tip: Only open up the cabinets that hold items you'll want to display. If you do, you will need to fill the holes with the wood putty during the sanding step and then sand them down flush to the rest of the door. and grabbed my hammer. Be sure to allow the paint sufficient time to dry between coats. You do not want the paint to peel and buckle.
This blogger wanted to open up one cabinet for shelving and add trim and fresh paint to the rest of the cabinet doors. I proceeded to sand all of my cabinet doors, drawers and shelves using an orbital sander.
I got out my electric Sander to make the process faster and easier. I love how much lighter and cleaner my kitchen looks with the white cabinets.
Or you could just do take out for the next month or so until you no longer feel the urge to destroy anything that might threaten your beautiful handiwork. Dispose of the tape and cloths appropriately. It is a great idea to place each door's/drawer's hardware in its own labeled container for reuse. Opting for a neutral or calming pastel on the lower cabinets keeps the vibes calm while going for a bolder, darker color makes more of a statement. Why not take it a step further and swap them with an interesting material, such as leather? Brandi Sawyer made the most of what she had by thickening the door frames with plywood and applying beadboard wallpaper to complete change her cupboards. The options are limitless if you're willing to put in a little bit of elbow greaseand the payoff will definitely be worth it. There! She shows her full process here.
By clicking Accept All Cookies, you agree to the storing of cookies on your device to enhance site navigation, analyze site usage, and assist in our marketing efforts. Then make sure youre following along on Instagram and TikTok for more fun project updates. I am now in the process of removing this paint to bring back the wood.
Stripping away paint colors with layers of Citristrip might not be your idea of a fun afternoon, but the final result is swoon-worthy and authentic. See we are being "green" again! I even removed the drawers from the gliders. This would look gorgeous over here.
Depending on your base coat of paint and the original color of your cabinets, you may need only one or two coats of primer. Overall, it's been great, but why are the cabinets wholly white? Replace the hardware on the doors and drawers and reattach them to the cabinets.
Attached are some images that show what a white kitchen with concrete counter tops, subway tiles and wood floors would look like. I knew that I would worry until the end of time if I did not sand, so my husband caved to my "need to create more work." I also did not chose knobs for the same reason. To paint the cabinet doors, I placed them on a table with some triangles underneath to prop them up. Refacing is another great way to get that designer look without spending a ton of money. Unfortunately, by spraying in such a confined space, it caused a ton of overspray and the paint tended to run in places. Remove all the paint, brushes, and other equipment and dispose of them or put them away in their respective areas. If you're concerned that it might be too much for your space to have a bold color on both your upper and lower cabinets, go bold just on the lower ones, as Amy of Ginger Hearts did.
I wanted a beautiful flat surface to paint later. itavi You can also, like me, decide to change the placement of every item in your cabinets.
So I decided to rip it off and have the cabinets extend all the way to the ceiling. Make sure to let the primer sufficiently dry between each application. I painted the protective top coat using the same technique as the base coat, but I was even more careful to do quick, smooth, straight lines of paint. Opting to repaint your kitchen cabinets white is a classic choice, and if you're looking for an easy, fresh upgrade, this is it. Try this clever DIY cabinet idea. This saved time and energy, and he could not mess anything up outside. And one was the dark, dilapidated cabinets. Erin was a home dcor and gardening expert at MyDomaine and has also extensively covered gardening and home decor trends at Apartment Therapy.
Haha! Have more questions about Nieu or refacing, I have some answers for you, Well, what do you think of this kitchen cabinet makeover tutorial? Your kitchen is the hub of your home, and you likely spend a good amount of time in it. For proof, just look at this $100 renovation. Instead of repainting them, she totally ripped them out and put up open shelving instead. Refacing! Detailed tutorials. I thought I might go crazy while painting mine with my two toddlers constantly "helping" me along. The color (Chelsea Gray by Benjamin Moore) instantly elevated the kitchenas did swapping out the dated drawer pulls for cup pulls. This particular paint seemed to grab any random dust mote and hair within the entire neighborhood and apply it to my cabinet doors.  This kitchen received a total overhaul, including completely new custom cabinets. I painted every visible surface from the front to the very far back corner of the shadowy depths since - if I stood on the far side of my kitchen with full lights and no doors - I could possibly see that one unpainted section and that just simply would not do. Clean, clean, clean! To do this, I first grabbed the measurements I needed and picked up some straight wood boards. Try washi tape. Switch out the hardware. You can quickly grab the correct door and corresponding hardware and quickly screw them into the cabinets. Alcurb, Thank you! I wasnt able to use my table saw to make the long cuts for this. You may be able to find more information about this and similar content at piano.io, How to Remove Wallpaper Without Damaging Drywall, Makeover Takeover: A Magical Before & After, Don't Miss the New HGTV Show from Cheap Old Houses, The Ultimate Guide on How to Paint a Dresser, This New Jersey Home Is a Dog Lover's Dream, This Farmhouse Kitchen Went From Dated to Dreamy. Display your favorite dishware, glasses, and plants on your open shelves while reserving the cabinets for food, storage containers, utensils, and all the other kitchen items that you don't want to have in plain view.
**For more tutorials, story highlights, and projects follow me @angelarosehome**, Are you ready for a kitchen cabinet makeover? The homeowners swapped out the fronts of the cabinets and painted them a Patriotic White by Benjamin Moore. You cannot simply write on the door to tell you its proper location since you will cover the whole thing with paint. 24 Low-Maintenance Plants for the Lazy Gardener, The Best Michigan Beach Town for a Summer Getaway, Easy, Cheap, 30-Minute (or Faster!)
In addition to gathering all of those vital supplies, you also need to cover every nearby, or maybe not so nearby, surface that you do not want to come in contact with your beautiful new paint.
A tip when painting, always leave a wet edge. I wasnt able to use my table saw to make the long cuts for this. Remember how I said to remove everything? The final result is a chic all-white kitchen, complemented by dark wood floors and an antique table standing in for a kitchen island.
Great job on the makeover and great job on the instructable! I then let them dry while hanging. If only I could convince you to come to my house. So try to complete this step when there is less likely to be dust and dirt being stirred up, such as when others are not home or do not have windows open that might carry in the lovely dust filled breeze. As with the primer, I propped up the doors to allow air flow as I painted them.
I thought "Wow! To give our kitchen an updated feel, I am replacing all the old hardware with new brushed nickel hardware. You dont even have to rip everything out. Very thorough instructable. Even if you don't refurbish all your cabinets, picking one to serve as a small island or shelf-like Sharon of House on Heatherfield didcan spruce up the look of your kitchen and bring in some natural elements. Like the look of open shelving, but your space isn't conducive to it? Perhaps you're thinking of doing a full-on kitchen renovation to really bring your space to the next level, but remodels are expensive. This step can be excruciating as well as boring. If you are reusing your hardware, make sure you cleaned it in the step above as well as the cabinets themselves.
You can see more on this process, Now, what was the real secret to my cabinet renovation? To do this, I first grabbed the measurements I needed and picked up some straight wood boards.
I did put painters tape on all the edges, where they meet the cabinets, since I do not want the paint to adhere to the backsplash and countertops. You cannot begin working if you are unable to get to the area you need to be working on fixing. If possible, immediately move the cabinet doors and drawers to a table where you plan to paint after removal. This part of the process was so satisfying for me. I simply pulled the build up off by hand and discarded it in the trash.
It definitely did not save me time or effort. Then I put another straight board on top about an inch over from where I wanted to cut and clamped that down. Whee!!! If you organized and packed it away well, you were able to easily get into your items to use the last couple of days, and now you can easily put it back in the correct areas of the cabinet. My husband wanted the wooden floors and concrete countertops.
We think Chip and Joanna would approve! These wooden cupboards were just begging for a refresh.
With a glass cabinet door, you can tuck your items safely behind a door and still show them off.
This will give your cabinets a much nicer finish. Yes.
Thats what I call getting a designer look without the designer budget. The rest did not require sanding according to the paints' instructions. The wood cabinets in the kitchen of the house I bought were painted over with the worst white possible. Nice Instructable! For this project, I partnered with Nieu to design a line of beautiful cabinet fronts in a variety of colors. I recently took on a kitchen renovation (see the final reveal.
Opening one cupboard, then adding chalk paint and new hardware left these cabinets looking lovely. In fact, I might just have to move to stop from reliving the horror of redoing days worth of work that should otherwise have been perfect. Frank b, I told my husband that I was afraid that it would not stick no matter the paints' claims. This could be a matter of minutes, so make sure to paint each area subsequently and finish each area completely before moving to the next. Thanks for the details and abundance of commentary, as well as your "old-school" opinions on doing it right the first time. You now get to reclaim your living area. Maybe you hate your kitchen cabinets so much you'd rather just start anew, and you have too many things for open shelving: you want cabinets. Using power tools and design to transform my home and yours. I still catch myself staring at it all the time. Kudos. Reply This coat gets tacky quicker and will smudge if you try to paint over a previously painted area too late. It's like you're in a hospital. If you don't have that type of character, you will just have to buckle down and fake it. For my cabinets, I painted the outside of the boxes in the color Rock Bottom by Sherwin Williams.
My painters tape and brown paper were kindly removed during this step by my beautiful toddlers, but you should wait until after your paint is drying/dried to remove it.
- but you definitely do not want paint to spill on your priceless antique dishware, or even that random can of green beans. Even I refused to paint the parts of the cabinet wall that will be forever behind the drawers.
You need to clean up any spilled paint, trash, etc. Well, the instructions on this particular protective coat says to allow it to dry for a full 24 hours! interior kitchen renovation before portfolio Using wood putty fill in the target area according to directions on the package. Did you make this project? So instead, I used two 24 boards to prop up the board I was cutting and clamped it all together. There is nothing like running out of something vital, like maybe that last tablespoon or so of paint you need to finish those final brush strokes.  Thats what I call getting a designer look without the designer budget. Congrats! Again?!?! Also, be sure to periodically remove any build up that accumulates on the sand paper from the finish on your cabinets.
This can get fairly expensive, so you can also place two screws into a two by four and place two of them underneath each door. Tip for numbering cabinet doors: On the top doors, number them across the very top. The use of two tones of gray pop beautifully in this kitchen, proving that paint can make a huge difference in any space. Again if you were able to label and organize your doors, drawers, and hardware, it will really pay off in this step. Not to mention that my kitchen would look cluttered and less than its best, even after I just scrubbed it from top to bottom! Other paints do require sanding so always make sure to read your specific products' requirements.I tried to make sure that I kept the sander as level as possible and not to sand in any one location for too long. First, I got rid of the molding. Not only is there a lot to paint, but there's also the matter of picking out the best hardware. There is nothing worse than losing valuable pictures.
Note our trash can, now with a star pattern lid! To start, I jumped up on the counter (totally safe right?) Sand it down flush with the cabinet door/drawer. So instead of worrying about how you're going to achieve the look you're after, check out these gorgeous ways to redo your kitchen cabinets for some much-needed design inspiration. It was a lot of work but also SO worth it.
It was a lot of work but also SO worth it. Count me in as a follower; I want see this kitchen change over the years. Less work, I am all for it!" I definitely favorited your 'ible. I do try to be thorough and produce work that I can be proud of including my instructable. Neutral cabinet colors such as beige or light gray still give the calming, light effect of white cabinets without being quite so bright, and they'll be able to blend with your other kitchen accents and trends as they evolve through the years. Great job! These leather handles showcased by Lisa Clark Design add some "wow factor" to her drawers while also remaining highly functional. If youre ready to give your kitchen a makeover, switching up the cabinets is a great place to start. Knowing that yuck is forever stuck on my kitchen cabinets might haunt me during meal times. Can you do both?
7 years ago You might end up ripping off parts of your gorgeous cabinet paint. WOW! I think I sampled at least fifteen other colors! Be sure to clean off any residual dirt and saw dust from the cabinet surfaces with a damp rag. Bonus! You can see more on this process here.
$108 later, it's practically unrecognizable. This is where you really get to see the full effect of your labor of love, or by now, hate. He has already made a concrete game table, seen here, My husband's concrete table experiment!
We've updated our Privacy Policy, which will go in to effect on September 1, 2022.
The cabinets needed a facelift, but the vintage stove had to stay.
If it is on the spot you just painted, you may want to use a clean, lint free cloth to just remove that tiny section of paint and reapply. These old wooden cabinets and hardware made the room appear dark and dated. itavi 
